|
Allegro CL version 10.1 |
This chapter contains the following sections:
8.1 Events not on components
8.2 A simplistic example as an introduction
8.3 Writing an event handler function
8.3.1 What if you change to the same value
8.4 The on-click event handler runs with any click
8.5 Getting a handler to display another window
This is chapter 8 of the User Guide for the Allegro CL 10.1 Integrated Development Environment (IDE). The IDE is only supported on Windows machines.
The chapters of the IDE User Guide are:
Chapter 1: Introduction to the IDE
Chapter 2: The Allegro CL Development Environment (IDE)
Chapter 3: An example
Chapter 4: Projects
Chapter 5: Components
Chapter 6: Designing a user interface using forms
Chapter 7: Menus
Chapter 8: Events (this chapter)
Events are a critical component of any visual application, that is one where users communicate with an application through windows and dialogs. An event is a mouse action (clicking a button, moving the mouse). Keyboard actions (typing a character, e.g.) are also an event but keyboard events are typically handled automatically.
This chapter mostly deals with events occuring on controls. Controls, as we will describe, have built-in event handlers that can easily be made to perform what task is desired in response to events. Catching events not over controls is more complicated.
See the essay cg-events.htm for more information. General Common Graphics and IDE documentation is described in doc/cgide.htm. The HTML documentation files can be accessed from the Allegro CL Integrated Development Environment using the Help | Allegro CL Documentation menu command (which displays introduction.htm, which in turn contains a list of all essay help files, including doc/cgide.htm). The remainder of this chapter discusses event handler functions on controls only.
This example is designed for programmers who are new to events. If you are already familiar with events, you may wish to skip down to the next section.
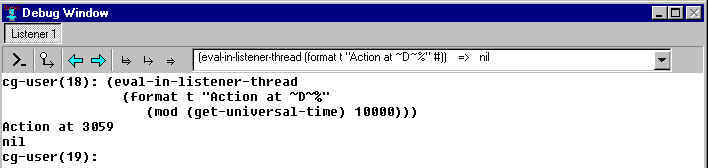
We are going to design a form where events simply cause something to be printed to the debug window. Evaluating this form:
(eval-in-listener-thread
 '(format t "Action at ~D~%"
    (mod (get-universal-time) 10000)))
causes `Action at xxxxx' (where xxxxx is a number based on the current time in seconds) to be printed in the debug window. (The eval-in-listener-thread wrapped around the call to format binds *terminal-io* to the Debug window during the evaluation of the body. If it was not present, *terminal-io* might be the Console window when a project is run, and then the messages would not be easily visible.)
We are going to define a function that causes this printing and see what happens when that function is associated with various events on a form.
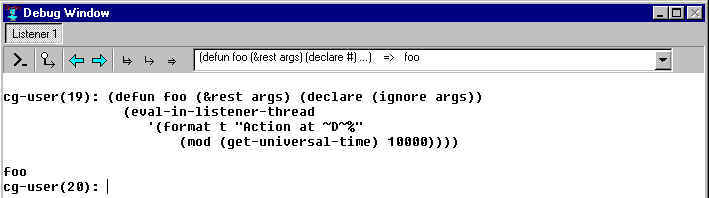
First, define the function in the debug window (simply because that is a convenient place). The function is
(defun foo (&rest args) (declare (ignore args))
  (eval-in-listener-thread
   '(format t "Action at ~D~%"
      (mod (get-universal-time) 10000))))
Two points about this function:
(&rest args) accepts any number of arguments
(including none), bundles them into a list and makes that list the value of args. (declare
(ignore args)) tells the system args will not be used. In this simplistic example,
we are not concerning ourselves with what arguments are actually passed to event functions
nor with what might be done with these arguments. We are simply interested in seeing when
events happen. In a real application, the arguments will typically be used rather than
ignored. (get-universal-time) returns an integer which is the number of seconds from
00:00:00 GMT midnight, December 31, 1899/January 1, 1900. Therefore, a different value
will be printed each time, indicating the number of seconds since the last call. We do
this simply to ensure the printed messages can be distinguished from one another. Now, start with a blank form. Add a radio button (click on the radio button icon on the toolbar and click on the blank form) and a check box. The form will look something like this (we have made it smaller but that is not necessary):

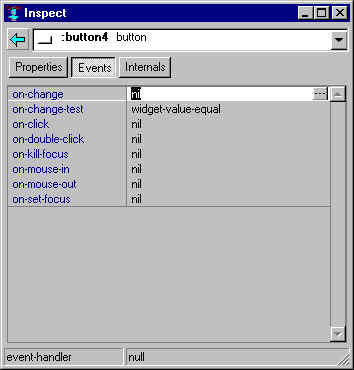
The radio button is selected (as indicated by the bounding box with the little squares). Choose the Events tab of the Inspector window:
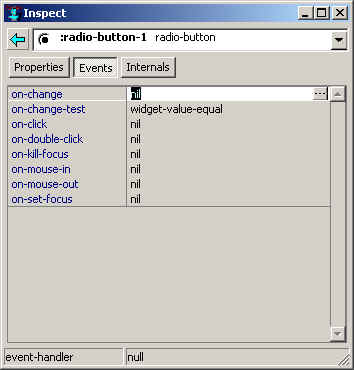
All the events (except on-change-test
which we discuss below) have no associated functions (as
indicated by the nil's). The nil next to on-double-click is
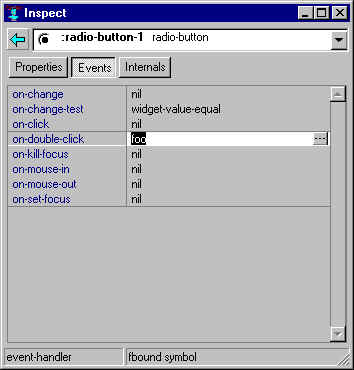
highlighted. Type foo <enter> and foo will appear in the on-double-click slot:
Now, click Run | Run Form or Run | Run Project. You will be asked if you want to save the project. There is no reason to save this simplistic example but do so if you wish. The form now becomes active. Arranging your windows so that the Debug windows and the form are both visible, double click on the radio button. You should see a message in the Debug window. Do it again and another message appears. Double clicking elsewhere, such as over the check box, does not cause a message to be printed. This picture shows the running form and the debug window after several messages (you will get different numbers if you try this, of course):

Stop running the form (click Run
| Stop). Using the Inspector window, change the value of the on-double-click
for the radio button back to nil. Try setting other values to foo
(except on-change-test where foo is not an appropriate
value) and trying some mouse actions to see what happens. In this way, when you run the
form again using Run | Run
Form, you can get a feel for the mouse (or keyboard) action associated with an event.
Here are some comments about some of the other event functions:
When a dialog has focus, one of the controls on the dialog (if there are more than one – that is why the check box is there) has focus within the dialog. This is usually visually evident because the border is modified. In the picture above, the radio button has focus and Radio Button is outlined. If you make on-set-focus foo (as we did with on-double-click above), and run the form, a message will be printed in the debug window when you click over the radio button, causing it to have focus. Pressing the Tab key also moves the focus about the dialog, from the radio button to the check box and back (you must have clicked on the radio button first, or tabbing will not select it). Press Tab repeatedly and a message is printed every other press (as the focus moves back from the check box to the radio button).
This event function is run when the focus moves away from the radio button control.
This event function is run when the mouse cursor moves over the control (regardless of where the focus on the window is, no clicks necessary). As you move the mouse back and forth over the radio button, messages will be printed in the debug window. If you move the mouse a lot, there will be a lot of messages. This is a good time to tell or remind you that on-mouse-in and on-mouse-out event functions should (1) be fast (because can run many, many times); (2) not have a permanent effect (since the mouse moving may be accidental – actions that have permanent effect should require a deliberate action such as a mouse click). Typical on-mouse-in and -out event functions do simple visual things such as changing the cursor.
This is the end of our simplistic example. We call it simplistic because in a real application, event functions will not simply print useless messages to a text-edit window. The purpose of this example was to show when event functions are run and what actions trigger them.
In our simple example, our event function simply wrote a message to a text-edit window saying that the event had occurred. This is not, of course, a useful event-handling function (users usually know that they did something with the mouse and do not need to be told). However, usefulness is only meaningful in the context of your application.
Once you have figured out what you want it to do, you write the handler by clicking on the extended editor button (with the three dots) in the events tab of the inspector. Here is the initial events tab for a button (named :button4):
Clicking on the extended editor button for the on-change event displays a function template in the editor workbook tab corresponding to the form being worked on:
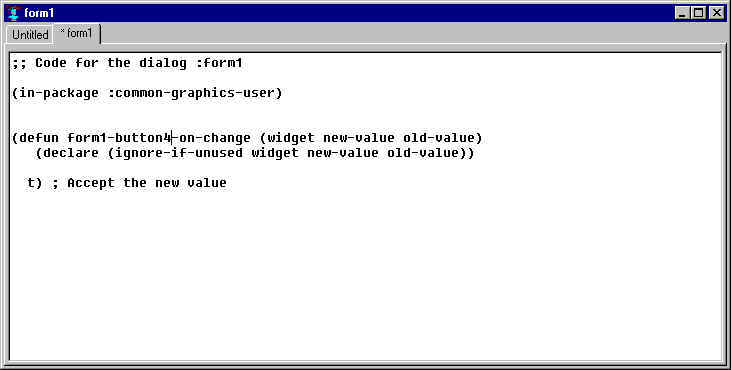
The template looks like:
(defun form1-button4-on-change (widget new-value old-value)
  (declare (ignore-if-unused widget new-value old-value))

  t) ; Accept the new value
This is a complete function definition, so far doing nothing except returning t. The system calls the on-change event handler function with three arguments: widget (the control whose values has changed, the button in this case); the new-value and the old-value. This function must return non-nil (t or any other value except nil) in order for the change to be effected (with some exceptions – radio buttons change whether the event handler returns true or nil, indeed even when there is no event handler). Generally, if this function returns nil, the change is rejected and the previous value returned to the control (though other side-effects performed by the on-change function are not undone, of course).
You can add code to the function so it will do additional things in your application.
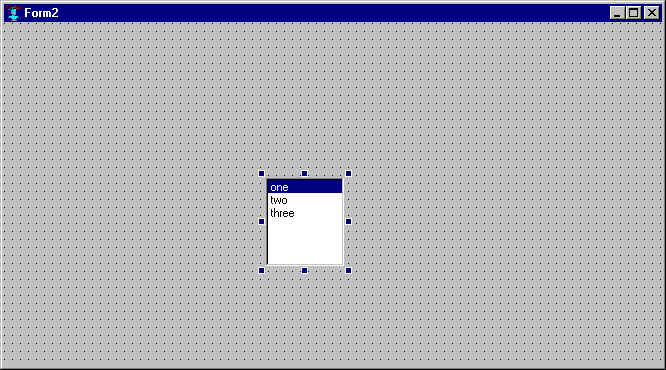
Let us consider a more complicated example. We get a new form (by choosing File | New Form) and choosing dialog from the possible form types. Then we place a single-item-list on it:
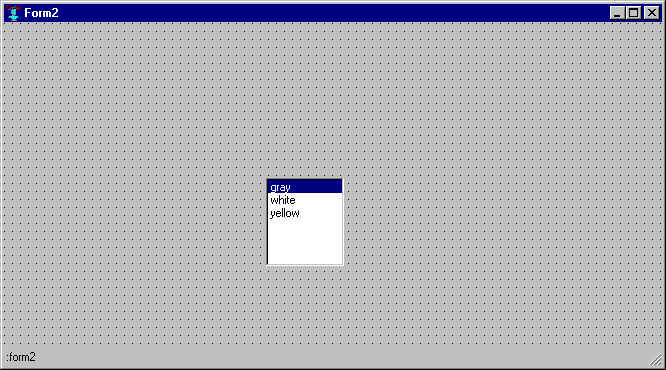
We inspect the form (by double-clicking on it away from the single-item-list) and change the value of the status-bar property to t:

We inspect the single-item-list (by double-clicking on it) and change the value of the range to (:gray :white :yellow). This is done by clicking on the button with three dots to the right of the range value, and replace the contents of the control that appears with '(:gray :white :yellow) (including the leading apostrophe). We also change the value to :gray:

Now the form looks like this, with a status bar (containing `:form2') at the bottom and a single-item-list with choices gray, white, and yellow (the printing function prints the symbol name of the values, which causes the leading colon not to be printed):
We want to make choosing a color have the effect of changing the background-color of the control.
We again inspect the single-item-list, look at the Events tab, and click on the extended editor button (with three dots, to the right) for the on-change event. We get a template in an editor buffer similar to the following:
(defun form2-single-item-list-1-on-change
    (widget new-value old-value)
  (declare (ignore-if-unused widget
                             new-value old-value))

  t) ; Accept the new value
We add this code to change the background color according to the new value:
  (cond
   ((eql new-value :gray)
    (setf (background-color (parent widget)) gray))
   ((eql new-value :white)
    (setf (background-color (parent widget)) white))
   ((eql new-value :yellow)
    (setf (background-color (parent widget)) yellow)))
  (invalidate (parent widget))
so the entire function looks like:
(defun form2-single-item-list-1-on-change
    (widget new-value old-value)
  (declare (ignore-if-unused widget
                             new-value old-value))
  (cond
   ((eql new-value :gray)
    (setf (background-color (parent widget)) gray))
   ((eql new-value :white)
    (setf (background-color (parent widget)) white))
   ((eql new-value :yellow)
    (setf (background-color (parent widget)) yellow)))
  (invalidate (parent widget))
  t) ; Accept the new value
The invalidate form makes sure that the background color change is put into effect (covering and uncovering the running form has the same effect). If you evaluate the new definition (click Tools | Incremental Evaluation with the cursor just after the final parenthesis) and you run the form, you can change the background color by clicking the appropriate value.
In our single-item-list example, the value could be :yellow and a user
could click on yellow. What happens? The answer is nothing. The on-change handler only runs when the new
value is different from the old value according to the on-change-test predicate. To make this
clear, let us modify the previous example by having the on-change event change the value and print a
message to the status bar of the dialog (using the function window-message) showing the time of the
action and the color chosen:
(defun form2-single-item-list-1-on-change
    (widget new-value old-value)
  (declare (ignore-if-unused widget
                             new-value old-value))
  (cond
   ((eql new-value :gray)
    (setf (background-color (parent widget)) gray)
    (window-message (parent widget)
        (format nil "Color is gray at ~D~%" (mod (get-universal-time) 10000))))
   ((eql new-value :white)
    (setf (background-color (parent widget)) white)
    (window-message (parent widget)
        (format nil "Color is white at ~D~%" (mod (get-universal-time) 10000))))
   ((eql new-value :yellow)
    (setf (background-color (parent widget)) yellow)
    (window-message (parent widget)
         (format nil "Color is yellow at ~D~%" (mod (get-universal-time) 10000)))))
 (invalidate (parent widget))
 t) ; Accept the new value
(Remember to evaluate this new definition – click Tools | Incremental Evaluation with the cursor just after the final parenthesis.)
Now clicking on a new value causes the color to change and causes a message to be printed in the status bar. But, as we said, clicking on the current value does not cause anything new to be printed in the status bar because the system compares the old value and the new value using the on-change-test handler. The on-change handler will only be run if the on-change-test indicates that the old-value and the new-value are different by returning nil. The default on-change-test is the function widget-value-equal and that function returns true for the same value.
To get something to happen with every click, you can change the on-change-test function (to, for example, always return nil). But this is not the recommended way. Instead, if you want feedback to the user confirming that their click was received, use the on-click handler, as we describe next.
As we noted above, the on-change event handler only runs if the new-value is determined (by the on-change-test) different from the old value. The typical way to change a value is with a mouse click, which moves the focus to the control and (typically) changes the value of controls such as radio buttons, single-item-lists, etc. Whether or not the on-change handler runs, the on-click handler will run whenever the component is clicked. However, if the component is changed by an access key or by tabbing, the on-click is not run since there was no click. But this is probably what you want. The typical concern is a user is clicking but seeing no response. In the example we have been developing, there is no response when the choice is not a change. We add an on-click handler to print a message to the status bar when the current color is clicked. First, on the Events tab of the inspector for the single-item-list, click on the extended definition button. This will put this code in the form2 editor buffer:
(defun form2-single-item-list-1-on-click (dialog widget)
  (declare (ignore-if-unused dialog widget))

  t)
Now add this below the declare form:
  (window-message (parent widget)
        (format nil "Color clicked at ~D~%" (mod (get-universal-time) 10000)))
so the result is
(defun form2-single-item-list-1-on-click (dialog widget)
  (declare (ignore-if-unused dialog widget))
  (window-message (parent widget)
        (format nil "Color clicked at ~D~%" (mod (get-universal-time) 10000)))
  t)
Now when you click the same color, a message appears in the status bar. We have two messages being sent to the status bar when a new color is clicked: one from the on-click and one from the on-change, and only one ends up visible. But that doesn't matter for our purpose, which is just to confirm to the user that the click was received.
See section 4.15.5 in chapter 4 Projects for information on how to display another window in your application. Similar code can go into an event handler (allowing you to have clicking a button pop-up or otherwise display another window in your application).
Go to beginning of this chapter.
Copyright (c) 1998-2017, Franz Inc. Berkeley, CA., USA. All rights reserved.
Documentation for Allegro CL version 10.1. This page has been moderately modified
from the 10.0 version.
Created 2017.2.27.
|
Allegro CL version 10.1 |