Introduction
The AllegroGraph web-based user interface is called WebView. (This interface was introduced in release 8.0.0 and until this version was called New WebView. Starting in release 8.3.0, the new has been dropped. Everywhere in the documentation, WebView refers to the new version of WebView. The older interface, called Traditional WebView, is being gradually deprecated.
WebView is what is displayed when user navigates to the URL of a running AllegroGraph instance in a web browser.
Login dialog
When WebView is started you are presented with a login window:
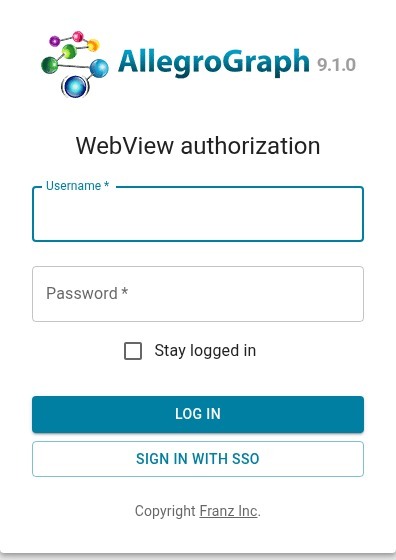
Supply your AllegroGraph username and password (or token). WebView will log you out if you are idle too long (24 hours), but check the Stay logged in checkbox if desired to allow 30 days until being logged out.
AllegroGraph supports Single Sign-on (SSO). When SSO is configured the login dialog has a"SIGN IN WITH SSO" button. See the SSO document for details on setting SSO up and logging on using it.
Initial Display
Here is the WebView page when it starts up (the first time there will be no repositories shown but this image comes after some use):
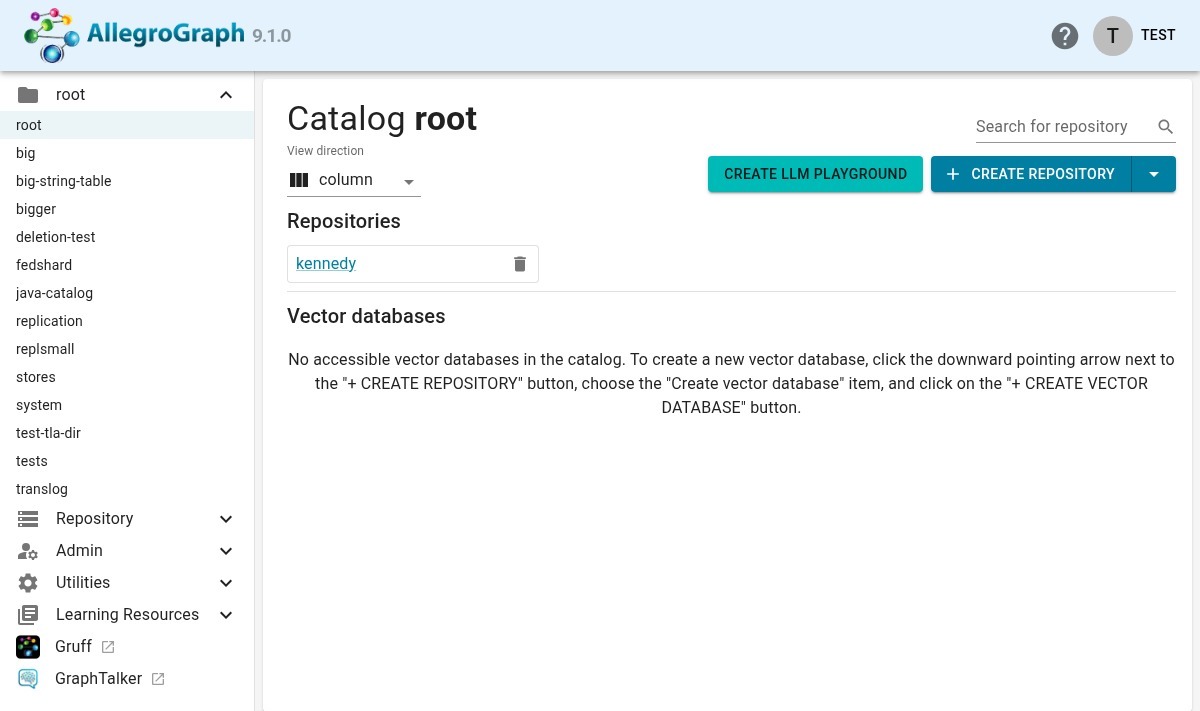
The exact contents depend on how WebView was initiated and characteristics and permissions of the user. Always displayed are the banner at the top and a menu list to the left. When first displayed, the main field in the center displays the repositories in the current catalog and some action buttons. Note that what works and sometimes what is displayed depends on the permissions of the current user. If the current user does not have permission to perform a certain action, that fact may be reported on the page or when the users attempts the action. Most pictures are taked when the user had superuser permission, so most illustrations in the document do not show restrictions.
The Banner
The banner, at the top of a WebView page, is always displayed. It has three active items:
The AllegroGraph logo. Clicking on this returns to the catalog/repo page.
A ? icon: when clicked, displays a menu with choices version information and links to the documentation on the franz.com website.
A person outline icon and the current user name. These are a single active region displaying when clicked a menu of some display preferences and other actions. Warning: one of the choices is Delete. If chosen and confirmed, the current user is deleted from the system and the screen changes to a login prompt. Do not do this unless it is what you want to do.
As you navigate among the various WebView pages, you can always get back to the catalog/repo initial page by clicking on the AllegroGraph logo on the left in the banner.
The USER menu
To the right of the display, the current username and an icon for the user are displayed. (The icon contains the first letter of the username; the color can be set on the user's page diplayed by the admin|users menu available to superusers.) Clicking on the username or the icon displays the USER menu.
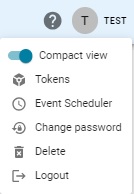
The exact contents of the menu depends on various factors. This menu is for a superuser (named test) who logged in using a password an so has all the choices, which are:
- Compact view: Toggles spacing between display elements.
- Tokens: Allows managing of tokens, which are password substitutes. Tokens allow others to log in as you, and may be time limited or deleted by the user at any time. Note that users who log in using a token will not see this option. See the description of agtool tokens for more information.
- Event Scheduler: only on the menu when the user is a superuser. See the event scheduler document for more infomation.
- Change password: Displays a dialog allowing your password to be changed. To effect the change you must enter your current password as well as the desired new password. Users who logged in with tokens and do not know the user password therefore cannot change it.
- Delete: It is very unlikely you ever want to use this choice, as it deletes the current user (i.e. you). Possibly useful if you suspect a security breach of some sort. (Users are usually managed by administrators with superuser privileges but a user can also self-destruct with this menu choice.) A do you really want to do this dialog allows you to change your mind before actually being deleted. A new login dialog is displayed after the user is gone. This choice only appears for users who used a password (rather than a token) to log in.
- Logout: User logout. The webview token is expired and the login dialog is displayed.
The repository page
As said, WebView typically opens to a page listing repositories in the current catalog (usually the root catalog). Along the top to the right are button for creating a new repository in the current catalog and a button for creating an Large Language Model playground (which also creates a new repo). See the llm document for information on the llm playground.
A search widget appears on the upper right, useful when there are very many repos.
The Menus
On the left are a list of applicable menus. The list depends on the permissions of the user. For example, if the user is a superuser, one of the choices will be Admin. The arrowhead next to the menu name points down if the menu is closed and up if open. Clicking on the menu name or arrowhead changes the state.
How to use the various menu items is usually clear once the menu is displayed so we will not go into too much detail in the document.
The catalog list
Catalogs are listed under the file folder icon to the left just under the AllegroGraph icon. There is always a root and a fedshard catalog. Other catalogs must be defined by you (our your administrator) and listed in a agraph.cfg configuration file (see the Server Configuration and Control document). Clicking on a catalog name displays the repositories (also called repos) in the catalog.
The Repository Menu
The Repository menu is only active when a repo is open. Click on an existing repo listed on the page or the Create Repository box to create a new one. Its drop-down menu also allows restoring a repo from a backup file or creating a vector database. Below is the dialog window after clicking on the Create Repository button.
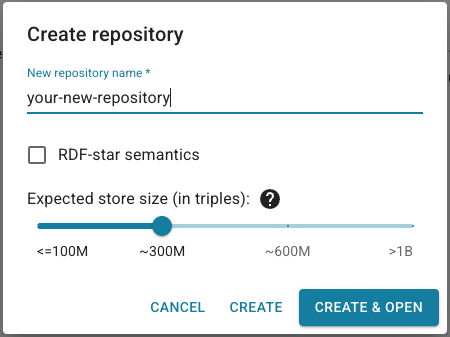
Optionally, you can enable RDF-star semantics and specify the number of expected triples in the store. AllegroGraph doesn't impose a hard limit on the new store. Instead, it provides a hint to AllegroGraph to achieve the best possible performance for reading and inserting data. The tradeoff here is shared memory usage. Increasing the expected store size leads to allocating more shared memory when opening a connection to the store.
Once a repo is open and the menu is live, you will see these items:
- Query: This important page allows executing queries and seeing results. Here it is after having run a query. The query shown is a useful one if you use triple attributes as it shows triples and their attributes:
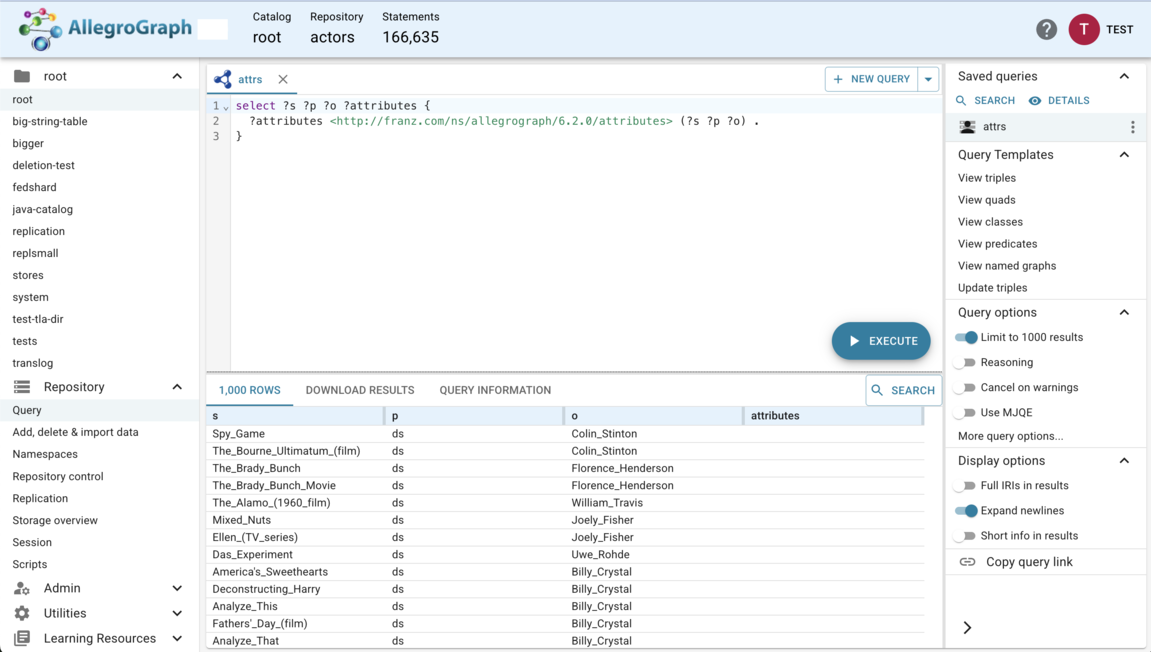
Note the user in this case thinks this query so convenient that it was saved (named attrs in the query tab and in Saved queries group in right sidebar). We repeat it to make it easy to cut and paste if desired:
select ?s ?p ?o ?attributes {
   ?attributes <http://franz.com/ns/allegrograph/6.2.0/attributes> (?s ?p ?o) .
 }
Recent queries are listed along the top (query tabs), and a selection of useful queries are listed on the right under Query Templates, including View triples which displays all triples (up to the specified display limit) in a repo. The display limit, on by default, is 1000, set in the Query Options to the right. See below for more information on the query page.
Add, delete, and import data: Lists the various ways triples can be added or deleted, with links. See the Add, delete, and import section below for details.
Namespaces: Lists available namespaces. See the Namespaces and query options document for more information.
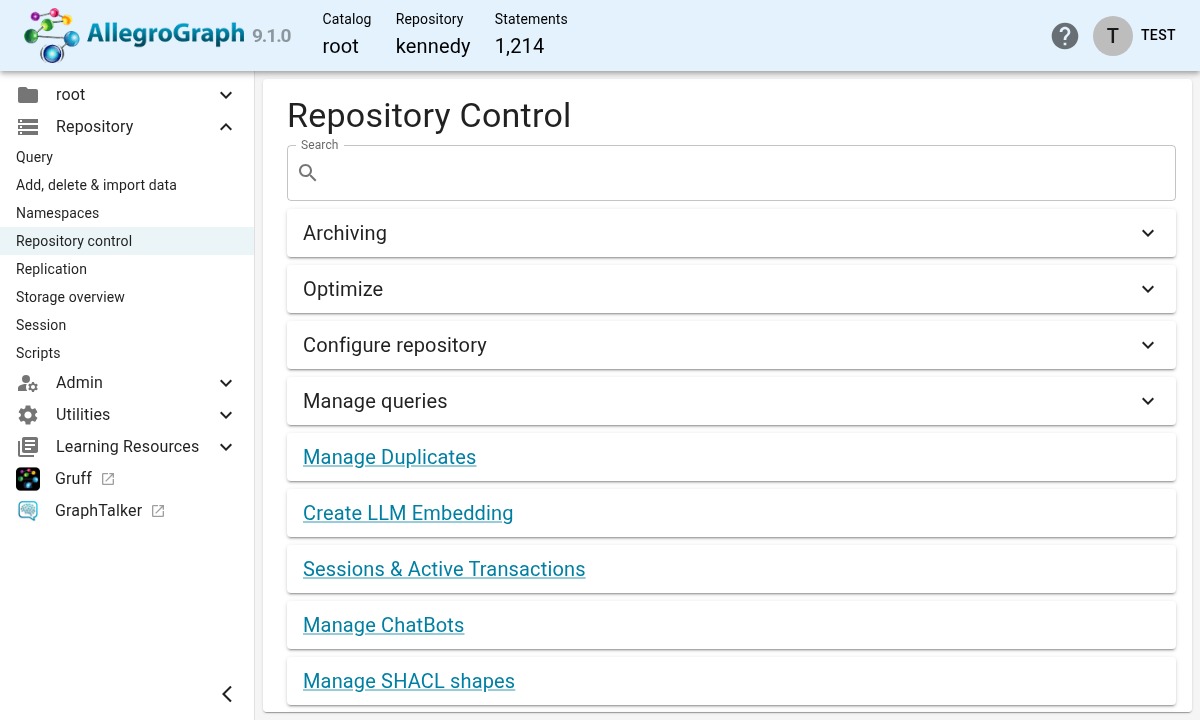
Repository Control: One of the most important repo menu choices. It displays a number of repo-related commands, and there is a Search box for finding additional commands (clicking in it drops down a menu of choices, as shown, while typing in the box displays relevant choices based on what you type). At the bottom of the tab is the SHUTDOWN REPOSITORY INSTANCE. Clicking this will close the repository and free up resources. (The repo will still exist, of course.)
Storage overview: Displays graphs on storage usage by AllegroGraph.
Session: Displays information about sessions and presents a menu of actions like commit, rollback, or close. If no session is running has a button to create a basic new one and a link to a page allowing more complex sessions to be created. See Sessions below.
Scripts: This link displays the Server Scripting page. Only users with Eval permission can write and run a script (see the Evaluate Arbitrary Code user permission in the General permissions section of the Managing Users document for information on Eval access).
The add, delete, import data page
When you click on the Add, delete, & import data item in the Repository menu, this page is displayed:
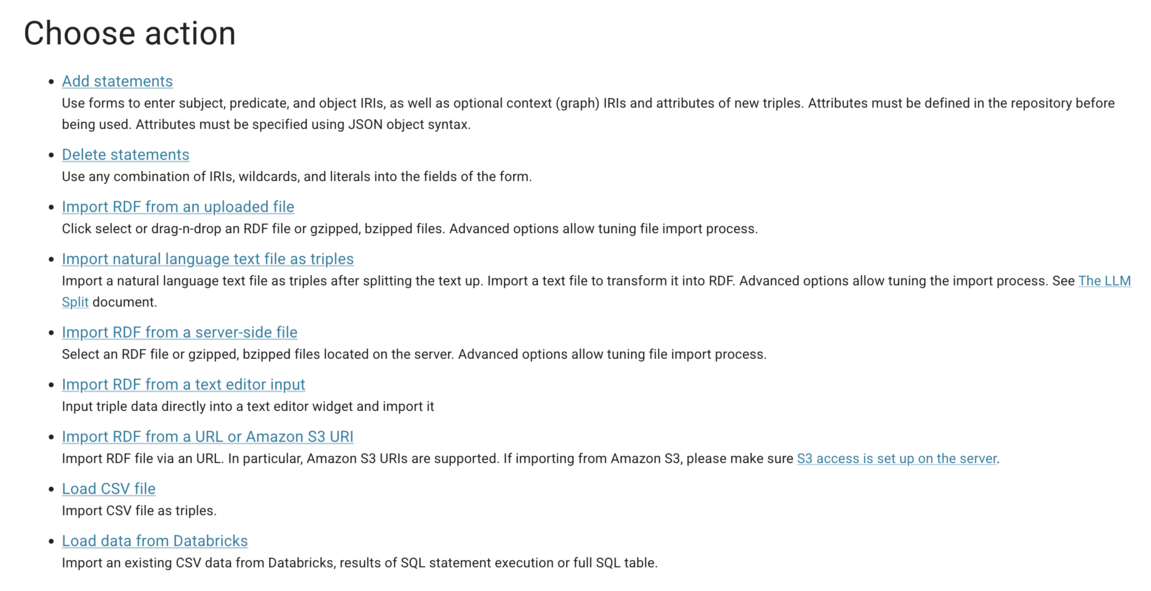
For all of the choices, except Add Statements and Delete Statements, if you attempt to load the same file twice, a warning dialog is displayed allowing you to confirm that is what is desired. See note 1 below for more information.
The choices include:
Add statements: allows you to add a single triple or quad, specifying attributes if desired, by directly entering the relevant data.
Delete statements: Allows deletion of triples of quads. Wildcards can be used to delete groups of statements. Specifying * for all fields deletes all statements from a repository.
Import RDF from an uploaded file: Displays a page where a file can be dragged and dropped or a standard file choice dialog can be displayed. Import options can be specified as well.
Import text file as triples: Displays a page where instructions for splitting a text file into pieces which are then added as triples can be specified. See The WebView interface to text splitting for more information.
Import RDF from a server-side file: Displays an internal file choice dialog allowing selecting a file from the machine where the AllegroGraph server is running. Import options can also be specified.
Import RDF from a text editor input: Displays a text editor where RDF data can be typed or pasted. Import options can also be specified.
Import RDF from a URL or Amazon S3 URI: Displays a page where a URL or Amazon S3 URI can be specified. Import options can also be specified.
Load CSV file: Displays a page where a CSV file can be dragged and dropped, or a standard file choice dialog can be used. After importing a CSV file, there is a UI to define the relationship between input rows and output triples. Limited import options can also be specified. For more details please see the section below.
Load data from Databricks: Displays a page where multiple ways to import data from Databricks are available. After importing data as a CSV file, there is a UI to define the relationship between input rows and output triples. Limited import options can also be specified.
It is permissable to load the same data file multiple times and there may be reasons for doing so, but often it is not what is desired, in part because it results in duplicate triples. When uploading a file and you click the VERIFY AND IMPORT FILE button twice, this notification is displayed:
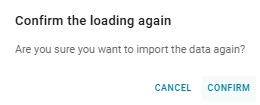
allowing you to cancel or confirm the duplicate load.
The Admin menu
This menu is only visible to superusers. It has the following items:
- Users: Please see the Managing Users document for further information. The AGWebView interface for controlling users (and also roles) is described in detail in that document along with the equivalent agtool users and agtool roles commands.
- Jobs: Lists running jobs. Most users do not have the necessary permissions to see the list, however.
- Requests: List of system requests. Usually useful only when there is a problem.
- Audit log: See the audit description below.
- View server log: Displays the server log.
- View and edit initfile: Changes are seen by new sessions.
- Process list: lists all running processes, providing information about them and with buttons for killing, telneting into, and the like.
- View server configuration: shows the contents of the agraph.cfg configuration file.
- WebView versions: notes the current WebView version and allows checking for newer versions.
The Utilities menu
Available to all users
- Sessions: Displays a page listing sessions and provides a link to a page allowing creation of complex sessions. See Sessions below.
- Server stats: Displays a page of server utilization graphs. These are very useful for, among other things, seeing the space and computation resources used by a complex query.
- Geospatial datatype designer: opens the Geospatial Datatype Designer page (see the WebView Geospatial Datatype Designer section in the N-dimensional Geospatial Usage Guide and Example document.
Other items
Learning Resources: A menu with various helpful links, such as Documentation, Examples, and Python Tutorials.
Gruff: Open Gruff
Data display conventions
Much of the WebView interface is concerned with the parts of triples, which are composed of Internationalized Resource Identifiers (IRIs) and literal values.
An IRI consists of a namespace and a local name, and is written enclosed in angle brackets:
<http://franz.com/examples#Alice> where http://franz.com/examples# is the namespace and Alice is the local name.
By default WebView drops the namespace and displays only the local name, which makes query results easy to read:
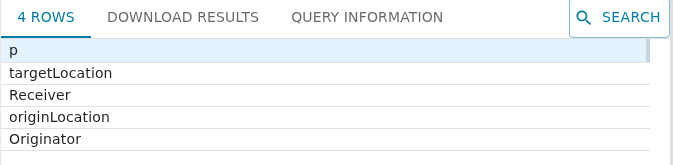
Turning on Full IRIs in results, under Display options at the right of the query page, shows the complete IRI of every part instead:
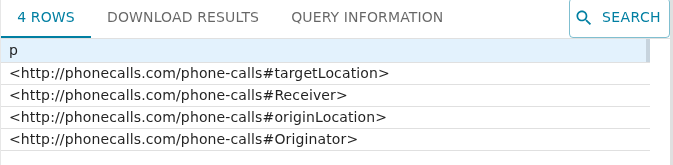
AllegroGraph supports many types of literal value. Literals generally appear as quoted strings. A value that looks like a string may in fact be typed -- "42" may be an xsd:long rather than text -- and turning on Full IRIs in results reveals the datatype of each literal as well.
More on the Query page
The query page looks like this when displayed:
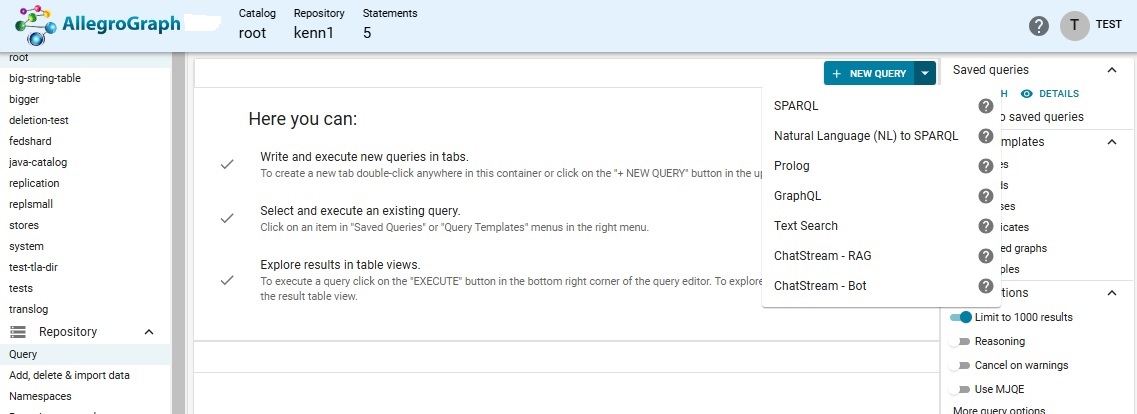
The New Query box displays a menu when the arrow to the right is clicked, as displayed in the picture. (Just clicking on New Query is the same as choosing SPARQL from the menu.) The query types are:
- SPARQL: (the default)
- Natural Language (NL) to SPARQL: See Natural Language SPARQL Queries
- Prolog
GraphQL
Text Search: you must have a freetext index associated with the repository. See Freetext Indices.
ChatStream - RAG: You must have a vector database associated with the repository. See ChatStream - Natural Language Querying for an example.
ChatStream Bot: See the LLM chatState Magic Predicate Details for information on setting up a chat bot.
Choose, for example SPARQL and the page changes like this, with untitled-NN added to the top (untitled-1 in the image):
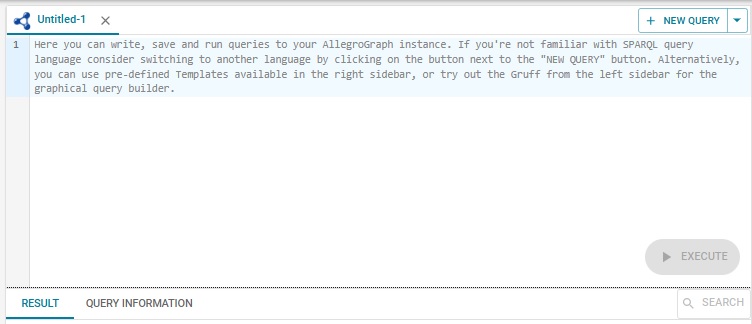
Enter a SPARQL query (we choose one of the predefined ones listed on the right:
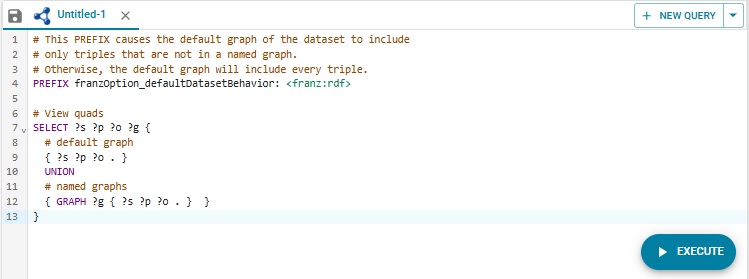
Once a query has been entered, if you hover over the Execute Button, two additional choices appear: Plan and Log. Click on Plan to see the query plan (what the system intends to do when executing the query). The plan will also display warnings if there are any. Log will cause the query to be logged.
Recent queries are listed along the top, saved ones by name. (Unsaved queries have titles relating to the query type, with 'Untitled' labeling to SPARQL, Prolog, and GraphQL queries, while text search and chat stream, and chat bot queries are labeled with their type.) Unsaved queries are persistent across reloads but their dummy names (Untitled-1, Untitled-2, etc) may be changed. Users can save queries to assign persistent names.) Saved queries are also listed to the right.
You save a query by clicking on the disk icon next to the query name. This displays the following dialog. The Author and Query description fields are optional.
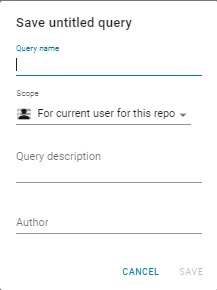
There are three choices for the scope of the saved query:
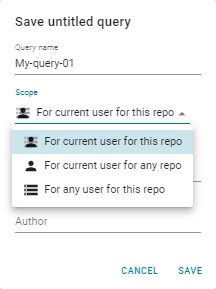
- For the current user for this repo: just the current user can see the query, and just for the current repository.
- For the current user for any repo: Just the current user can see the query, but it is available in any repository the current user can open. (Note: not all queries are meaningful in all repositories.)
- For any user in this repo: All users who can access the current repository can see this query. This choice is only present for users who have write permission in the repository.
You can edit and resave saved queries. All users (who can access the repo) can see and use the any user in this repo saved queries but only users with write permission can edit those queries.
Adding the PREFIX
PREFIX franzOption_logQuery: <franz:yes> will cause information about the query, including the query plan, to be printed to the log. Debug information will be included if the query fails.
This related PREFIX
PREFIX franzOption_logQuery: <franz:onFailure> will log query information only if the query fails. This information is very useful when debugging query problems. If you ask Franz Inc. about a query, be sure to send the query plan and also any debug information in the log recorded using this PREFIX.
On the right there are several menus with Query and Display options. Most are self-explanatory. The Display Option Full IRIs in results is useful if you want to see the IRIs but is off by default because full IRIs clutter the results.
Query auto-completion
When typing a query on the query page, the system will display auto-completion menus when it has the necessary information to do so. Auto-completion is provided for the following inputs:
- namespaces defined on the server and in the query itself; Also it will suggest namespaces to abbreviate IRIs;
- SPARQL keywords, functions and magic properties;
- variables defined in the query (without scope checking);
- IRI after typing
<>orany-string:for specific part (spog); - literals after typing
"",'',"""""",''''''; - graphs after the
graphkeyword; - classes only after
a,rdf:type, or<http://www.w3.org/1999/02/22-rdf-syntax-ns#type>; - literal types after
^^;
Completions are cached. <, """, '''; will be auto-closed (e.g. entering < will also enter a > and place the cursor between them).
Here is an example. In the kennedy example in the Agraph Quick Start document we have this query:
select ?p ?o WHERE {<http://www.franz.com/simple#person1> ?p ?o} Here are some pictures showing completion menus displayed as the query is typed in. First sel displays choices including select:
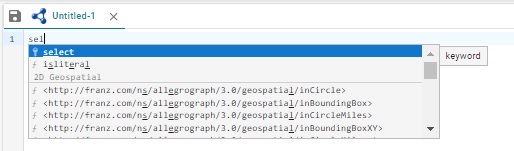
Then the person1 IRI (note the closing > was added):
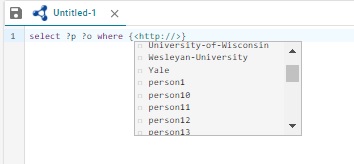
And (finally for this example) the variable choices after entering ?:

Some query examples
SPARQL Queries
The reader might appreciate some "seed" queries to help get started with SPARQL. Note the use of curly braces {} instead of parentheses () in SPARQL queries.
"Show the subject and object values from fifty rdf:type triples." This returns only the values you ask for.
select ?s ?o where {?s rdf:type ?o} limit 50 "Construct fifty new triples from values found in existing triples." This returns a set of actual triples, sometimes called a "graph."
construct {?s ?p ?o} where {?s ?p ?o} limit 50 "Describe a resource to me." Note that this query returns all triples that describe a specific resource, including those obtained by traversing a blank node.
describe ?s where {?s ?p ?o} limit 1 Prolog Queries
The user account must have permission to "execute arbitrary code" in order to execute a Prolog query.
AllegroGraph provides "select" queries as an extension to its internal Prolog language. This is a simple Prolog query. Note the use of parentheses () instead of curly braces {}, and that the triple patterns begins with a "q". Also, namespace abbreviations must be preceded by a bang (!) character.
(select (?s ?o) (:limit 10) (q ?s !rdf:type ?o) ) This query returns subject and object values for ten triples that contain an rdf:type predicate.
Prolog select queries are the portal to AllegroGraph's geospatial and social-network features.
GraphQL Queries
See the GraphQL document for examples of GraphQL queries.
Sessions
A session provides ACID compliance for the data in a store. Sessions are also the tool for creating complex federated repositories, with reasoning and graph filtering applied to the individual repositories of the federation. You can start a session on just the currently open repository, in order to get transaction semantics.
Sessions can commit automatically or only when told to do so, where that is meaningful. We say where meaningful because you cannot add triples to or delete triples from a federated store, and so there can be no changes to commit.
Sessions can be started in two ways.
Starting a session on the current repository
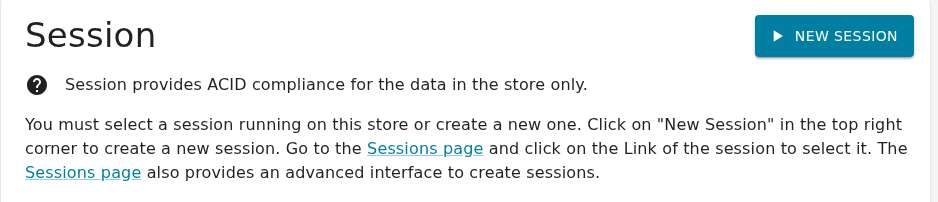
Choose Session on the Repository menu. When no session is running on the store, the page offers a NEW SESSION button, which starts a session on the current repository:
The Sessions page
Sessions on the Utilities menu displays the Sessions page, which lists the running sessions and provides an advanced interface for creating new ones. Each row has a Link, which selects that session, and a Close button, which shuts it down:

Clicking + NEW SESSION on that page displays a form describing the session to be created:
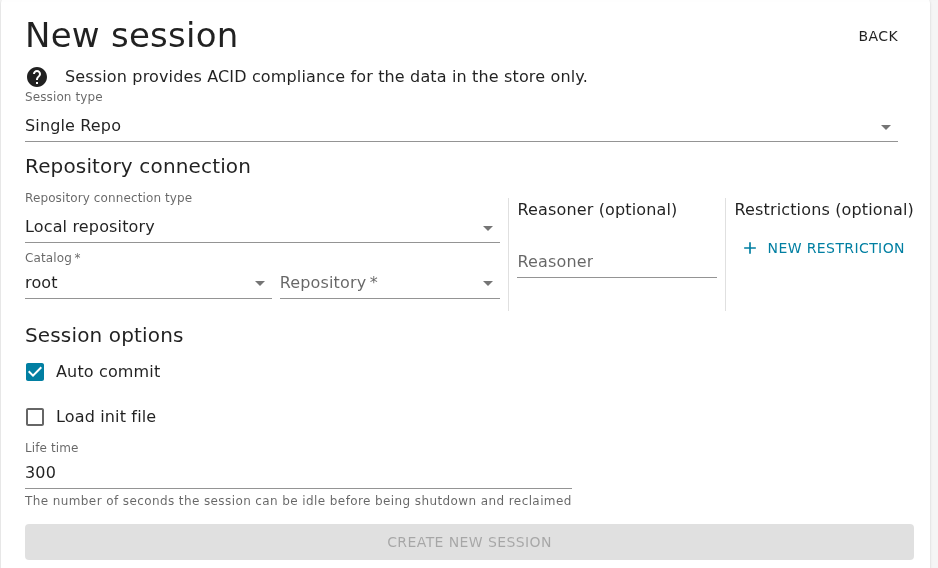
Session type is either Single Repo or Federated Repo. For each repository connection you say whether the repository is local or remote and name its catalog and repository. A Reasoner may be applied, and one or more Restrictions may be added, each naming a graph the session is restricted to (an empty restriction denotes the default graph). Federating several repositories, applying a reasoner to each, and filtering by graph are the same operations expressed by a complex repository specification; see Complex Repository Specification in the Repository Specification document.
Under Session options, Auto commit determines whether changes are committed as they are made. Uncheck it for transaction semantics, where you issue Commit and Rollback yourself. Note that with the optional Sesame 2.7 transaction handling semantics, autocommit reverts to true after a commit or a rollback. Many complex sessions cannot be modified at all -- triples can neither be added nor deleted -- so there is nothing to commit or roll back. Load init file loads the initfile into the session. Life time is the number of seconds the session may sit idle before it is shut down and reclaimed.
Working in a session
While a session is selected, the banner gains a Session field naming the session's store, and the Session page offers COMMIT, ROLLBACK and CLOSE SESSION:
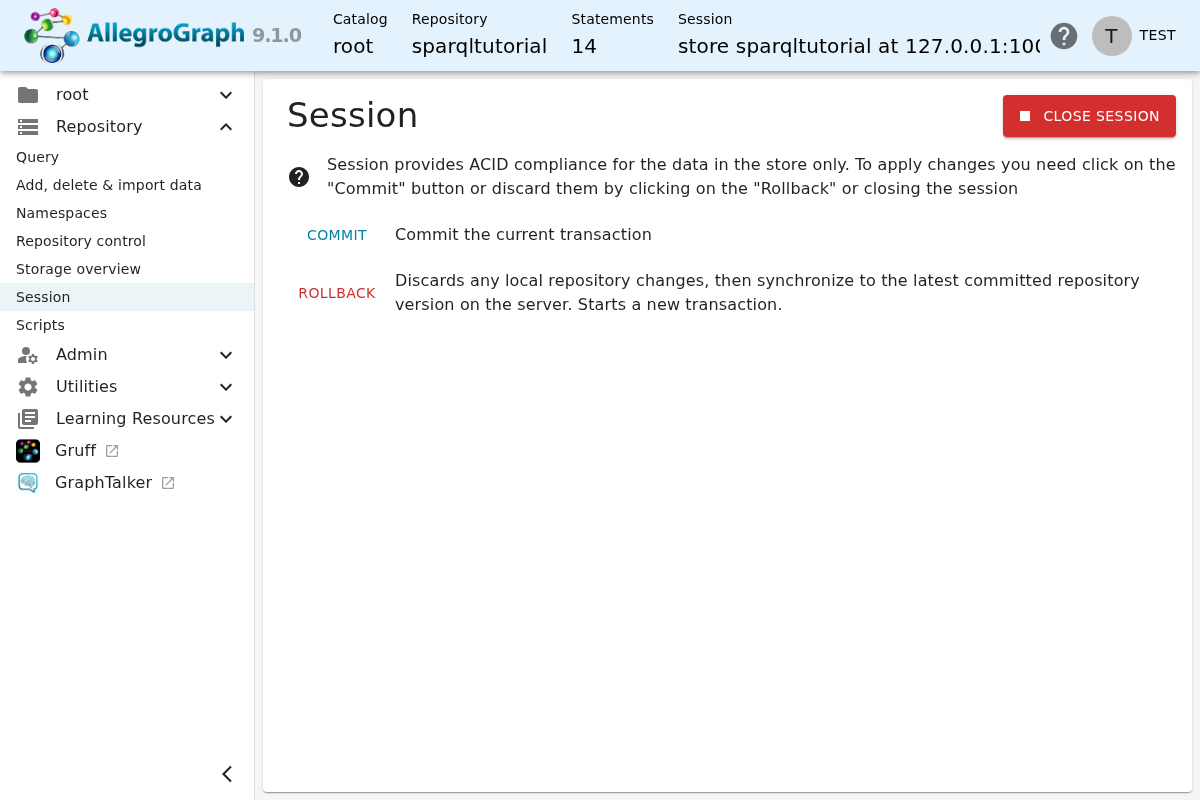
Commit commits the current transaction. Rollback discards any local repository changes, synchronizes to the latest committed version of the repository on the server, and starts a new transaction. Neither applies to a session created with Auto commit, nor to a store that does not support them, as a federated store does not.
Changes must be committed if they are to persist: closing a session without committing loses them. Materializing entailed triples is an exception, because the materializer commits as it goes -- its commit size is a setting on the reasoning page -- so materialized triples are committed even if you never click COMMIT.
Triple indexes
Triple indexes are discussed in the Triple Indices document. The Triple Indexes page reports on them and provides the operations that manage them. Reach it by choosing Repository control on the Repository menu, opening the Optimize section and clicking Optimize the repository (triple indexes).
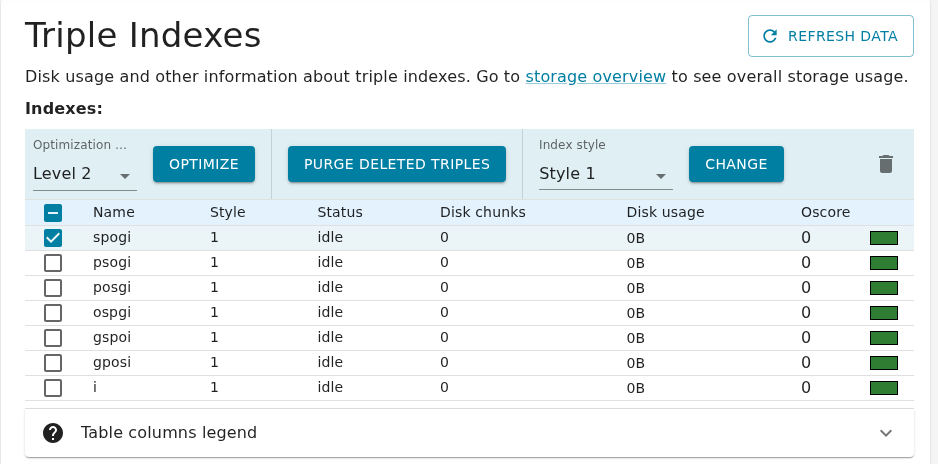
For small databases indexes may be kept in memory; for larger ones they are written to disk files. Only disk usage is reported here, so a small store may show no space used for any of its indexes.
All current triple indexes are listed, along with:
The index Style (see Index styles in the Triple Indices document).
The index Status, that is, whether there are jobs updating it.
The number of Disk chunks the index occupies.
The Disk usage of the index.
The Oscore (overlap or optimization score) of the index, which is the average number of chunks that must be examined to find a specific triple.
The Oscore measures how long it takes to find a triple in the index. The lower the number the shorter the time. Oscores are reduced by index optimization, typically to 1.0 immediately after a level 2 optimization completes. The coloured box at the right of each row indicates the optimization quality of the index: green is OK, yellow means optimization should be considered, and red that lack of optimization is degrading performance significantly. These are subjective measures -- you may feel that even a green index would benefit from optimization.
REFRESH DATA, + NEW INDEX and SETTINGS are always available. + NEW INDEX adds an index and SETTINGS displays a settings dialog.
Selecting one or more indexes with the checkboxes reveals the operations that act on the selection:
- OPTIMIZE
- Optimizes the selected indexes at the level chosen in the Optimization level control beside the button.
- PURGE DELETED TRIPLES
- Removes inaccessible triples from the selected indexes -- see Purging Deleted Triples. Available only to a user with permission to purge triples; in the current release only superusers have it.
- CHANGE
- Changes the style of the selected indexes to the one chosen in the Index style control beside the button. Index styles are described in Index styles in the Triple Indices document.
The delete icon at the right of the header deletes the selected indexes. You cannot delete every index -- at least one must remain.
Beside the link to this page, the Optimize section of Repository control offers Automatic optimizer, which optimizes indexes whenever it detects that optimization is needed and the index appears idle.
Attribute definitions and static filters
Triple attributes and static filters are described in the Triple Attributes document. What WebView provides is the means to define attributes and to set the static filter; choose Repository control on the Repository menu and then Manage triple attribute definitions and static filter.
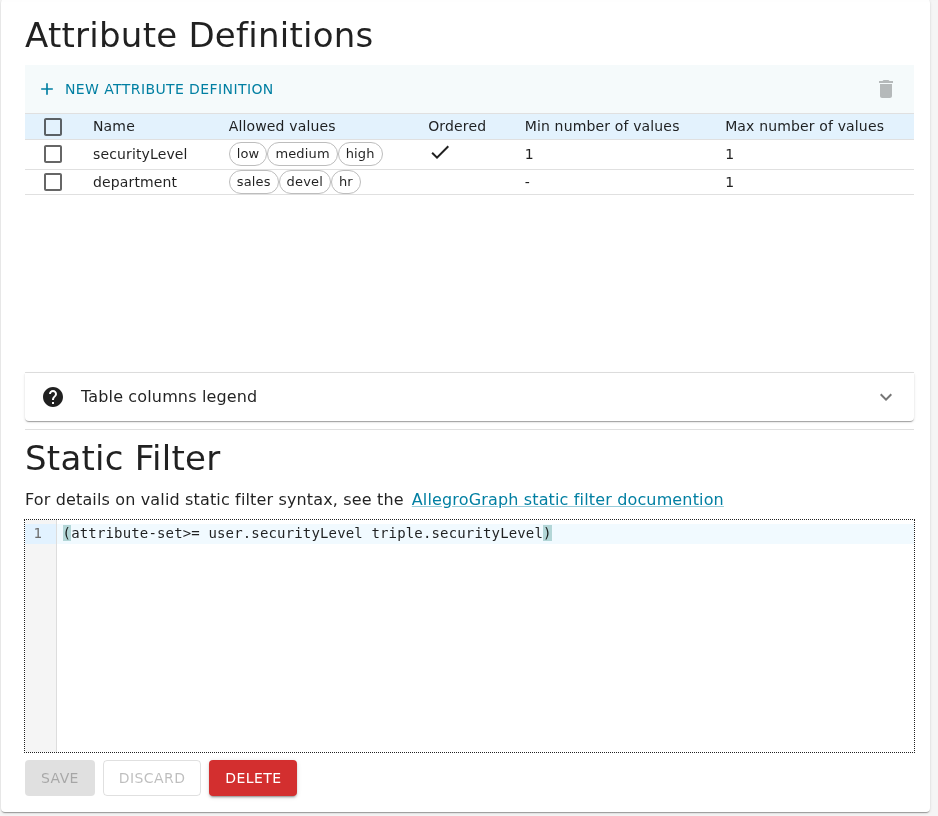
Each attribute definition has a name, a set of allowed values, whether the values are Ordered, and the minimum and maximum number of values a triple may carry. In the illustration securityLevel has a minimum and a maximum of 1, so every added triple must carry exactly one securityLevel. Note that when an attribute is defined with a minimum greater than 0, no triple can be loaded into the repository without that attribute having the required number of values.
The Static Filter editor below the definitions holds the filter expression, which becomes active when you click SAVE. DISCARD abandons an edit and DELETE removes the filter altogether.
Two limitations are worth knowing. WebView has no way to associate attributes with a user, so if a static filter restricts access to triples, no user can see those triples in WebView -- they can still be reached with other tools, as java-tutorial/AttributesExample.java shows. And because the filter applies to every query, a filter that matches nothing makes the repository appear empty in WebView.
Active transactions
This page lists the sessions and prepared transactions that are currently running, along with the current generation and the state of the transaction log lock. The only action it offers is to force a commit or a rollback of a prepared transaction. Reach it by choosing Repository control on the Repository menu and then Sessions & Active Transactions. Only a superuser can see it.
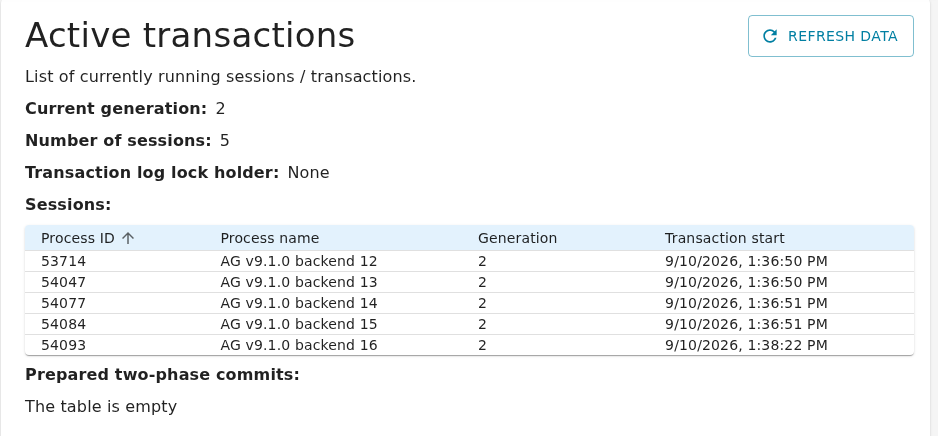
Refresh data redisplays the table.
The Requests page
Requests on the Admin menu, available to superusers only, displays the HTTP requests the server has recently received.
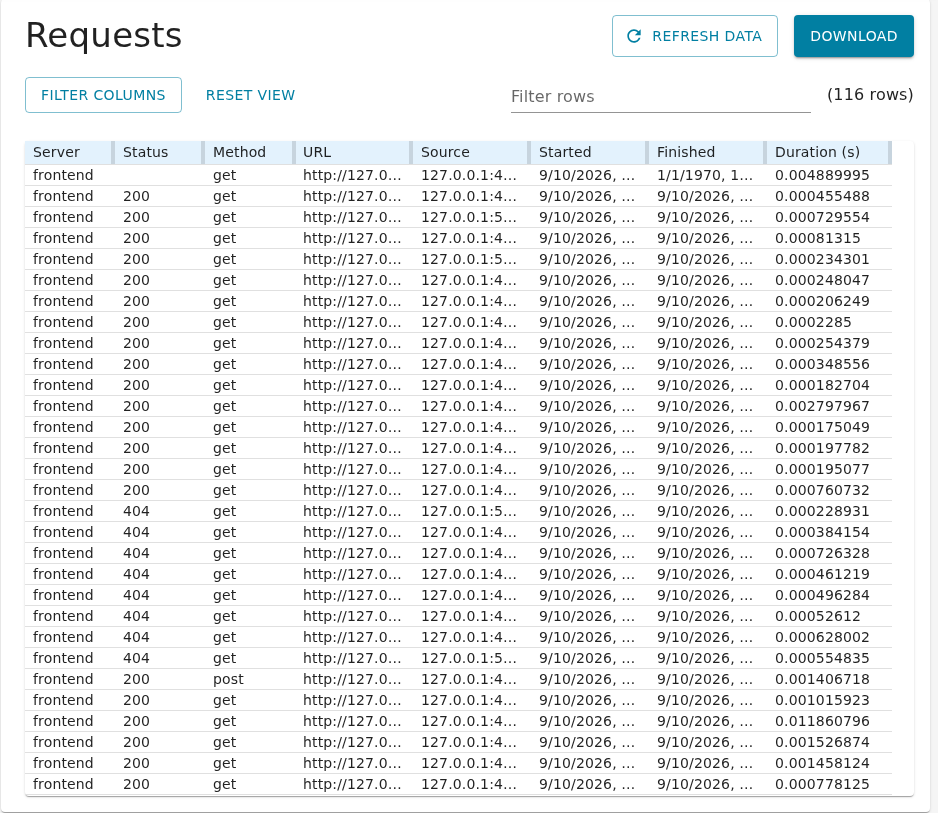
The columns are Server, Status, Method, URL, Source, Started, Finished and Duration. Filter columns chooses which of them are shown and Reset view restores the default layout. Download saves the data to a file and Refresh data redisplays the table. The Filter rows box narrows the display to rows matching the text you type, and the row count beside it reports how many rows are displayed. Clicking a column heading sorts by that column; clicking again toggles between ascending and descending order.
The process list
Process list on the Admin menu lists the AllegroGraph processes that are currently running. AllegroGraph creates many subprocesses, and this page is used for debugging AllegroGraph behaviour.
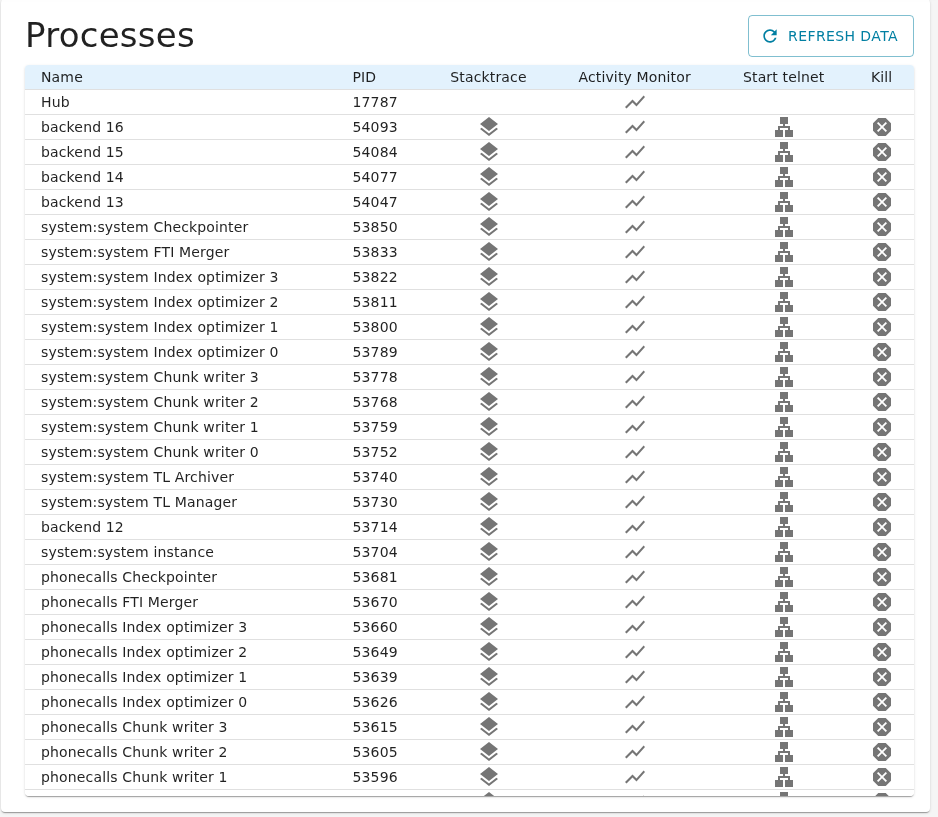
Each process offers these actions:
- stacktrace
- Displays the stacktrace of the process.
- kill
- Kills the process.
- start telnet
- Opens a telnet port directly into the eval command loop of the process, letting an engineer interact with it for diagnostic purposes.
Server stats
Server stats on the Utilities menu brings up a page of performance charts for the server machine. The charts show approximately the same machine statistics printed by the vmstat command, over the recent past.
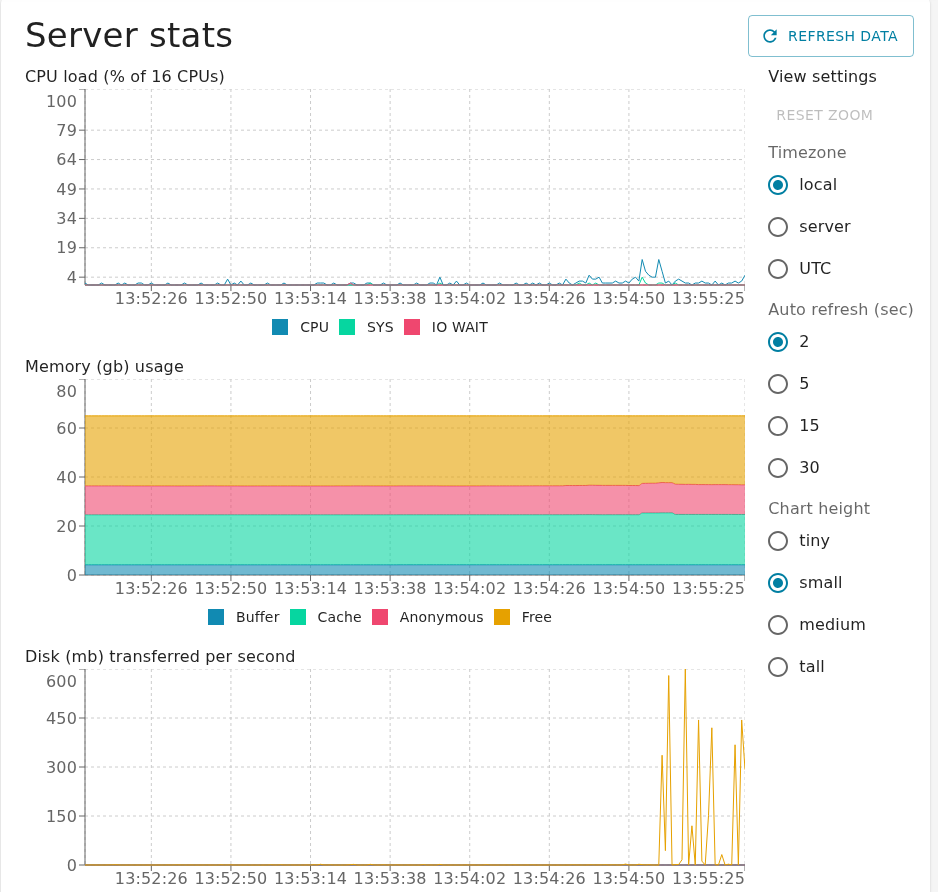
There are charts for CPU load, memory usage, disk transferred per second, swapped in, swapped out, processes and scheduling. The illustration shows the first three. CPU load is charted as CPU, SYS and IO WAIT, and memory usage as buffer, cache, anonymous and free.
Selecting a portion of a chart -- position the mouse over it, press the primary button and drag -- zooms every chart to the selected interval. RESET ZOOM cancels the zoom and REFRESH DATA updates the charts. The View settings panel at the right chooses the Timezone in which times are shown (local, server or UTC), how often the charts Auto refresh, and the Chart height.
Miscellaneous Tasks
You can do most everything necessary with some command somewhere in WebView, but it may not always be easy to find the right menu or the right choice. In this section we show how to accomplish certain common tasks. Even if the task you are looking for is not here, showing how commands for these tasks are found may assist in finding what you are looking for.
Create Freetext Index
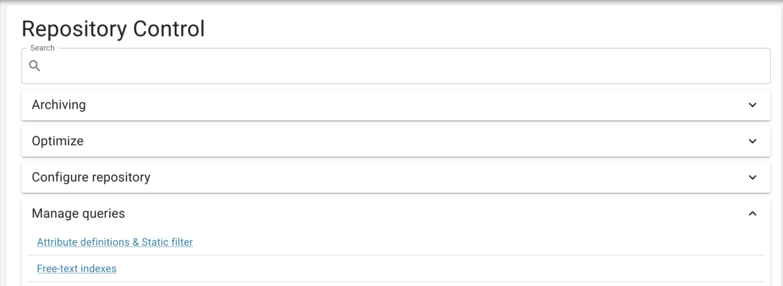
To manage (create, edit, delete) freetext indexes you need to visit the Freetext Indexes page. The Freetext indexes link is available on the Repository Control page, Manage Queries section. See the bottom of the screenshot below:
On the "Freetext Indexes" page you will see the list of existing freetext indexes.
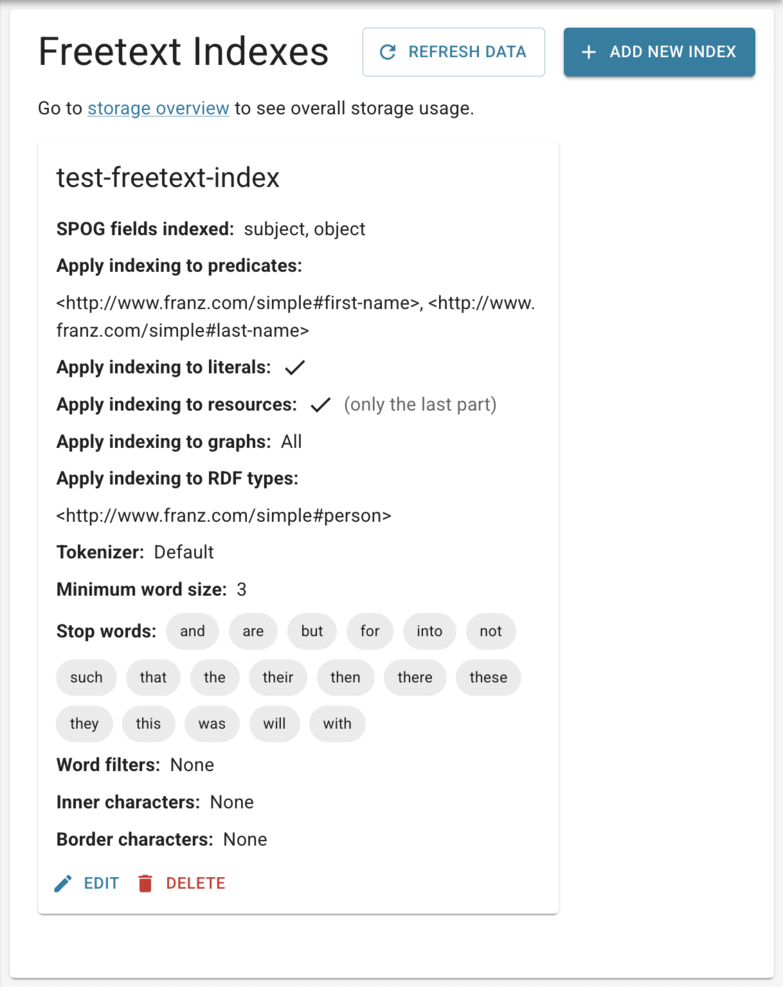
To create a new freetext index, you need to click on the "+ ADD NEW INDEX" button. After that, you will see the following page:
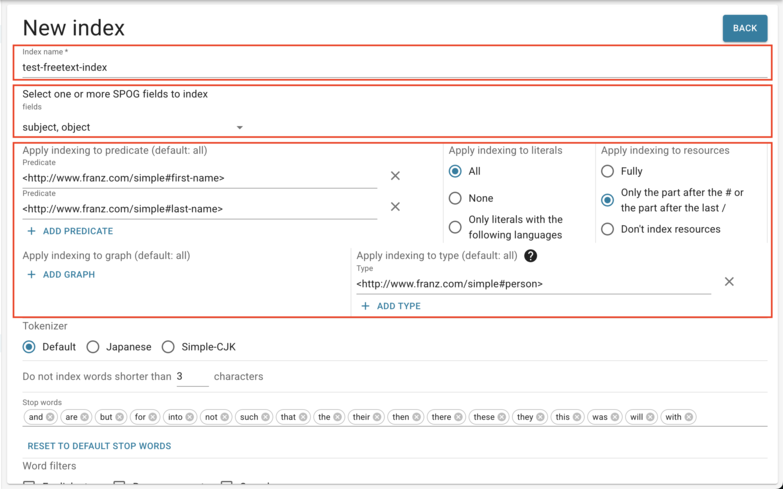
Below is the description of each section highlighted with red rectangles (from top to bottom):
- Index Name. In the input, you type your freetext index name. A SPARQL query can reference all or a specific freetext index to apply textual search.
- Select one or more SPOG fields to index. You pick which part of your quad (subject/predicate/object/graph) the indexing will be applied. By default, freetext indexing is applied only to the object part. With the index configuration in the screenshot above, the textual search will be done against subjects and objects.
- Defines filters for quads to index. In the screenshot above, where we show an example of creating a freetext index, there is a conjunction of the following filters:
- only quads with
<http://www.franz.com/simple#first-name>or<http://www.franz.com/simple#last-name>predicates. - quads with any graph (named or default).
- only
S P O Gquads which haveS rdf:type <http://www.franz.com/simple#person>triple.
With the filter above, indexing will be applied to:
- any literal.
- any string in resources after last
#or last/which are subject or object (picked in the 2nd section).
The rest of the page defines the behavior of string processing before indexing.
Edit or Delete Freetext Index
You can edit any configuration of a freetext index by clicking on the "EDIT" button on an existing freetext index card. The exception is freetext index name, you can't change it (create a new freetext index if you want a new name). Sections of the freetext index configuration are described in the paragraph above. You can also delete a freetext index by clicking on the "DELETE" button on an existing freetext index card.
Managing Query options
The predefined query options are listed in SPARQL Query Options section of the SPARQL Reference document. A query option is enabled with a PREFIX to the query of the following form:
PREFIX franzOption_optionName: <franz:optionValue> where optionName names the option and optionValue specifies the option value. For example, the PREFIX, with optionName logQuery and optionValue onFailure specifies that query execution details should be logged only when the query fails:
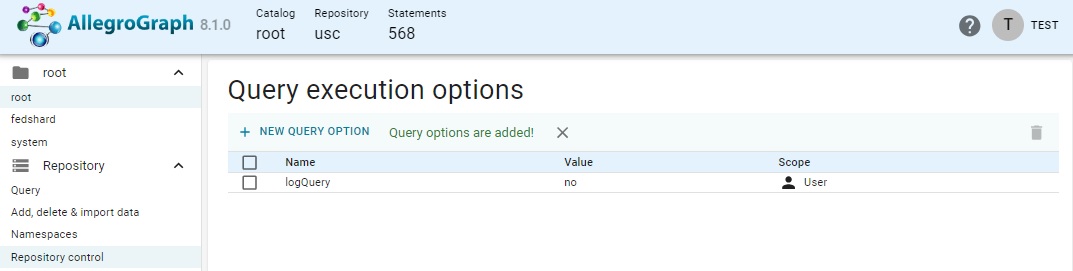
PREFIX franzOption_logQuery: <franz:onFailure> You can view and manage currently enabled query options for a repo on the Query execution options page. This page is displayed by that option on the Repository control menu displayed by clicking Repository control on the Repository menu displayed on the left of the screen and searching for Query in the search box which is displayed.
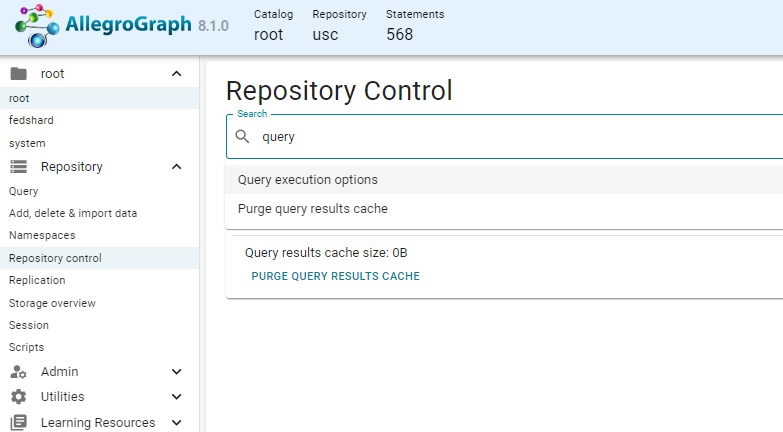
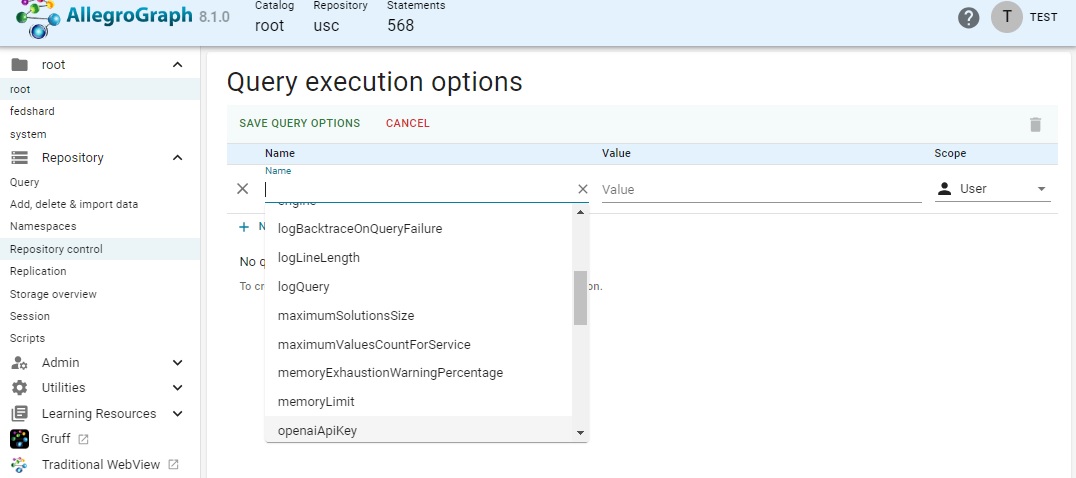
That displays a page that displays existing options (there are none in our illustration) and allows adding new ones. Clicking on New query options displays a from to add an option. The Name field has a drop down menu (as shown) with defined options:
And when a name is chosen, the Value field also has a menu of choices (if relevant -- sometimes you must specify the choice):
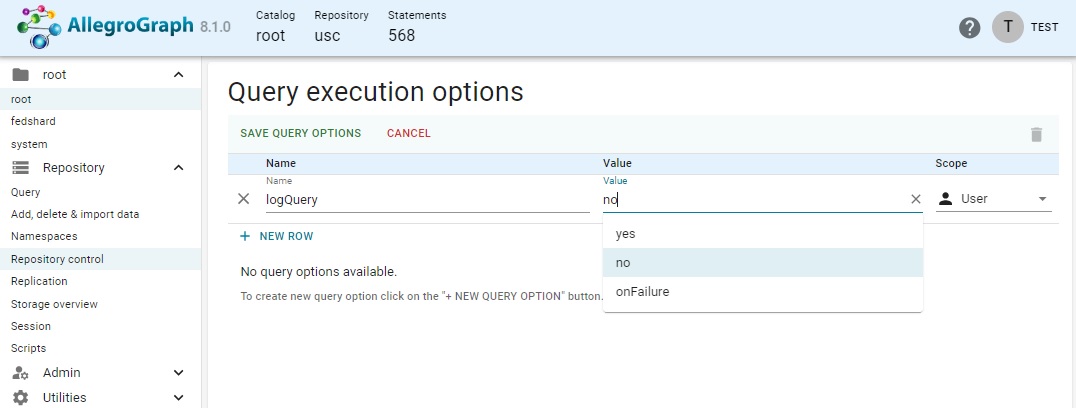
You can also specify the scope: for you, the user; for this repo; or for all queries.
Once the values are chosen, clicking SAVE QUERY OPTIONS adds the option.
Exporting or backing up triples from a repo
Exporting data from a repo means writing a single file of a specified format (such as Ntriples or Nquads, and serval others) suitable for loading in any version of AllegroGraph or indeed any RDF database program. Backing up data means writing all data associated with a repo to a specialized file or files suitable to be read into AllegroGraph (or the same or later version than the one backed up).
Exporting data to a file
Display the Repository control menu and enter export in the search box.
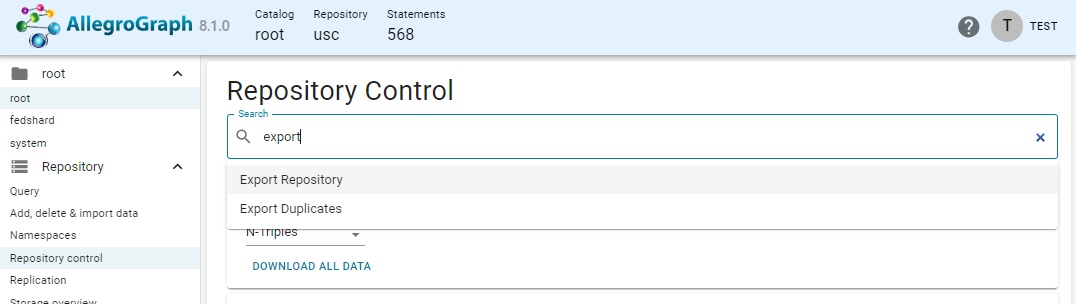
Choose Export repository. This actually takes you to the Archiving choice, with the portion for downloading data displayed.
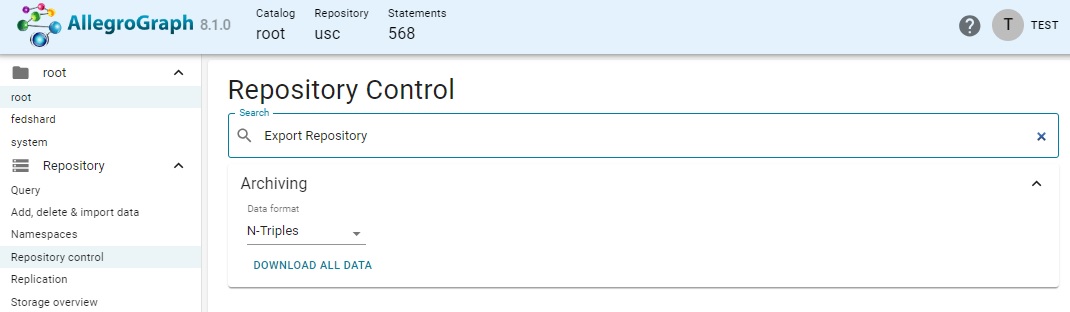
There is a drop down menu for specifying the file type (we have chosen N-Triples) and a DOWNLOAD ALL DATA button. Clicking it displays a file dialog allowing you to specify a filename and location.
Backing up a repo
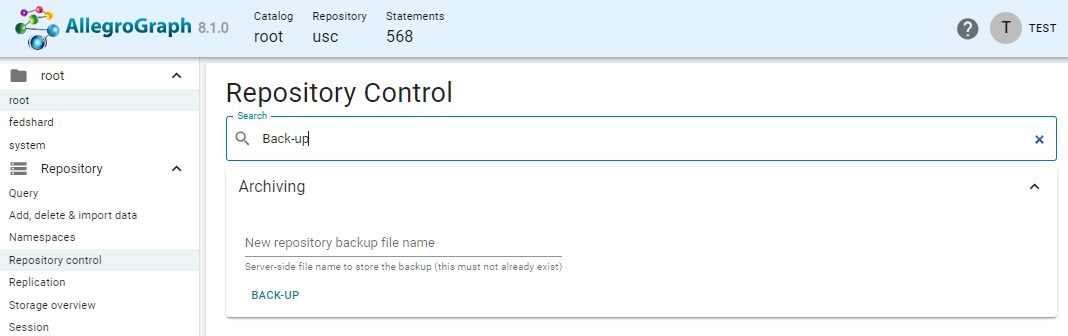
Searching for back-up displays the portion of the Archiving page that applies to backing a repo up. You have to specify a new name (not already used) for the back-up files and click "BACK-UP" (the location is part of the AllegroGraph directory).
Backing up everything
There is no WebView command to back up all repos at once. To do that, use agtool, as described in Repository Backup and Restore.
Handling duplicate triples and attribute aggregation
One of the repository menu choices is Manage Duplicates:
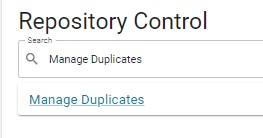
This displays the following:
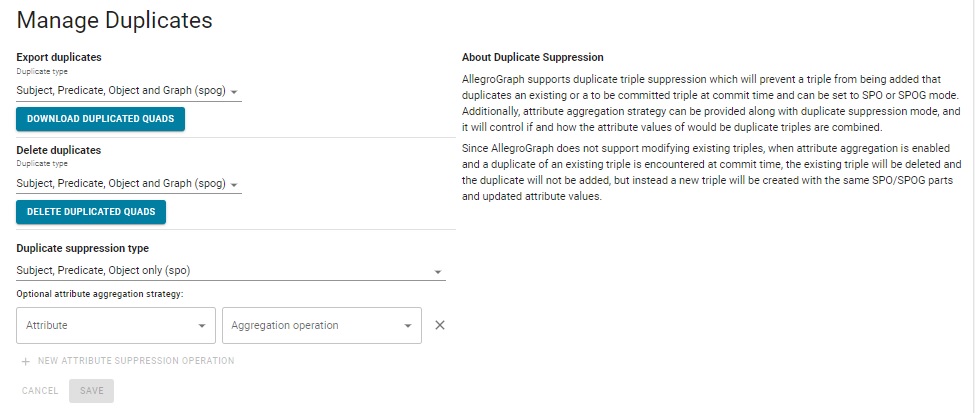
See the Deleting Duplicate Triples document for a detailed description of managing duplicates.
The following text is repeated in Deleting Duplicate Triples.
To display the Managing Duplicates page in WebView, choose Manage Duplicates from the Repository Control menu when a repository is open.
That displays the following page:
There are four fields on that page.
Export duplicates: Allows downloading a list of duplicate triples (when the drop down list is SPO as shown) or quads (when it is SPOG). The download process is triggered by this choice.
Delete duplicates: When chosen, duplicates (SPO or SPOG depending on what is specified in the drop down menu, SPO in the illustration) are deleted. If SPO duplicates are deleted, there is no control over the value of the graph on the remaining, undeleted triple. When triples are deleted, they are not actually removed, just marked as deleted. Over time, if many triples are deleted (because they are duplicates or just superseded by later data) they can waste significant space. See Purging Deleted Triples for information on cleaning up deleted duplicate and other deleted triples.
Supress duplicates by specifying the Duplicate supression type. The choices, as showing in the illustration, are Off, Subject, Predicate, Object and Graph (spog), and Subject, Predicate, Object only (spo). This specifies what is to be done to duplicates at commit time (not at load time unless commits are done simultaneously with the load). If the SPOG or SPO choices are selected and attribute aggregation (described next) is not enabled, no new duplicates will be committed but existing duplicate, if any will be unaffected. The subsiduary Optional attribute aggregation strategy (described next) affects adding duplicates and existing duplicates.
Optional attribute aggregation strategy: See the Aggregating attributes of duplicate triples section of the Triple Attributes document for information on attribute aggregation but in short, when you have two triples with the same SPO or SPOG (depending on which you consider to be duplicates) and both have attributes, instead of deleting one and keeping the other, you may wish to delete both (or not load one and delete the other) and create a new triple with different attributes constructed from combining in some fashion the attributes of the two triples.
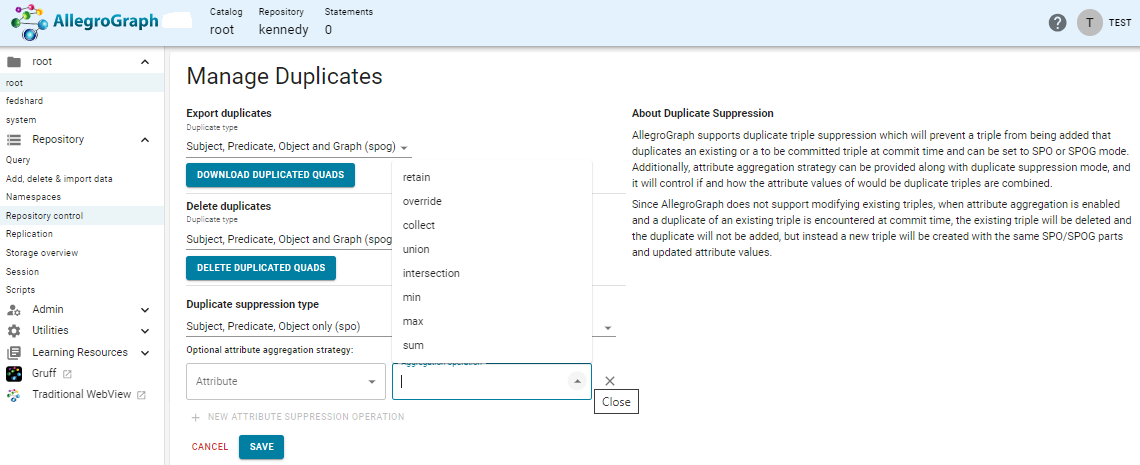
Here is an example: Suppose you have a modified attribute with a single value (the date of the last modification) and a modified-history attribute (listing all modification dates). The current triple has attributes { "modified": "02212023", "modified-history": [ "02212023" ] }. Now you want to add an SPO identical triple with attribute { "modified": "08252024", "modified-history": [ "02212023" ] }. But you now want the attributes to be { "modified": "08252024", "modified-history": [ "02212023" "08252024" ] } (the date of the latest modification and the list of modification dates). You would specify the aggregation stratgy of the modified attribute to be override and that of the modified-history attribute to be collect. The new triple will be as desired (except the order of modified-history may be reversed). The various aggregation choices are displayed in the menu displayed when clicking on the Aggregation box.
Load CSV file
Users can define transformation rules in WebView by visiting the Load CSV file page from the Add, delete & import data section in the right sidebar. First, a CSV file must be uploaded. In the screenshot below, it's the staff.csv file with the following content:
id,first,last,position,salary,hired,boss,website
1,Bruce,Smith,developer,80000,2001-02-01,3,http://bruce.com
2,Jim,Crane,CEO,1000000,1995-03-15,,http://jimco.com
3,Jane,Doe,manager,200000,1995-10-31,2,http://janeco.com
The goal here is to transform each row from the CSV file into one or more statements. Transformation rules described above are represented in the following WebView UI:
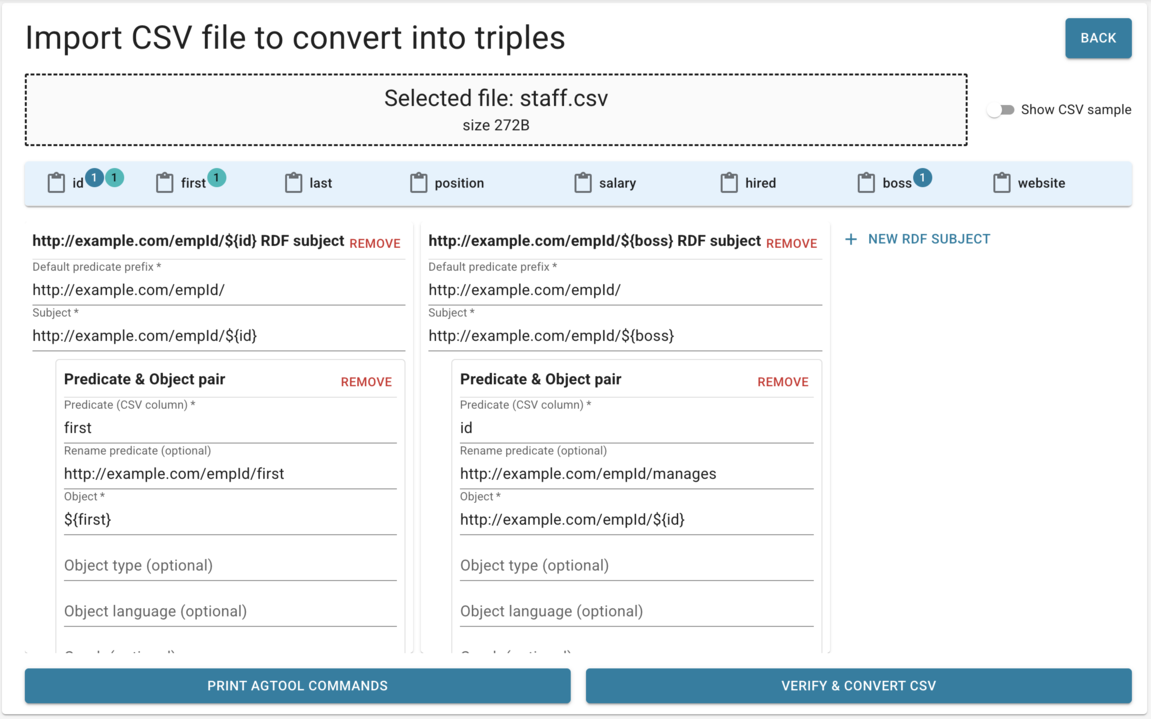
With these transformation rules, AllegroGraph populates the store with the following triples:
<http://example.com/empId/1> <http://example.com/empId/first> "Bruce" .
<http://example.com/empId/2> <http://example.com/empId/first> "Jim" .
<http://example.com/empId/3> <http://example.com/empId/first> "Jane" .
<http://example.com/empId/3> <http://example.com/empId/manages> <http://example.com/empId/1> .
<http://example.com/empId/2> <http://example.com/empId/manages> <http://example.com/empId/3> .
The description below explains how each UI part leads to the result above.
Subject definition
Every statement (triple or quad) starts with a subject. So the top-level part of this transformation UI is a card that holds info about future subjects. Users can have multiple cards to process the same CSV rows and populate statements with different subjects. Let's see the first 4 triples from the output and how their subjects are generated. There is http://example.com/empId/${id} template for the subject. The template converts every value of the id column from every row (if present) into an IRI. So for the first row where the id value is present, there will be <http://example.com/empId/1> subject. The future subject doesn't have to contain the first column of the input CSV, it could be any column. In the second card, there is http://example.com/empId/${boss} template. So by following the same template rule, it creates a subject part in future triples for every row except the second row. The second row doesn't have a value in the boss column and that's why a statement for this row isn't created.
Predicate, Object, Graph definitions
After deciding which column will represent subjects in your future statements, in nested cards users can define transformations for predicates, objects, and optionally graphs by filling fields from top to bottom. You can define different types of relationships between columns and the rest of a statement:
- 1-to-1 mapping between a column and predicate, object.
- Fill object with constant values.
- Create a new predicate based on different column values from the same row.
After focusing on the Predicate (CSV column) field, users can pick a column from the uploaded CSV file. Fields Rename predicate (optional) and Object are filled automatically with the assumption you want to have a simple 1-to-1 mapping. It defines the correspondence where the picked column is the name of the future predicate and the column's value from each row is the future object. Optionally, users can rename the predicate, specify object type, language, and graph. In the screenshot above, the first card defines a string object filled with values from the first column and http://example.com/empId/first predicate. From the same screenshot, the second card defines an IRI object with a value created from the template http://example.com/empId/first/${id} and a custom name (http://example.com/empId/manages) of the predicate.
It's a common practice to have rdf:type triples so for a picked subject users may want to have a constant value for the object, like http://www.w3.org/2000/01/rdf-schema#Class. To make it happen, users can pick rdf:type from the Predicate autocomplete field or type their own custom predicate. After that, you can type the desired type for the selected subject in the Object field.
From the staff.csv example, let's say that users want to have a new http://example.com/empId/fullName predicate which holds the full name of a person. Similar to the first (1-to-1 type), users can select the first column in the Predicate (CSV column) input, rename the predicate from http://example.com/empId/first to http://example.com/empId/fullName, and type ${first} ${last} in the Object field.
Users can have multiple "Predicate & Object pair" nested cards within the same RDF subject card to avoid subject repetition.
LLM support
As said above, WebView supports creating LLM Playgrounds repositories. These repos have suitable prefixes applied to every query, such as one containing the openaiApiKey query option. This tool is described in the LLM document. However, LLM tools and magic predicates are available in any repository. Playgrounds just provide some prefixes automatically.
Other tools specify embeddings used in LLM work. The following subsections describe the relevant tools in WebView.
LLM embedding specification
LLM embedding is described in the LLM Embed Specification document. Such specifications are used when a vector dababase is created. The specification can be defined using a .def file (as is done with the the historical figures example and the Chomsky47 example). They can also be defined directly with the Create LLM Embedding dialog in AGWebView, as we describe in this section.
Let's start with the .def file used in the historical figures example (the api-key is not valid).
embed
 embedder openai
 if-exists supersede
 api-key "sk-U43SY1234567NSGmxlYbT3BlbkFJjyQVFiP5hAR7jKLMnopq"
 vector-database-name ":10700/historicalFigures-vec"
 if-exists supersede
 limit 1000000
 splitter list
 include-predicates <http://www.w3.org/2000/01/rdf-schema\#label>
and let us see how to provide this same information using the Create LLM Embedding dialog in AGWebView, displayed when Create LLM Embedding is selected in the Repository Control menu displayed when a suitable database is open.
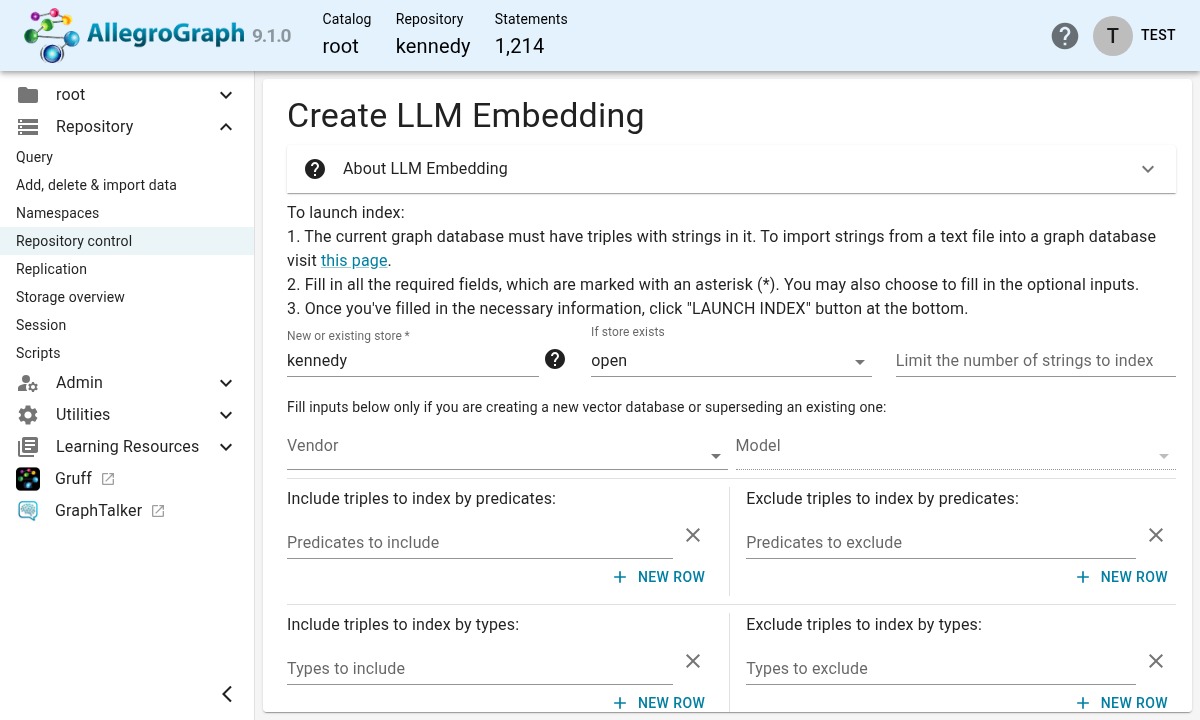
Here are the fields, many of which are optional. Note that a field may become required depending on values of other fields.
New or existent Vector Database: the name of a new vector database, which will then be created, or an existing one, which will either be modified or replaced, according to the value of the next entry.
If databse exists: default is open (meaning add to its contents). Other choice is supersede meaning delete the existing database and open a create one with the same name. If the named database does not exist, open and supersede mean the same: create a new vector database. Equivalent to the
if-existsline in the .def file.Limit the number of strings to index: the value should be a positive integer and can be omitted if you don't want to limit number of strings to embed. A value will restrict the number of index items. Equivalent to the
limitline in the .def file.
The next line (Fill "Embedder", "Model", and "API key" only if you want to create the Vector Database:) is only relevant if a new database is being created, either because the named database does not exist or is being superseded.
Embedder: the type of embedded to use,
openaiordemo.demois not a real embedder but just there for testing.openaiis the only actual embedder available at this time (other may be added and it is possible that they will become available faster than this documentation is updated, but any new ones will be listed in the drop down menu). Equivalent to theembedderline in the .def file.Model: a drop-down menu shows the suitable models based on the choice of embedder. There may be only one. Equivalent to the
modelline which can be in the .def file (though not in the example shown).API key: put in your key of LLM provider (for example OpenAI). Keep in mind that keys typically give access to a server which costs money, so be careful who can see you key and be aware that the key is written to the new vector database. That means that users with access to the vector database have access to API key too. Equivalent to the
api-keyline in the .def file.
The last entries allows specifying predicates and types you wish to include. The include fields default to <*>/*, meaning all predicates/types and the exclude fields default to none. You can specify exactly what to include and exclude with the right combination of include and exclude specifications, using wildcards where convenient.
Interface to the audit log
The following description is repeated in the audit documentation.
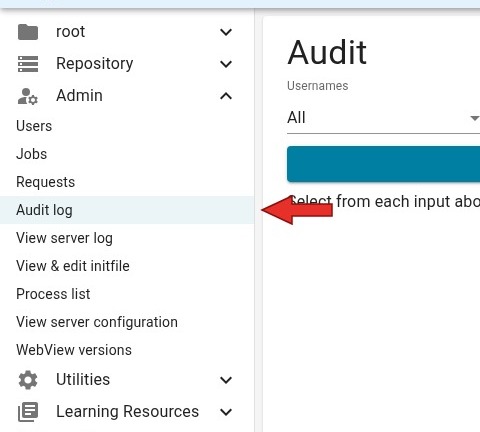
You can use the WebView interface to examine auditing information. Only superusers can look at this information. There is an Audit log entry on the Admin menu to the left of the screen, as shown in the illustration:
If selected, the following page is displayed:
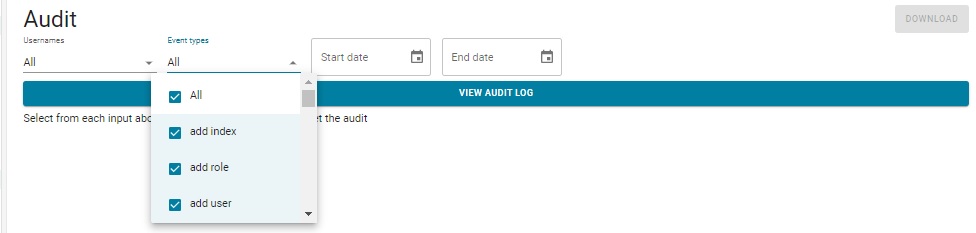
There are drop-down multiple-item menus for selecting the user(s) of interest and the events of interest (the beginning of that menu is displayed). There are also date widgets allowing specifying a start date and an end date which can be used to restrict the events being displayed to a specific time period. Leaving the start date blank but specifying an end date causes all events up to the end date to be displayed; leaving the end date blank but specifying a start date causes all events from the start date to be displayed; and leaving both blank causes all events to be displayed.
After we have, as superuser test, added two users (user1 and user2), we look at the updated log (looking at actions by test performing the event add user) which shows when those users were added and by whom. The information is refreshed whenever the View Audit Log button is clicked.
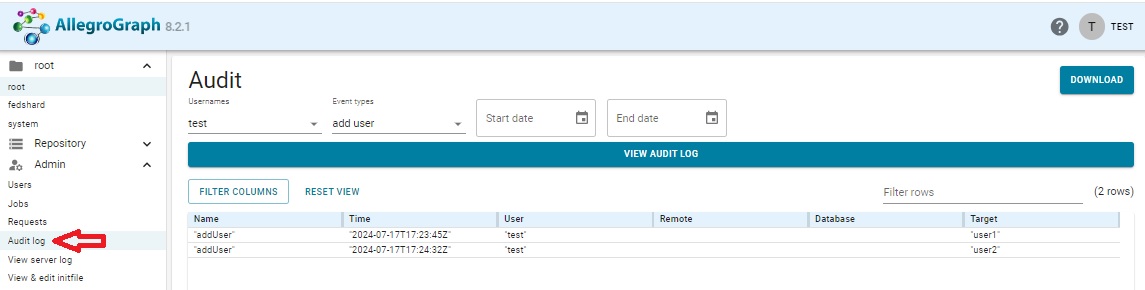
The FILTER COLUMNS button allows you to hide columns in the display. The RESET VIEW button restores all columns.
Next user user1 creates a repository kennedy, to which user1 adds a bunch of triples, and test (the superuser) modifies user1's user permissions several times. Here are screens after that activity, the first showing all activity by test and user1 and the second just the change user activity of test. Clicking VIEW AUDIT LOG clears the currently displayed information and displays information based on the selections in the various lists and boxes.
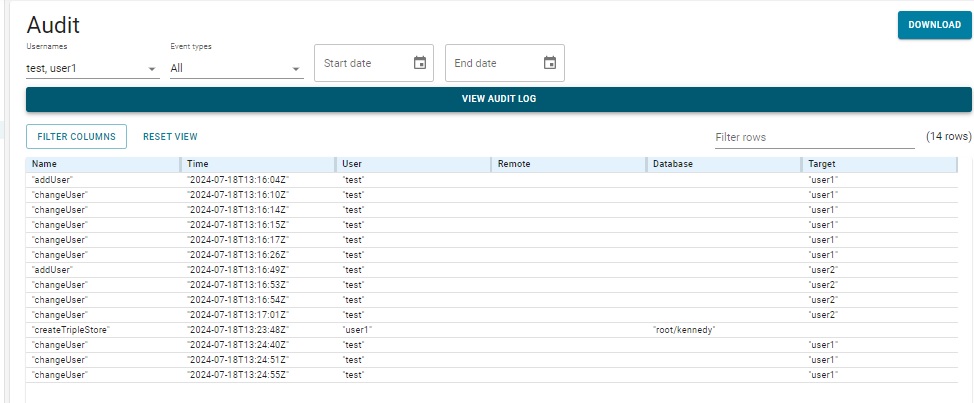
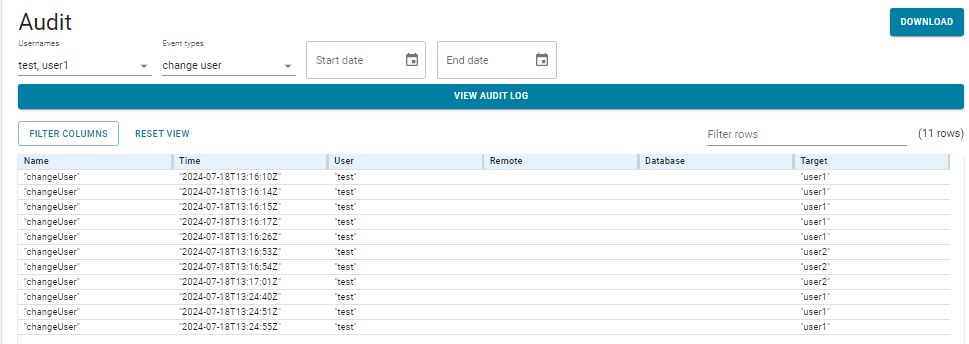
user1 did add triples to the kennedy repository, but the audit log does not record adding and deleting triples so that activity is not shown.