Introduction
AllegroGraph Multi-master Replication is a real-time transactionally consistent data replication solution. It allows businesses to move and synchronize their semantic data across the enterprise. This facilitates real-time reporting, load balancing, and disaster recovery.
Single repositories can be replicated as desired. The replicas each run in an AllegroGraph server. A single server can serve multiple replicas of the same repository (this is not typical for production work but might be common in testing). Note if there are multiple replicas in a single server, each replica must either be in a different catalog or must have a different name.
The collection of servers with replicas of a particular repository is called a replication cluster (or just cluster below in this document). Each repository in the cluster is called an instance. One instance is designated as the controlling instance, which will be described in more details below.
Each instance in the cluster can add or delete triples and these additions and deletions are passed to all other instances in the cluster. How long it takes for instances to synchronize depends on factors external to AllegroGraph (such as network availability and speed and whether the other servers are even available) but given time and assuming all instances are accessible, after a period of no activity (no additions or deletions) all instances will become synchronized.
Setting up a multi-master cluster
You can start multi-master replication cluster on a repository using AGWebView, using the agtool repl command, or using the REST interface. We will discuss using AGWebView and agtool repl in greatest detail.
A cluster is created by starting with an initial instance of a repository (which may be an empty repository or may already contain triples) and then cloning it. The clones can be on the same server or on different servers.
The cluster can be grown at any time by adding additional instances and it can be shrunk by removing instances.
The first step to setting up a multi-master cluster is to specify a repository in some catalog on some server as the first instance of a cluster. The repository must be an existing repository (which may have just been created for this purpose). Once it has been converted to be the first instance of a replication cluster, other instances can created and added to the cluster. (Existing repositories cannot be added to an existing cluster. Each instance added after the initial creation of a cluster will be newly created when added.)
Newly created instances can have their own names and can be in their own catalogs. So the initial instance can be named kennedy and be in the root catalog of server1, a second instance can be named kennedy-dup and also be in the root catalog of server1, a third named kennedy in the catalog mycatalog of server1, a fourth named kennedy in the root catalog of server2, and so on.
Setting up a multi-master cluster using AGWebView
To create a multi-master replication cluster in AGWebView, you must start with an existing repository in the server connected to by the AGWebView screen. You can use an existing repository (that is not already part of any cluster) or you can create a new repository using the tool on the catalog page in AGWebView (the link is to the description of the Root catalog page).
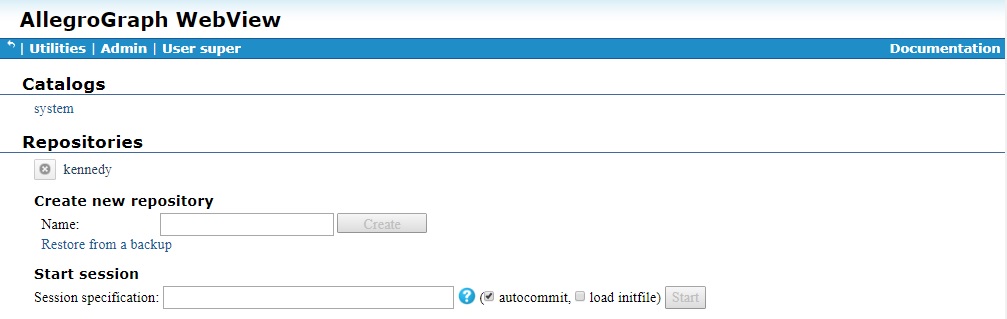
There you will see repositories already existing in the catalog, along with tools to create a new ordinary repository and (unrelated to the discussion here) to start a session. Choose an existing repository to make the first instance of a cluster or create a new one for that purpose. We have a kennedy repository and we will use that one. Clicking on the repository name will take you to the repository overview page, described next.
Using AGWebView to convert a repository to a multi-master instance
Here is a portion of the Repository Overview:
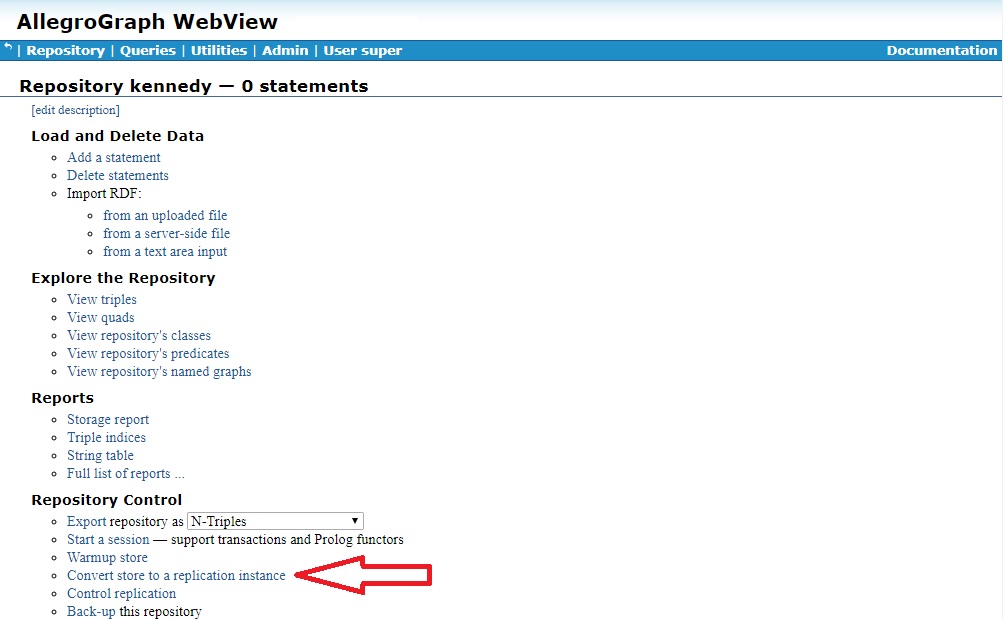
The red arrow points to the link Convert store to a replication instance. Clicking on this link displays the following dialog on the AGWebView page:

The information you will supply in the various fields identifies the instance being created and specifies how other instances will contact the new instance. You have to decide whether they will use HTTP or HTTPS, and what the host and port are. Just the Scheme and the Port fields will be filled in initially (we have filled in the remainder as an illustration). The fields are:
- Scheme
- http or https.
- Host
The server containing the repository which is to be made into the first instance of the new cluster runs on a specific host. That host is specified in this field. The value must be specified in a way that allows access from any server that will contain a repository in the cluster. The value can be a hostname or an IP address. You should avoid the hostname
localhostas that will not work properly for access from other machines. (localhostcan be used when all cluster repositories will be in servers running on a single machine, which can be useful for testing but is unusual in production environments.)Because you are creating the first instance of a new cluster, the host must be the machine running the server in which the existing repository being converted resides, and the port must be a port on that machine which communicates with that server.
- Port
- The current port is filled in but you may wish to use another port (such as a port for HTTPS).
- Catalog
- This field as shown is not settable since the repository already is in some catalog (such as, in this case, the root catalog) and that cannot be changed by the conversion operation. (The dialog for creating a new instance is very similar but the catalog field is active in that dialog since the new repository instance can have a different name and be in a different catalog.)
- Username and Password
- This is the username and password that will be used by other replication instances to contact the replication instance being created. It must be a username with superuser privileges.
- Instance Name
- Each instance of a cluster must have a unique (to the cluster) name. (It will also have an instance ID number assigned by the system.) This allows easy reference to the instance. You can leave this field blank and the system will select a name.
When the form is filled in, click on the Convert Store to Instance button and the conversion will take place.
The controlling instance
In a replication cluster, one instance is distinguished as the controlling instance. When a cluster is created, the first instance becomes the controlling instance. Later, control can be shifted to other instances.
Certain operations can only be done by the controlling instance. These special operations are those that if done simultaneously on multiple instances would cause conflicts to exist. These operations are:
Adding another instance to the cluster.
Removing an existing instance from the cluster.
Defining or deleting a triple attribute (see Triple Attributes)
Defining an encoded id.
Managing clusters in AGWebView once created

When a repository is an instance of a cluster, its AGWebView repository page contains a Replication Control section with a Manage Replication Instances [as controller] link (as controller only appears if the instance is the controlling instance, but the section appears, with at least a link to Manage Replication Instances on the repository pages for all instances in the cluster).
Clicking on the link takes you to the Replication Cluster Management page, shown (for a cluster with only one instance which is thus the controlling instance) below.
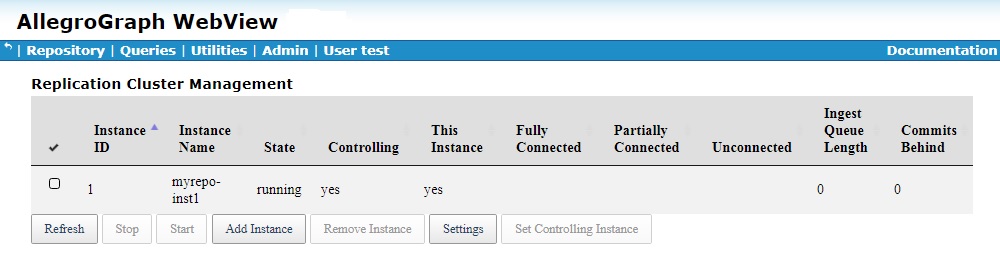
We will describe the various columns and buttons shortly, but first we add an instance by clicking on the Add Instance button. This dialog appears:
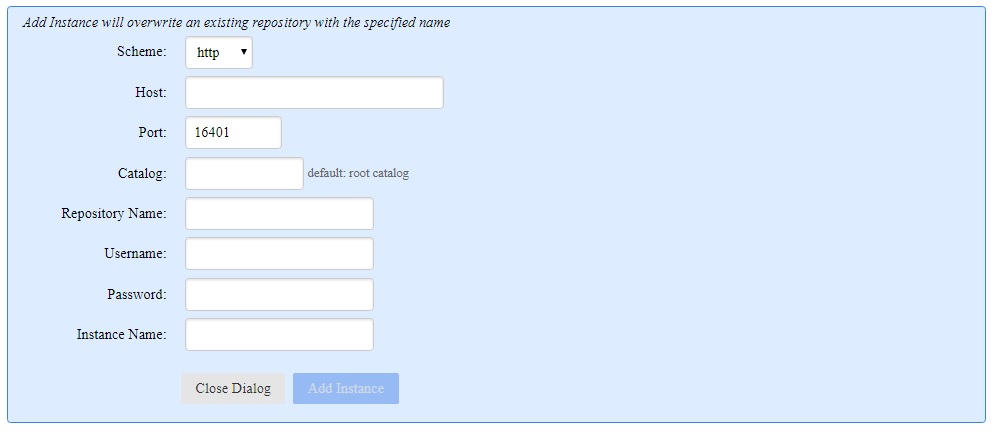
You fill in the various fields. Here are some notes:
- Port
- It fills in the port used by the current server. Be sure to change this to be the port used by the target server. (If both servers are running on the same machine, the port number will be different but if they are on different machines, the number may be the same.)
- Catalog and Repository Name
- These can be different on the target server than on the current server. The catalog specified must exist on the target server (the root catalog, the default if no catalog is specified, always exists). The repository name can be the name of an existing repository, but (as the warning at the top says) that repository will in that case be destructively replaced with all its data being lost.
The Instance Name must be a unique (in this cluster) name (the system will choose a suitable name if none is provided). The Host can be an IP address or a hostname. localhost should not be used unless all servers in the cluster are running on the same machine.
We now have two cluster instances in two servers. The Replication Cluster Management table for the controlling instance now looks like this:

and the page for non-controlling instances looks like this:
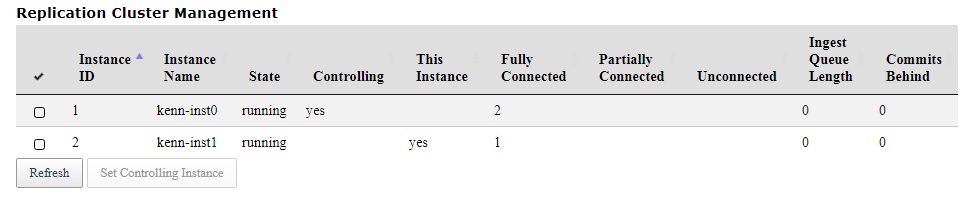
The information table is similar in both cases but the controlling instance page has many control buttons while the non-controlling page has just two.
The columns in both are:
- Selection Tool
- If the checkbox in this column is checked, various button options become live and clicking the button affects the selected instances.
- Instance ID
- The value is the instance ID number assigned by the system to each instance. Clicking on this heading inverts the display order.
- Instance Name
- The given name for each instance (chosen when the instance was created).
- State
- The current instance state (running, unreachable, etc.) An instance is unreachable if it cannot be contacted. That can happen when the instance is stopped or when the machine or the AllegroGraph server on which the instance would run is itself not running.
- Controlling
- The controlling instance has 'yes' in this column. There is only one controlling instance. See below for information on the controlling instance.
- This Instance
- The AGWebView you are looking at is displaying information about a specific server. The instance identified in this column is the instance in that server.
- Fully Connected, Partially Connected, Unconnected
- Lists (by instance ID number) the instances to which the instance in the row is fully, partially, or not connected. Instances send handshake messages to each other to determine connectivity. If some but not all handshakes have succeeded, the instances are partially connected.
Instances communicate with each other. They regularly send lists of transactions they have initiated or processed. Instances also have a list of commits they know they need to process.
- Ingest Queue Length
- The number of commits this instance has collected that it must ingest.
- Commits Behind
- The information passed between instances tells how many commits an instance has initiated. If Instance1 tells Instance2 that it has initiated 100 commits and Instance2 has only seen 90 commits from Instance1, it calculates it is 10 commits behind. Adding all those as yet unseen commits from all instances to the ingest queue length gives this value. Note this value is always an estimate since information on commits is sent periodically and there may be additional commits by other instances since their last report.
What buttons appear below the table depends on whether the instance displaying the page is the controlling instance or not. See the illustrations above, where the controlling instance shows all the buttons and other instances show only two (Refresh and *Set Controlling Instance).
We describe the buttons for the controlling instance. Some affect the whole table and are thus always active. Others affect just one or more instances and so are inactive unless some instances are selected. The buttons are:
Refresh Always available. Refresh the displayed data. Also on non-controlling instance page.
- Stop
- Available when one or more instances are selected. Stop the selected instances. When an instance is stopped, data cannot be added or deleted from it and it will not receive commits from other instances. An instance is also stopped when its associated server is down or otherwise unavailable but this option stops the instance while leaving the server running.
- Start
- Available when one or more instances are selected. Restarts a stopped instance. A no-op if the instance is already running.
- Add Instance
- Always available. Allows adding a new instance. See Managing clusters in AGWebView once created above for details and an example.
- Remove Instance
- Available when one or more instances are selected. Removes the selected instances. The removed instances become regular repositories containing the triples they contained when removed. In the typical use case, removed repositories are then deleted but that is neither automatic nor required.
- Settings
- Always available. Displays a dialog showing the settings. See Instance Settings for more informaton.
- Set Controlling Instance
- Available when exactly one instance is selected. Makes that instance the controlling instance. A no-op when the selected instance is already the controlling instance. Also on non-controlling instance page.
Instance Settings
The several instances in a cluster are intended to be synchronized so they have the same set of triples but when instances are making commits which add or delete triples, the instances are unlikely to actually be identical. It takes time for information about triple additions and deletions to propagate around the various instances. Eventually (assuming the instances and the associated network are actually running) synchronization will occur, but how quickly depends on factors outside the scope of this document and perhaps outside your control.
You may want to ensure that instances do not diverge too much. The settings described here allow you to control instance divergence by preventing commits until instances are sufficiently synchronized.
Default values for these setting can be specified for a server in its config file. New clusters set up by a server will use those settings unless other settings are specified on cluster creation. Once a cluster is created, the settings can be changed by the controlling instance.
There are four settings, displayed in the dialog displayed when the Settings button is clicked on the Managing Clusters dialog for the controlling instance described in the Managing clusters in AGWebView once created section above.
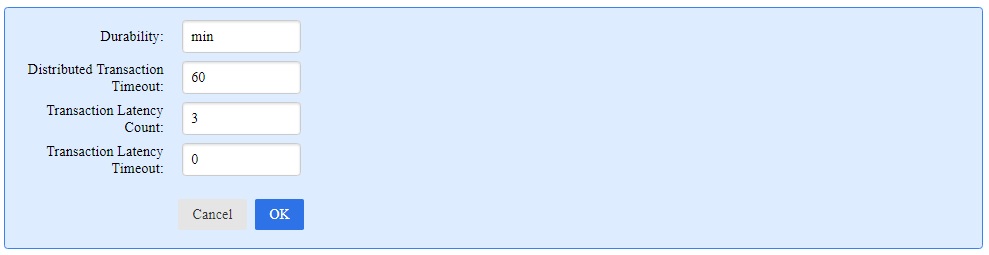
The settings are
- Durability
This is a positive integer value that specifies how many instances must have a commit ingested in order for that commit to be considered durable. The count includes the instance that made the commit.
Suppose there are 9 instances in the cluster. Setting the durability to 1 means that when an instance makes a commit that commit is immediately considered durable before even being sent to any other instance (the commit will still be sent to the other instances after it's considered durable).
Setting the durability to 9 means that every instance must have ingested the commit before it's considered durable. If one or more instances are stopped at the moment then the commit will not become durable until the stopped instances are restarted.
When specifying the durability you can use three symbolic names instead of an integer: min, max, and quorum. min always means 1. max means the number of instances in the cluster. As the cluster grows and shrinks the meaning of max is automatically changed to be the number of instances in the cluster. quorum means the next integer greater than half the number of instances. If there are 9 instances a quorum is 5. If there are 8 instances quorum is also 5.
The default value for this setting in the server running the controlling instance is set by the
durabilityconfiguration directive. See the Top-level directives for multi-master clusters section in the Server Configuration and Control document. If not specified in the configuration file, this value defaults tomin.
- Distributed Transaction Timeout
A non negative integer. This is the number of seconds to wait for a commit to become durable. If durability is greater than 1, a commit initiated by an instance cannot complete until (durability - 1) other instances have indicated they have committed as well or until the timeout is reached. If the number of seconds specified by
Distributed Transaction Timeoutpasses before enough instances report they have committed, the original commit completes and control returns to the caller that initiated the commit.The default value for this setting in the server running the controlling instance is set by the
distributedTransactionTimeoutconfiguration directive. See the Top-level directives for multi-master clusters section in the Server Configuration and Control document. If not specified in the configuration file, this value defaults to 60 (seconds).
- Transaction Latency Count
This value along with Durability are the controls that the administrator has in determining the level of synchronization and coupling between the various instances in the cluster.
The Transaction Latency Count is the number of transactions that each instance will allow to be non-durable and still commit another transaction.
If the Tranaction Latency Count is 4 then even if the last four commits are not yet durable we can do one more commit. If when we go to commit again we find the last 5 commits are non-durable then the commit function will signal an error (but the error can be delayed by a positive value of Transaction Latency Timeout).
Another example: If the Transaction Latency Count is set to zero then each commit must be durable before the next commit can be done or an error is signaled.
The default value for this setting in the server running the controlling instance is set by the
transactionLatencyCountconfiguration directive. See the Top-level directives for multi-master clusters section in the Server Configuration and Control document. If not specified in the configuration file, this value defaults to 3.
- Transaction Latency Timeout
The value should be a non-negative integer indicating the number of seconds that the system will wait until the Transaction Latency Count is met. If the Transaction Latency Count is not met by the Transaction Latency Timeout, then an error will be signaled.
Commits cannot complete until they become durable (the number of instances commiting is at least the value of Durability) or until the Distributed Transaction Timeout number of seconds has passed. There may be several commits waiting to become durable. When Transaction Latency Count plus 1 commits are waiting to become durable, attempting an additional commit will signal an error.
The error, however, will not be signaled until
Transaction Latency Timeoutseconds have passed. If during that time, sufficient commits have become durable, the commits that exceed theTransaction Latency Countwill then proceed and (assuming the number of pending commits drops below Transaction Latency Count plus 1, no error will be signaled. If the number of pending commits remains above that value, an error will be signaled whenTransaction Latency Timeoutseconds have passed.You may want (particularly when testing and making large batch updates) to set this value to a large number, like 3600 (which is one hour) to avoid errors caused by, say, an overloaded test machine but still catch errors when the wait is so long that a more serious problem is indicated.
The default value for this setting in the server running the controlling instance is set by the
transactionLatencyTimeoutconfiguration directive. See the Top-level directives for multi-master clusters section in the Server Configuration and Control document. If not specified in the conifguration file, this value defaults to 0 (seconds).
Cluster operations you cannot do with AGWebView
There are certain cluster operations that cannot be done using AGWebView. Instead, you should use the agtool repl command interface. These things include
Quiesce the cluster (stop all commits until the cluster is in sync) (see agtool repl quiesce)
Set instance priorities (see agtool repl priority)
Specify the retention period of transaction logs (see agtool repl retain)
Using the agtool repl command
The agtool repl command can be used to create and manage multi-master clusters. agtool is the general command tool for AllegroGraph (see the agtool General Command Utility document).
The general form of the agtool repl command is
agtool repl COMMAND [ OPTIONS ] ... where COMMAND is one of:
- controlling-instance - Set the controlling instance of a cluster.
- create-cluster - Create the first instance of a cluster.
- grow-cluster - Add an instance to the cluster.
help- Display repl usage.- priority - Specify the priority for retrieving commits.
- quiesce - Control the coordination of replication in the cluster.
- remove - Remove an instance from the cluster.
- retain - Specify the retention period of transaction logs.
- settings - Set cluster parameters.
- start - Restart a stopped cluster instance.
- status - Get the status of an instance of the cluster.
- stop - Stop a cluster instance.
The SPEC argument to agtool repl
Most agtool repl commands take a SPEC argument that specifies the cluster instance to act upon. The form of this argument is
http(s):[//[USER:PASSWORD@]HOST[:PORT]][/catalogs/CATALOG]/repositories/REPO Example:
http://test:xyzzy@host:43160/repositories/my-repo The user is test with password xyzzy, and the repo is my-repo on host host listening on port 43160. This repository is in the root catalog (the default so no catalog is specified). The scheme is http.
Using agtool to set the controlling instance
This can also be done in AGWebView (see Managing clusters in AGWebView once created). The agtool repl controlling-instance usage is
agtool repl controlling-instance [ OPTION ] ... SPEC INSTANCE_NAME Options are --force (force operation to complete even if all requirements are not met) and -v/--verbose (more verbose output). SPEC is as described above and must specify the controlling instance of the cluster. The instance name (in the cluster) must be included and cannot be the controlling instance name. INSTANCE_NAME can be the name or a SPEC value denoting the instance to become the controlling instance. If the controlling instance is down, INSTANCE_NAME must be a SPEC value denoting the instance to become the controlling instance and --force should be specified.
Using agtool to create a cluster
This can also be done in AGWebView but using a somewhat different sequence of commands (see the note below and see Using AGWebView to convert a repository to a multi-master instance. The agtool repl create-cluster usage is
agtool repl create-cluster [ OPTION ] ... SPEC [ INSTANCE_NAME ] Options are --group (see below) and -v/--verbose (more verbose output). SPEC is as described above. The instance name (in the cluster) can be included. An instance name will be assigned if it is not specified. The instance will become the first instance of the cluster and hence the controlling instance.
The --group option cannot be specified using AGWebView. Cluster instances may be in a group but need not, so --group need not be specified. Groups have names which identify them. Group names must be distinct from instance names. Since this is the first cluster instance, the group specified will be created with this instance as its first member. See priority below for information on how groups are used.
Note on the difference between this command and creating a cluster in AGWebView: When you create a cluster in AGWebView, you first create a repo and then convert it to a cluster repo. (You can have added triples before conversion, but you always start with an existing repository and its contents are unchanged by the conversion.) When you use agtool repl create-cluster, you are creating a new, empty repository as a cluster repo. If `SPEC' names an existing repo containing triples, the system will delete it and create a new, empty repo with the same name. agtool cannot be used to convert an existing, non-empty repository to a cluster repository.
Using agtool to add an instance to a cluster
This can also be done in AGWebView (see Managing clusters in AGWebView once created). The agtool repl grow-cluster usage is
agtool repl grow-cluster [ OPTION ] ... SPEC TARGET-SPEC [ INSTANCE_NAME ] SPEC and TARGET-SPEC are as described above. SPEC indentifies the controlling instance of an existing cluster and TARGET-SPEC identifies the new cluster instance. If TARGET-SPEC identifies an existing repository, that repository will be deleted and reconstituted as a cluster instance. If INSTANCE-NAME is not specified, one will be assigned.
The OPTIONs are --group and -v/--verbose (more verbose output). --group is optional. It specifies the group the new instance should be in (if any). The value can be an existing group name (the instance will go in that group) or a new name (a new group will be created). See priority below for information on how groups are used.
Using agtool to specify cluster instance priorities
This cannot be done in AGWebView. The agtool repl priority usage is
agtool repl priority [ OPTION ] ... SPEC Options are --relation (see below) and -v/--verbose (more verbose output). SPEC is as described above.
Priorities specify how commits from different instances will be processed by a particular instance. See the section Repository Priority for information on how priorities are used.
The --relation argument value should be a string of the form name1,name2,value where nameX is a group or instance name.
Note that two instances in the same group have a default priority of 20 with respect to each other. This can be overridden. Two instances not in the same group (perhaps not in any group) and not having a defined priority have default priority 10.
Using agtool to quiesce a cluster so all instances sync up
This cannot be done in AGWebView. The agtool repl quiesce usage is
agtool repl quiesce [ OPTION ] ... SPEC SPEC is as described above.
OPTIONS include one required option, --action, and two optional options, --timeout (seconds to wait for the operation to complete) and -v/--verbose (more verbose output).
--action specifies the quiesce action. It must be one of:
stop: Put the specified instance in a state where attempting a new commit causes an error. The instance then waits to be connected to all other instances so all of its existing commits are distributed. Once all instances are in this state (see --
action=stopallbelow) then we know that all instances are caught up with all other instances. This action can timeout.stopall: This does the operation of
action=stopon all instances This action can timeout.start: This allows the specified instance to accept commits.
startall: This does the
--action=starton all instances.restartall: This does the
--action=stopallfollowed by theaction=startall.ready: This is like stop except it doesn't prevent commits from occuring. It just checks that this instance is connected to all other instances and that it has no more commits to distribute.
readyall: This does
--action readyon all instances.
Each instance of the cluster runs independently bringing itself up to date with other instances as rapidly as it can. There may be a time when you need all instances to get completely in sync and have a commit distributed to all of them before anything further is changed.
Quiescing the cluster means stopping all instances from commiting and waiting until all instances are up to date. All of the quiesce operations will only work if all cluster instances are running. If any have been stopped or if an agraph server is simply unreachable at the moment the quiesce operation will wait until all instances are running or until the specified timeout is reached. Specifying a timeout is always a good idea as otherwise the system can wait forever.
Using agtool to remove a cluster instance
This can also be done in AGWebView (see Managing clusters in AGWebView once created). The agtool repl remove usage is
agtool repl remove [ OPTION ] ... SPEC INSTANCE_NAME Options are --force (force operation to complete even if all requirements are not met), --timeout (number of seconds to wait for the operation to complete) and -v/--verbose (more verbose output). SPEC is as described above and must specify the controlling instance of the cluster. The instance name (in the cluster) must be included and cannot be the controlling instance name. INSTANCE_NAME can be the name or a SPEC value denoting the instance to be removed. The instance identified by INSTANCE_NAME is removed from the cluster. (Note that the format of this command differs from other commands. SPEC and INSTANCE_NAME both must be supplied and must refer to different instances (SPEC to the controlling instance, INSTANCE_NAME to the instance to be removed.)
Using agtool to specify the transaction log retention period
This cannot be done in AGWebView. The agtool repl retain usage is
agtool repl retain [ OPTION ] ... SPEC SPEC is as described above.
OPTIONS are the following, which specify how transaction logs should be retained.
- --must-retain MUST-RETAIN
- The ID of the minimum transaction log that must be retained. A value of -1 will turn off retention based on this value.
- --since-time SINCE-TIME
- All transactions since the given date must be retained.
SINCE-TIMEmust be an ISO date, "now", or a universal time. A value of -1 will turn off retention based on this value. - --time-interval TIME-INTERVAL
- Transaction log entries between now and time-interval seconds ago will be retained. You can use this to retain, say, the last 24 hours of entries by specifying 86400 seconds. A value of -1 turns off retention based on this value.
There is also a -v/--verbose option (more verbose output).
Using agtool to set cluster parameters
This can also be done in AGWebView (see Managing clusters in AGWebView once created). The agtool repl settings usage is
agtool repl settings [ OPTION ] ... SPEC [ INSTANCE_NAME ] Options allow you to specify which settings you want to set. See Instance Settings above for more information on these values. The choices are:
- --distributed-transaction-timeout SECONDS
- Set the distributed transaction timeout in seconds for all instances.
- --durability DURABILITY
- Set the durability for the cluster: an integer or
min,maxorquorum. - --transaction-latency-count COUNT
- Set the transaction latency count for all instances.
- --transaction-latency-timeout SECONDS
- Set the transaction latency timeout in seconds for all instances.
There is also a -v/--verbose option (more verbose output). SPEC is as described above and must be the controlling instance.
Using agtool to start an instance
This can also be done in AGWebView (see Managing clusters in AGWebView once created). The agtool repl start usage is
agtool repl start [ OPTION ] ... SPEC The single option is -v/--verbose (more verbose output). SPEC is as described above and need not be the controlling instance. The command is sent directly to the specified instance which is then restarted. This is a no-op if it is already running.
Using agtool to get the status of an instance
The agtool repl status usage is
agtool repl status [ OPTION ] ... SPEC The single option is -v/--verbose (more verbose output). SPEC is as described above. The instance status is printed. Note the status is quite verbose and is intended to assist debugging so may not be meaningful to users. This can also be done in AGWebView (see Managing clusters in AGWebView once created). Not all the information is displayed in AGWebView.
Using agtool to stop a cluster instance
This can also be done in AGWebView (see Managing clusters in AGWebView once created). The agtool repl stop usage is
agtool repl stop [ OPTION ] ... SPEC Options are --force (force operation to complete even if all requirements are not met), --timeout (seconds to wait for the operation to complete) and -v/--verbose (more verbose output). SPEC is as described above. It identifies the instance to be stopped, not the controlling instance (unless that is the instance to be stopped). The specified instance is stopped (no longer can make or process commits). This is a no-op if it is already stopped.
Details on Certain Multi-master Replication Features
In this section, we describe certain features mentioned elsewhere in this document but requiring a longer description best put in a single location.
Repository priorities
All repositories in a replication cluster share information about their own commits and those of other repositories that they know about. This ensures that cases like the following are properly handled: REPO-3 is down when REPO-1 makes a commit, and then REPO-1 goes down followed by REPO-3 coming up. REPO-2 -- which has been running the whole time -- will inform REPO-3 of REPO-1's commits.
It can sometimes happen that a repository falls behind (perhaps it was offline or running slowly during a period of great activity). In that case, it finds that the same commit information is available from many other repositories and the question arises: from which of the repositories should it take the information?
Suppose in your setup you have two data centers, one in Chicago in the USA and one in Singapore. Each has 10 machines each running an AllegroGraph server. You have a multi-master replication cluster with instances on every one of the 20 servers.
If an instance in Singapore falls behind (say, because its server is taken down for maintenance for 24 hours during which other instances made many commits), it will be far behind when it comes back up. Should it get information from an instance in Chicago, which is around the world, or another instance in Singapore, down the hall? Obviously it should get as much information as possible from its neighboring instances.
Where instances prefer to get information is determined by the priority feature. When the same information is available from mnay instances, it will be taken from the instance whose priority is highest.
Here is a more detailed example. All instances in a replication cluster are named instN (where N is an integer).
Instance inst1 needs a certain commit and it finds that the commit is available on inst2, inst3 and inst4.
Which instance should inst1 ask for the commit?
The system calculates the priority between the pairs
inst1 inst2
inst1 inst3
inst1 inst4
and the highest value wins.
Groups also come into play when computing the priority. Each instance is in zero or one group.
The set of group names are distinct as are the set of instance names. Furthermore group names are distinct from instance names. Thus a particular name is either an instance name, a group name or neither.
The priorities are specified as a set of triples:
(name1, name2, priority) meaning for name1 the priority of getting commits from name2 is priority. Again name1 and name2 can be names of instances or groups.
The priority will determine whether we use this connection to retrieve a commit we need.
For each pair of instances inst1 and inst2 we compute the priority value this way, checking each of the possibilities listed in order and stopping when we find a possibility that matches:
If there's a triple
["inst1", "inst2", value]then that is the priority value for inst1 getting commits from inst2.If inst1 is a member of group group1 and there is a triple
["group1", "inst2", value]then that is the value.If inst2 is a member of group2 and there is a triple
["inst1", "group2", value]then that is the value.If inst1 is in group1 and inst2 is in group2 and there is a triple
["group1", "group2", value]then that is the value.If none of the above match then the default value is 10.
For each group there's a default triple (that can be overridden) of
["group1","group1", 20] meaning, by default members of the same group have a priority of 20 between them. Two instances that are in no group are not considered to be in the same group.
Priorities can be set between instances and/or groups with agtool or using the REST interface. They cannot be set with AGWebview.
The REST interface for multi-master replication
Multi-master replication clusters can be created and managed using the REST interface. There is an introduction to multi-master replication REST commands in the Multi-master replication section of the REST/HTTP interface. All REST interface commands are described in the HTTP reference document.