| Allegro CL version 10.1 Unrevised from 10.0 to 10.1. 10.0 version | ||||||||
This document contains the following sections:
1.0 Introduction to the Chart WidgetThe Chart Widget is a new feature in Allegro CL 8.1. This document provides a tutorial on its use.
There is a chart-widget
example in the IDE's Navigator Dialog. You may want to try
it first to get a feel for the variety of things that the chart-widget
can do. Then return to this tutorial to learn how to write
chart-widget code from scratch. Once you have displayed the Navigator Dialog
(using the Help
menu), display the Examples tab and search for
chart-widget in the list of examples.
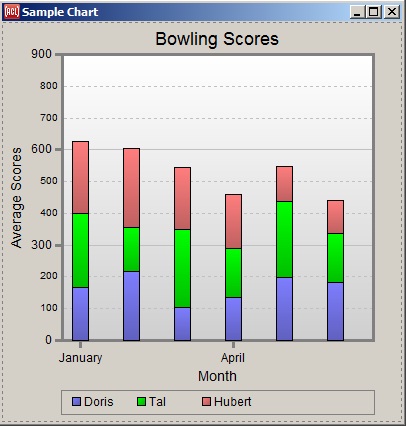
Before beginning the actual tutorial, here is a complete example of
typical code for creating a chart-widget and giving it some values. This is
to give you an overview of the kind of code that is involved.
Evaluate the following code and check out the chart that it creates. Here's how you can evaluate the pieces of code throughout this tutorial. If you are viewing this in the IDE's Allegro Help window, then you can select each form by clicking down just to the left of the opening parenthesis and then dragging just past the final closing parenthesis and releasing. You can then use the Tools | Incremental Evaluation command (control-E in Host mode) to evaluate the form in place. Otherwise you could first copy each form to the editor and evaluate it there. To evaluate the whole sequence of forms most quickly, open the file [Allegro directory]/examples/cg/chart-tutorial.cl. In that file you can simply press the numeric keypad's Enter key multiple times to evaluate successive forms and skip over the comment blocks. (Alternately use the main Enter key while holding down the Alt key.)
(let* ((width 400)
       (height 400)
       (chart-widget
        (make-instance 'chart-widget
          :chart-view :bar
          :title "Bowling Scores"
          :chart-objects #((:id :doris)
                           (:id :tal)
                           (:id :hubert))
          :item-axis (make-instance 'item-axis
                       :axis-label "Month"
                       :minor-tics-per-major-tic 3
                       :draw-minor-labels nil
                       :on-print-major-label
                       (lambda (month-symbol)
                         (format nil "~:(~a~)" month-symbol)))
          :value-axis (make-instance 'value-axis
                        :axis-label "Average Scores"
                        :margin-inside-axis-label 8
                        :range-bottom 0
                        :range-top 900
                        :major-tic-increment 300)
          :bar-chart-view (make-instance 'bar-chart-view
                            :values-are-stacked t
                            :bar-width 16
                            :bar-spacing 8)
          :chart-legend (make-instance 'chart-legend
                          :on-print-chart-object
                          (lambda (value)
                            (format nil "~:(~a~)" value)))
          :right-attachment :right
          :bottom-attachment :bottom
          :left 0 :top 0
          :width width :height height))
       (dialog (make-window :chart-tutorial
                 :class 'dialog
                 :title "Sample Chart"
                 :scrollbars nil
                 :interior (make-box-relative 0 40 width height)
                 :dialog-items (list chart-widget))))
  (dotimes (item-index 12)
    (dotimes (object-index 3)
      (set-chart-value
       chart-widget
       :item-id (aref #(january february march april may june july
                            august september october november december)
                      item-index)
       :object-id (aref #(:doris :tal :hubert)
                        object-index)
       :value (+ 100 (random 150)))))
  dialog)
This window should be displayed (but the values are chosen randomly so the heights of the bars will be different):
That example specifies the values of various chart properties as initargs to make-instance, which is the typical way to do it. In the tutorial we will usually specify property values by calling accessor functions instead, so you can see them change one at a time.
Notice in the code above how certain chart "sub-objects" such as the item-axis are created first, and then the sub-objects are passed as initargs to the chart-widget itself. (If you don't specify a particular sub-oject explicitly, a default one will be created automatically.)
After creating the chart-widget, set-chart-value is called a number of times to add data values to the chart.
After looking over that code a bit to get a general feel for it, you can close the chart dialog and proceed with the tutorial, where we will take things one step at a time.
In the IDE, a chart-widget can alternately be created interactively by using the chart-widget button on the Components Toolbar to place a chart-widget onto a form window in a project. The button shows two vertical bar-chart bars, one red and one blue. You can then modify the properties in the inspector as with other widgets.
First we'll make an empty chart-widget on a dialog, looking like this:
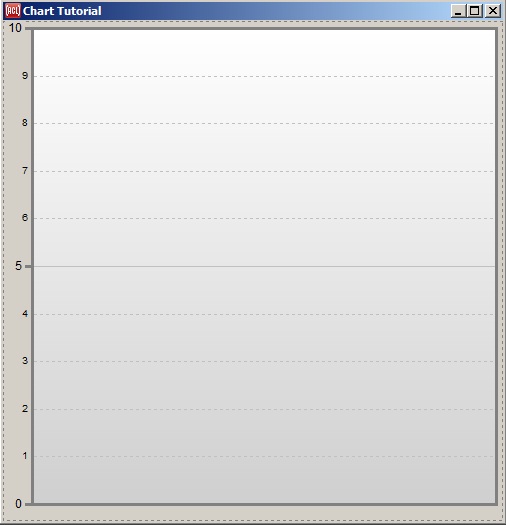
We'll reuse this
single chart-widget throughout the tutorial, and so we'll bind the
global variable *chart-widget* to the tutorial
widget to make it easy to modify it with top-level forms. And since
we'll be changing the state of this single widget through the
tutorial, it's important to evaluate the tutorial code sequentially,
since some steps undo a state that was created in the previous step.
And don't close the "Chart Tutorial" window until the end.
(let* ((width 500)
       (height 500)
       (chart-widget (make-instance 'chart-widget
                       :chart-view :bar
                       :right-attachment :right
                       :bottom-attachment :bottom
                       :left 0 :top 0
                       :width width :height height))
       (dialog (make-window :chart-tutorial
                 :class 'dialog
                 :title "Chart Tutorial"
                 :scrollbars nil
                 :interior (make-box-relative 0 40 width height)
                 :dialog-items (list chart-widget))))
  (setq *chart-widget* chart-widget)
  dialog)
You may want to move and resize the tutorial dialog that you just created so that it's beside this window where you're reading the tutorial. And you might want to watch the chart widget as you evaluate each expression so that you notice each change to the widget.
Remember not to close this "Chart Tutorial" dialog until you're done with the tutorial.
While the chart-widget has many properties for customizing its
appearance, you typically don't need to specify many of them because
they have reasonable default values. Above we initially specified
only :chart-view :bar to display the data as a bar
chart. (The default value is :line, which displays
the same data as a line graph instead.) As usual with widget
properties, most any chart-widget property can be set up at creation
time with an initarg, as in :chart-view :bar, or
changed any time later by calling the associated property-setting
function, as in (setf (chart-view *chart-widget*)
:bar).
Without specifying any further properties, we can immediately begin
adding values to the chart and see what happens. We do this by
calling the main chart-widget function, which is set-chart-value. Let's add an initial
value of 12.
(set-chart-value *chart-widget* :value 12)
Notice that the range of values on the vertical axis at the left automatically became 0 to 15, with additional tic marks for 5 and 10. The chart-widget by default will automatically choose "round" (decimal) values for the value range so that it contains all of the values that you've added so far. (To override this computed range, you could provide explicit values for the range-bottom and range-top properties.)
Adding additional values will continue to use the same range as long as the new values fit within it.
(progn
  (set-chart-value *chart-widget* :value 7)
  (set-chart-value *chart-widget* :value 14))
But adding a value outside the range will cause the range to be expanded as needed.
(set-chart-value *chart-widget* :value 37)
And of course negative values are no problem.
(set-chart-value *chart-widget* :value -4)
The vertical axis at the left is called the value axis. It always displays a continuous range of values between a minimum value and a maximum. The horizontal axis at the bottom, on the other hand, is called the item axis because it always displays a sequence of discrete items, which have values.
The value axis does not have to be the vertical one; the axes can be swapped by setting the chart-orientation property. So it's best to always speak of the value axis and the item axis rather the vertical and horizontal axes. And either axis can increase in the opposite direction via the invert-axis property.
Let's give these axes some labels to identify them. While we're at it, let's add titles to the whole chart as well. Normally you'd pass the initargs for these properties when creating the widget, but we're doing things one at a time here.
(progn
  (setf (axis-label (value-axis *chart-widget*)) "Value")
  (setf (axis-label (item-axis *chart-widget*)) "Item")
  (setf (title *chart-widget*) "Chart Tutorial")
  (setf (subtitle *chart-widget*)
    "Building a chart one step at a time."))
Notice how the body of the chart became smaller to make room for the new labels. The layout is another thing that the widget handles for you automatically, though there are properties for overriding things like the spacing between parts of the chart and the font sizes and so on.
Don't miss the special thing that we needed to do just now to modify a property of the value axis:
(setf (axis-label (value-axis *chart-widget*)) "Value")
We first needed to call value-axis to find the value axis sub-object of
the chart widget, and then call (setf axis-label)
on the value axis. There are two reasons for this design:
The complete set of sub-objects is item-axis, value-axis, bar-chart-view, line-graph-view, and chart-legend. If you're editing a chart-widget in the inspector, you will need to click on those sub-object names in the left column to get to their properties. That's not needed with most widgets.
So far we've used set-chart-value only to add new bars to our bar graph, but it's more versatile. You can also change the value of existing chart items at any time, for example. The bar labeled "3" looks a little too tall, so let's make it shorter by passing its index along with a new value.
(set-chart-value *chart-widget* :item-index 3 :value 10)
You might notice that the value axis range could be made smaller now, but that wasn't done automatically. The value range is adjusted automatically only when it needs to be larger for a few different reasons:
But you can tell the chart to recompute the range at any time by calling update-chart-widget.
(update-chart-widget *chart-widget*)
The value argument specifies the principal value for a chart-item, but there are additional types of values as well. When showing the bar-chart view, the widget can also display a from-value argument by making the bar begin at a different place than the usual "base value". Let's make the fourth bar begin at a non-zero value.
(set-chart-value *chart-widget* :item-index 3 :from-value 3)
Other auxilliary value types include high-value, low-value, and icon-size.
(set-chart-value *chart-widget* :item-index 1
                 :high-value 8 :low-value 4)
These values are drawn as T's by default, a style which is often used
to indicate error ranges. But high and low values have a couple of
other drawing styles as well. (The default is called
:tee.)
(setf (high-low-value-style (bar-chart-view *chart-widget*))
  :bar)

(setf (high-low-value-style (bar-chart-view *chart-widget*))
  :diamond)
Any values that you've added can be turned off by setting them to
nil instead of a number. So let's turn those
high and low values back off (one at a time this time, to show that
they are independent).
(set-chart-value *chart-widget* :item-index 1 :low-value nil)

(set-chart-value *chart-widget* :item-index 1 :high-value nil)
A set of bars could be used as a set of meters by updating their values repeatedly. Here's a quick example of modifying bars randomly. This example passes the update-now argument to redisplay the chart after every change for an animation effect, rather than letting them all get queued for a single redisplay at the end, as would normally happen. It also calls chart-value to read an existing value in order to modify it incrementatlly.
(dotimes (j 150)
  (dotimes (item-index 5)
    (set-chart-value *chart-widget*
                     :item-index item-index
                     :value (+ (chart-value *chart-widget*
                                            :item-index item-index)
                               (* (random 4)
                                  (sin (/ (* 2 pi (+ j (* 10 item-index)))
                                          50))))
                     :update-now t)))
Feel free to evaluate that one again if you didn't catch it well.
The item-index argument to set-chart-value can be any non-negative integer
to either add a new item or modify an existing one. It can also be
the keyword :new to add a new item just after all
existing items; that's the default behavior that we saw early on.
item-index can also be the keyword
:last, to modify the chart item that is currently
the "last" one, meaning the one with the highest index. This is
particularly useful when adding a series of values for multiple chart
"objects", which we'll learn about next.
Our chart has several bars so far, but these bars all refer to a
single "chart object". A chart object typically represents a
real-world thing of some sort, such as a bowler. A chart object will
have a sequence of values that are displayed in multiple "chart items"
along the item axis, such as an average bowling score for each month.
The chart-widget can
simultaneously display multiple objects by drawing multiple lines
across a line graph, or stacked bars or side-by-side bars in a bar
graph.
Use the object-index argument to set-chart-value to specify the object for the new value. The default value is 0, so you don't need to pass an object-index at all when there is only a single object in the chart.
Let's fill in some values for multiple objects to see what that looks like.
First we'll clear off those old values by setting the chart-items property to nil. (The chart-items property holds a tree of values that
the widget collected from all of the calls to set-chart-value. You could cons up this tree
yourself and place it into this property instead of calling set-chart-value, but that's probably
less convenient.)
(setf (chart-items *chart-widget*) nil)
Now we'll fill in a bunch of monthly bowling scores. This example
uses the special :last and :new
values of the item-index argument to add values
for several chart objects to one chart-item before making a new chart
item.
(progn
  (setf (axis-label (item-axis *chart-widget*)) "Month")
  (setf (axis-label (value-axis *chart-widget*)) "Average Score")
  (dotimes (item-index 24)
    (dotimes (object-index 5)
      (set-chart-value
       *chart-widget*
       :item-index (if (zerop object-index) :new :last)
       :object-index object-index
       :value
       (max 100
            (min 300
                 (+ (if (plusp item-index)
                        (chart-value
                         *chart-widget*
                         :item-index (1- item-index)
                         :object-index object-index)
                      (+ 100 (random 150)))
                    (random 21)
                    -10)))))))
That value argument did some fancy footwork to ensure that nobody's average changes by more than 10 points in one month, for a more realistic chart.
The incremental nature of each bowler's monthly score change may be more apparent if the bars are stacked vertically instead of resting side-by-side. That also saves space.
(setf (values-are-stacked (bar-chart-view *chart-widget*))
  t)
Or even more apparent if we were looking at a line graph instead of a bar chart.
(setf (chart-view *chart-widget*) :line)
You have probably noticed that a legend box appeared at the bottom of
the chart for the first time when we used multiple chart objects. The
reason is that the default value of the draw-legend property is
:when-multiple-objects, since you typically don't
need a legend for a single object. The chart-legend sub-object has various properties
to control the layout of the legend.
Now this chart isn't particularly meaningful when each chart item and each chart object is labeled with an integer. That's the default behavior, but you can specify any labels that you like for each index.
First let's associate a real-world object with each chart object index. Watch the legend as you evaluate this form.
(setf (chart-objects *chart-widget*)
  (vector (list :id :doris) (list :id :cloyd)
          (list :id :hubert) (list :id :tal)
          (list :id :myrtle)))
The chart-objects property value can be either a vector or a list. Each object's plist within that sequence must be a list, though. The ID for each object is part of a plist because an object can have additional attributes, such as which of two value axes it belongs with (that's covered at the very end of the tutorial).
Adding chart object IDs causes the legend to print the IDs rather than their indices. By default the object IDs are printed with princ-to-string. But since people's names are normally capitalized, we should give the legend a printer function that converts the real-world object into a pretty string to display for it in the legend. Watch the legend again as you evaluate this form.
(setf (on-print-chart-object (chart-legend *chart-widget*))
  (lambda (value)(format nil "~:(~a~)" value)))
We can similarly add meaningful month labels to the chart item tic marks, to replace the default indices. There are two ways to do this. One way is to supply a printer function that converts directly from an item's index to the string to display. If we know that the values we added began at January 2005, then our function can calculate the month and year of each index, and format a string from those two values.
Watch the item axis as you evaluate this expression.
(setf (on-print-major-label (item-axis *chart-widget*))
  (lambda (value)
    (format nil "~:(~a~) ~a"
      (aref #(:jan :feb :mar :apr :may :jun :jul
                   :aug :sep :oct :nov :dec)
            (mod value 12))
      (+ 2005 (floor value 12)))))
By default, axis labels will wrap at spaces to save space. You can turn that off by setting the major-label-wrapping and/or minor-label-wrapping properties of the axis object.
Note by the way that on Windows labels of horizontal axes can be displayed at an angle: see major-label-angle and minor-label-angle.
That was a little bit tricky writing an on-print-major-label function to convert item indices to item label strings, because the item indices aren't very meaningful. Another approach is to give each chart item a meaningful ID when the item is created. Then the meaningful ID will be passed to the printer function, which it can interpret more easily. (The default ID is the index.)
This second approach would even be necessary if the items are not regularly-spaced values with a simple mapping from their indices to their meanings. Let's say that our bowlers aren't in a league and instead bowl occasionally whenever they get the urge. Let's furthermore pretend that they've already got a record of recent scores stored away in a list like the following.
(defparameter *scores*
  '(((2005 dec 12) :doris 164 :tal 152)
    ((2006 feb 3) :doris 168 :tal 145 :hubert 97)
    ((2006 feb 18) :doris 160 :tal 173 :hubert 110 :myrtle 124)
    ((2006 jun 17) :doris 172 :tal 160 :myrtle 142)
    ((2006 aug 31) :tal 170 :myrtle 135)
    ))
We could use each date list like (2005 dec 12) as the ID of each chart
item as we add it to the chart. Then all that the printer function
needs to do is convert the date list to a pretty string. Let's undo
the current chart values and printer function, and add values from our
master *scores* list.
This example also passes an object ID instead of an object index. We already set up the object ID's earlier when we set the chart-objects property so that the object ID's would appear in the legend.
(progn
  (setf (chart-items *chart-widget*) nil)
  (setf (on-print-major-label (item-axis *chart-widget*)) nil)
  (let* (date person score)
    (dolist (event *scores*)
      (setq date (pop event))
      (loop (unless event (return))
            (setq person (pop event))
            (setq score (pop event))
            (set-chart-value *chart-widget*
                             :item-id date
                             :object-id person
                             :value score)))))
But those date ID's don't look very nice on the tic marks, so let's add a printer function back on, though this time it can be simpler by acting directly on a meaningful ID rather than on an index.
(setf (on-print-major-label (item-axis *chart-widget*))
  (lambda (value)
    (format nil "~:(~a~) ~a ~a"
      (second value)(third value)(first value))))
When the item-id argument is passed and no item-index argument is, then set-chart-value will try to find an existing chart-item that has that ID. If it finds one, then it modifies that existing chart-item, and otherwise it creates a new chart-item at the end. That's why we only needed to specify item-id and object-id to both create each new item and also to give an existing item additional values for the other chart-objects.
A subtle point: it's OK to use a list as an item ID because the default chart-item-id-equality-test is the function equal, which is good for comparing lists. For some types of ID's you may need to change that property (which in the inspector is on the Events tab).
If you already have all of your values stored in a readily-accessible place such as an array, then you may want to use an alternative to set-chart-value, which is to supply a chart-value-returner function. This function will get called whenever a chart item is actually drawn (usually due to it being uncovered and/or scrolled into view). Your function should then look up the data value wherever it's already stored and return it. This avoids having the chart-widget code internally cons up a tree of values that you pass individually to set-chart-value.
Let's test this out by supplying a chart-value-returner function that looks up the
requested value in our *scores* list. The
arguments to our function will be the chart-widget itself, the value
type (such as :value for the main value, as when
calling set-chart-value), the
item-index, the object-index, and the object-id. Our
*scores* list records value by the object-id, so
we'll look them up using that rather than the object-index. Using a
chart-value-returner means
that we no longer have chart-items with item-id's, and therefore our
printer function will once again receive item indices, so we have to
replace our tic label printer function again with one that takes
indices.
First we'll clear the accumulated data in the chart-items property, or else it would override the chart-value-returner function.
(setf (chart-items *chart-widget*) nil)
And now we'll provide a chart-value-returner that will supply the same values lazily when needed, without ever accumulating data in the chart-items property. Since there is no longer an accumulated list of items from which a value range would be automatically computed, we also must set the chart-items-max-index property to tell the widget how many items it should draw.
When the value-type argument is
:id, we will return the date list that we use as an
item ID, and our on-print-major-label function will create a tic
label string from that ID. When the value-type
argument is :value, we will return the data value
for the specified object and item. We can just ignore other
value-type arguments since we don't care to
display those values.
(progn
  (setf (chart-items-max-index *chart-widget*) 4)
  (setf (chart-value-returner *chart-widget*)
    (lambda (chart-widget value-type item-index
                          object-index object-id)
      (declare (ignore chart-widget object-index))
      (let* ((score-item (nth item-index *scores*)))
        (case value-type
          (:id (first score-item))
          (:value (getf (rest score-item) object-id)))))))
Of course, using an array would be more efficient than a list, but this is just a demo.
Even if you have no data on hand, you could still use a chart-value-returner function to graph a mathematical function, for example. The item indices will always be integers beginning at zero, though, so you need to translate those indices into the actual X values of interest. Let's try a sine wave.
(let* ((num-steps 16)
       (item-axis (item-axis *chart-widget*))
       (value-axis (value-axis *chart-widget*)))
  (setf (on-print-major-label item-axis) 'princ-to-string)
  (setf (axis-label item-axis) "Degrees")
  (setf (axis-label value-axis) "Sin (stacked)")
  (setf (values-are-stacked (line-graph-view *chart-widget*)) t)
  (setf (chart-items-max-index *chart-widget*) num-steps)
  (setf (chart-value-returner *chart-widget*)
    (lambda (chart-widget value-type item-index
                          object-index object-id)
      (declare (ignore chart-widget object-index object-id))
      (let* ((degrees (* (/ item-index num-steps) 360)))
        (case value-type
          (:id (float degrees))
          (:value (sin (/ (* degrees 2 pi) 360))))))))
If the chart-value-returner property remains the same function, but you happen to know that something has changed that will cause the function to return different values, then you can call update-chart-widget to display the new values. That function will uncache data that was computed for the old values, and invalidate the widget so that the new values will be drawn. To cause the new values to be drawn immediately, pass the update-now argument.
Here's a variation of the sine wave example that animates the wave in
this way. Here the chart-value-returner function closes over a
frame variable that is later incremented to cause
the chart-value-returner to
draw different values each time the chart is redisplayed.
(let* ((num-frames 60)
       (frame 0)
       (num-steps 16)
       (value-axis (value-axis *chart-widget*)))
  (setf (range-bottom value-axis) -5)
  (setf (range-top value-axis) 5)
  (setf (chart-items-max-index *chart-widget*) num-steps)
  (setf (chart-value-returner *chart-widget*)
    (lambda (chart-widget value-type item-index
                          object-index object-id)
      (declare (ignore chart-widget object-index object-id))
      (let* ((degrees (* (/ item-index num-steps) 360)))
        (case value-type
          (:id (float degrees))
          (:value (* (sin (+ (/ (+ (* degrees 2 pi)
                                   (/ (* 360 frame pi) num-frames))
                                360)))
                     (1- (/ frame (floor num-frames 2)))))))))
  (loop (when (> frame num-frames)(return))
        (update-chart-widget *chart-widget* :update-now t)
        (incf frame)))
Here's a more interesting variation that we won't attempt to explain.
(let* ((num-frames 60)
       (frame 0)
       (num-steps 16)
       (value-axis (value-axis *chart-widget*)))
  (setf (range-bottom value-axis) -5)
  (setf (range-top value-axis) 5)
  (setf (chart-items-max-index *chart-widget*) num-steps)
  (setf (chart-value-returner *chart-widget*)
    (lambda (chart-widget value-type item-index
                          object-index object-id)
      (declare (ignore chart-widget object-index object-id))
      (let* ((degrees (* (/ item-index num-steps) 360)))
        (case value-type
          (:id (float degrees))
          (:value (* (sin (/ (* degrees frame .18 pi) 360))
                     (1- (/ frame (floor num-frames 2)))))))))
  (loop (when (> frame num-frames)(return))
        (update-chart-widget *chart-widget* :update-now t)
        (incf frame)))
Well, that was all jolly good fun. But now to back up and cover some other chart-widget properties. First we need to restore the more boring sine wave.
(let* ((num-steps 16)
       (item-axis (item-axis *chart-widget*))
       (value-axis (value-axis *chart-widget*)))
  (setf (on-print-major-label item-axis) 'princ-to-string)
  (setf (axis-label item-axis) "Degrees")
  (setf (axis-label value-axis) "Sin (stacked)")
  (setf (values-are-stacked (line-graph-view *chart-widget*)) t)
  (setf (chart-items-max-index *chart-widget*) num-steps)
  (setf (chart-value-returner *chart-widget*)
    (lambda (chart-widget value-type item-index
                          object-index object-id)
      (declare (ignore chart-widget object-index object-id))
      (let* ((degrees (* (/ item-index num-steps) 360)))
        (case value-type
          (:id (float degrees))
          (:value (sin (/ (* degrees 2 pi) 360))))))))
The chart-widget and its sub-objects have many additional properties that determine the final look of the chart. Most of these should be fairly obvious, or easy enough to figure out by playing with them in the inspector. One final matter that may not be so obvious, though, is major and minor tic marks. Both the value axis and the item axis can have major tic marks, tic labels, and grid lines and/or minor ones between successive major ones. The value axis tends to pick out "round" values for these properties for you, but you are likely to want to set these yourself for the item axis where the widget can't know what values would fit your arbitrary chart items.
In particular, you may want to set the minor-tics-per-major-tic property of the item-axis. This is always 1 by
default, and so all of the tics along the item axis are major ones.
If you happen to know that each of your items represent a quarter of a
year, then you may want to set minor-tics-per-major-tic to 4 so that there will
be a major tic for each year, with three minor tics in between for
each quarter.
Let's try that with our sine wave, where a minor-tics-per-major-tic of 4 will place a major tic at each 90-degree point. And by turning off minor labels, we will cause the values to be closer together since they don't have to leave room for all those minor labels.
(let* ((item-axis (item-axis *chart-widget*)))
  (setf (minor-tics-per-major-tic item-axis) 4)
  (setf (draw-major-grid-lines item-axis) t)
  (setf (draw-minor-grid-lines item-axis) t)
  (setf (draw-minor-tics item-axis) nil)
  (setf (draw-minor-labels item-axis) nil))
Another way to save tic label space is to draw only every N'th label. So we could decide to draw minor labels again, but only every second one. Notice that a minor label will never be drawn on the same item where a major label is drawn (or even where a major tic is drawn).
(let* ((item-axis (item-axis *chart-widget*)))
  (setf (draw-minor-labels item-axis) t)
  (setf (minor-label-frequency item-axis) 2))
One more interesting property to mention: If your data doesn't fill the entire width of your chart, you may want to make it stretch to fit by turning on the fit-chart-items property.
(setf (fit-chart-items *chart-widget*) t)
Here's how you can save the current image of the chart-widget as a BMP
file. This works with any Common Graphics window other than an
os-widget-window, though if
the double-buffered property
is not turned on then the window must be exposed at the time. (A
chart-widget always has
double-buffered turned on.)
This example will save a chart as a BMP file and then show it in whatever program is registered on your machine to display BMP files.
(let* ((pathname (merge-pathnames "chart.bmp"
                                  (sys:temporary-directory))))

  ;; Create a pixmap from the chart's window, and then write it to a
  ;; BMP file.
  (save-pixmap (get-pixmap (window *chart-widget*))
               pathname)

  ;; Show the saved pixmap in a third party program.
  (run-shell-command
   (windows-command-for-document-type "bmp" :path pathname)))
We'll close the tutorial with a couple of standalone examples that don't follow from the sequence above. So feel free to close the Chart Tutorial window at any time now.
First an example similar to the one at the top. This will illustrate some of the finer points of major and minor tics and labels. Specifically, we'll show monthly data with three months per minor tic and four quarters per major tic, and offset the major tic labels so that they are drawn in the middle of the years that they represent rather than at the beginning of the years.
We recommend that you study the various properties in this code to see how they work together.
(let* ((width 800)
       (height 400)
       (object-ids #(:doris :hubert :myrtle :cloyd
                           :tal :gladys))
       (chart-widget
        (make-instance 'chart-widget
          :chart-view :line
          :title "Bowling Scores"
          :chart-objects (map 'vector (lambda (id)
                                        (list :id id))
                           object-ids)
          :item-axis (make-instance 'item-axis
                       :axis-label "Date"

                       ;; This one is for data values
                       ;; per minor tic, which in this
                       ;; case is months per quarter.
                       :minor-tic-increment 3

                       ;; A minor tic for each quarter of the year.
                       :minor-tics-per-major-tic 4

                       ;; Draw each major label AFTER its tic
                       ;; mark by half of a major increment.
                       ;; This draws the year in the middle
                       ;; of the set of values for the year.
                       :draw-major-labels :after

                       :draw-minor-labels t
                       :draw-major-grid-lines t
                       :draw-minor-grid-lines t

                       ;; You wouldn't normally spell out each year
                       ;; in English words, but we do so here to
                       ;; illustrate how a major tic label can
                       ;; span across multiple minor tic labels.
                       :major-label-wrapping nil
                       :on-print-major-label
                       (lambda (month-and-year)
                         (format nil "~:(~r~)"
                           (second month-and-year)))

                       :on-print-minor-label
                       (lambda (month-and-year)
                         (format nil "~:(~a~)"
                           (first month-and-year)))
                       )
          :value-axis (make-instance 'value-axis
                        :axis-label "Average Scores"
                        :margin-inside-axis-label 8
                        :major-tic-increment 300)
          :line-graph-view (make-instance 'line-graph-view
                             :values-are-stacked nil
                             :draw-icons nil)
          :chart-legend (make-instance 'chart-legend
                          :on-print-chart-object
                          (lambda (value)
                            (format nil "~:(~a~)" value)))
          :right-attachment :right
          :bottom-attachment :bottom
          :left 0 :top 0
          :width width :height height))
       (dialog (make-window :chart-tutorial
                 :class 'dialog
                 :title "Sample Chart"
                 :scrollbars nil
                 :interior (make-box-relative 0 40 width height)
                 :dialog-items (list chart-widget))))
  (dotimes (item-index 36)
    (dotimes (object-index 6)
      (set-chart-value
       chart-widget
       :item-id (list (aref #(january february march april may
                                      june july august september
                                      october november december)
                            (mod item-index 12))
                      (+ 2004 (floor item-index 12)))
       :object-id (aref object-ids object-index)
       :value (max 100
                   (min 300
                        (+ (if (plusp item-index)
                               (chart-value
                                chart-widget
                                :item-index (1- item-index)
                                :object-index object-index)
                             (+ 100 (random 150)))
                           (random 21)
                           -10))))))
  dialog)
And, finally, an example to show the option for two value axes. Many charts use two value axes with different ranges (and often different units) to plot two lines close together to see how well they correlate. This can be done with the chart-widget by supplying a chart-axis object for the value-axis-2 property, along with the usual one for the value-axis property. The two axes work exactly the same way.
The key value here is the chart-objects property, which specifies that the :temperature value goes with the value-axis number 2. (Any other value means value axis number 1.)
          :chart-objects #((:id :doris)
                           (:id :tal)
                           (:id :temperature :value-axis 2))
So let's see how room temperature affects bowling performance. This code demonstrates a few different ways to tell the viewer which graph lines go with each axis. These include color matching as well as textual notes in the axis labels and legend.
(let* ((width 400)
       (height 400)
       (data #(
               ((2005 sep 12) :doris 164 :tal 156 :temperature 72)
               ((2006 jan 31) :doris 155 :tal 162 :temperature 68)
               ((2006 feb 18) :doris 150 :tal 173 :temperature 66)
               ((2006 aug 18) :doris 172 :tal 148 :temperature 79)
               ((2006 sep 12) :doris 168 :tal 152 :temperature 77)
               ))
       (value-axis-2 (make-instance 'value-axis
                       :axis-label "Temperature (red dashes)"
                       :draw-minor-grid-lines nil
                       :draw-minor-labels nil
                       :axis-width 2
                       :axis-color red
                       :major-grid-line-color
                       (make-rgb :red 255 :green 196 :blue 196)
                       :major-label-color dark-red))
       (chart-widget
        (make-instance 'chart-widget
          :title "Bowling Scores and Room Temperature"
          :footnote (format nil "Doris bowls better when it's warmer, ~
                        while Tal bowls betters when it's cooler.")
          :chart-view :line
          :chart-objects #((:id :doris)
                           (:id :tal)
                           (:id :temperature :value-axis 2))
          :item-axis (make-instance 'item-axis
                       :on-print-major-label
                       (lambda (value)
                         (format nil "~:(~a~) ~a ~a"
                           (second value)(third value)
                           (first value))))
          :value-axis (make-instance 'value-axis
                        :axis-label "Scores"
                        :axis-width 2
                        :axis-color blue
                        :major-label-color dark-blue
                        :minor-label-color dark-blue)
          :value-axis-2 value-axis-2
          :line-graph-view (make-instance 'line-graph-view
                             :line-dashings
                             '(:solid :solid :dash)
                             :line-colors
                             '(blue dark-green red))
          :fit-chart-items t
          :chart-items-max-index (1- (length data))
          :chart-value-returner
          (lambda (chart-widget value-type item-index
                                object-index object-id)
            (declare (ignore chart-widget object-index))
            (let* ((item-entry (elt data item-index)))
              (case value-type
                (:id (first item-entry))
                (:value (getf (rest item-entry) object-id)))))

          ;; The legend's print function indicates which
          ;; value goes with each axis.
          :chart-legend
          (make-instance 'chart-legend
            :on-print-chart-object
            (lambda (value)
              (format nil "~:(~a~) (~a axis)"
                value (case value
                        (:temperature "right")
                        (t "left")))))

          :right-attachment :right
          :bottom-attachment :bottom
          :left 0 :top 0
          :width width :height height))
       (dialog (make-window :bowling-and-temperature
                 :class 'dialog
                 :title "Bowling Scores and Temperature"
                 :scrollbars nil
                 :interior (make-box-relative 0 80 width height)
                 :dialog-items (list chart-widget))))

  ;; A final animation:
  ;; Reverse the temperature axis several times to show
  ;; correlations in each orientation.
  (dotimes (j 4)
    (sleep 2)
    (setf (invert-axis value-axis-2) t)
    (sleep 2)
    (setf (invert-axis value-axis-2) nil))

  dialog)
As the chart clearly shows, Doris bowls better when it's hotter and Tal bowls better when it's colder. (You might show this chart to Doris and Tal and watch them fight over the thermostat.)
That's the end of the tutorial. You may want to inspect some charts and play with the properties that weren't covered here. Happy charting!
Copyright (c) 1998-2022, Franz Inc. Lafayette, CA., USA. All rights reserved.
This page was not revised from the 10.0 page.
Created 2019.8.20.
| Allegro CL version 10.1 Unrevised from 10.0 to 10.1. 10.0 version | ||||||||