
|
Allegro CL version 11.0 | ||||||||
This document describes installation of Enteprise and Professional Allegro Common Lisp and related products. Installation of the free Allegro Common Lisp Express Edition is described in another document (express-installation.html).
Allegro CL 11.0 is provided in two versions on most platforms: an SMP version which can use more than one hardware processor at a time and a non-SMP version which uses only one processor. These two versions have separate downloads and their fasl files (output of the Lisp compiler) are not compatible: you download and install each separately. Please also note:
For each distribution, the installation process of Allegro CL 11.0 is similar to installation of previous versions of Allegro CL. In some cases, the process has been simplified. Linux and Apple macOS users no longer need to install GTK (and XQuartz on macOS), as the IDE is purely browser based on those platforms.
Once Allegro CL is installed, the following documents are a good place to start:
release-notes.html: the Release Notes for Allegro CL and all add-on products.
index.html: this document is the introduction to and overview of the documentation and has links to all other documents.
startup.html: this document describes how to start Allegro CL and what the startup procedure is. See particularly Starting on Windows machines in that document.
cgide.html: this document is the introductory document for Common Graphics and the Integrated Development Environment. It contains pointers to the rest of the CG and IDE documentation.
eli.html: this is the documentation for the Emacs-Lisp interface (ELI). While the IDE can provide a substitute for running Allegro CL as a subprocess of Emacs, many users like to use Emacs along with the IDE. The Emacs-Lisp interface provides many commands etc. for facilitating running Allegro CL in that way. See particularly What should be in your .emacs file in that document for information on what to add to your .emacs in order to ensure the Emacs-Lisp interface code is loaded.
Some users prefer to use SLIME, and we feel it is a good alternative to ELI. In recent years, SLIME has seen more development than ELI.
SLY is a fork of SLIME and is an alternative to both SLIME and ELI.
Both SLIME and SLY are fine alternatives to ELI.
c:\acl11.0\. When we describe a pathname including the Allegro directory, we typically surround it in brackets, for example: the directory where you put patch files is [Allegro directory]/update/.The size of the Allegro directory, after installation, is approximately 500 Mbytes, but it varies by platform. More space may be required during installation for temporary files.
The list of supported operating systems can be found in the release notes for the version of Allegro you are installing.
Before installing a new version of Allegro CL, you do not need to uninstall the previous version.
Note: on Windows, installation updates the registry so that extensions (such as .lpr and .dxl) refer to the most recently installed version.
You must have a license file to use Allegro CL and its associated products. The license file is not included with the regular distribution (it is included with the Express Edition and pre-releases of Enterprise/Professional). The license file also controls access to certain features in the product.
Professional and Enterprise customers with current support agreements should have received an email message with instructions on how to obtain their license file. The email contains a URL from which the license file can be retrieved. If you are unable to download the license file from this email, let us know.
You should retrieve the license as soon as you receive the email, even if you have not downloaded the software, so the license file will be ready when you install Allegro CL. The name of the file, when it is installed, must be devel.lic.
The license file is a text file which includes plain and encrypted text parts. See The Allegro CL license file in startup.html for a sample, if you have problems starting Allegro and think your license file may be corrupted.
If you upgrade your license or purchase additional add-on products, you will be sent new email with instructions for retrieving a new license file. Placing the new license file in the Allegro directory is all you must do to use the upgraded version of the new add-on products. You should regenerate any applications which were built with the old license file, however.
If you do not have a license file or the license file you have does not seem to license the correct product mix, contact your Account Manager.
If you have the Express Edition, see express-installation.html.
Here are the installation steps:
Download the software: you should have received email instructions for downloading the software. See the information above about how to contact us if you have a problem with your license file or downloading.
In all cases, the download is a single file. The file's extension is exe for Windows, dmg for macOS, and tbz2 for Linux and FreeBSD.
Install the software: skip to the appropriate section for your platform:
Install the license file: If you do not already have the license file, then please read obtaining a license file above. You cannot use the product until you have installed a valid license file.
Note: the license file is included in the Express Edition.
Installing the license file on Macs requires special steps, see below. On all other platforms you install the license file by copying it to the Allegro installation directory and making sure it is named devel.lic.
Test the installation: now that everything is installed, it is time to make sure it works. See testing the installation worked below.
Install OpenSSL libraries (OPTIONAL): see Installing OpenSSL below for more information.
Download patches: patches (correcting bugs or providing new features) are released for Allegro CL regularly. For normal usage, we recommend that you update regularly, including immediately after installation. See The update program below for information on getting and installing patches.
On some operating systems, you may need to elevate to administrator privileges to perform the update process.
On Windows, there is a menu item update.exe (download new updates + rebuild images) that will perform both tasks (and ask for administrator privileges if it needs to be administrator to do so).
Install Emacs and ELI (OPTIONAL): see our website for details, if you want to install GNU Emacs or ELI.
The installation on UNIX uses built-in command tar:
$ cd /usr/local
$ tar jxf acl11.0-linux-x64.tbz2
You may choose any parent directory for the installation. Just change the first cd command above to include your desired parent location. The above command will create a new directory with a name something like acl11.0.64. In this case, the Allegro installation directory would be /usr/local/acl11.0.64/.
Copy the license file into the Allegro directory and change its name to devel.lic.
See the testing the installation section below.
Newer versions of Glibc (we know it happens with version 2.41) might cause problems. For example, if you see this error:
/usr/local/acl11.0express.64/libacli11029t6.so:
cannot enable executable stack as shared object requires: Invalid argument
This is due to security changes in Glibc for which we made a patch in March 2025 for version 11.0.
There is a bit of a chick and egg problem with patching this: the patch mechanism runs Allegro CL to patch itself and if Allegro CL does not run then it cannot patch itself. In this case, you can fix the issue without patching by doing this:
$ cd /usr/local/acl11.0.64/
$ execstack -c *.so
This will clear the executable stack flag of the shared libraries that Allegro CL uses.
NOTE:: if execstack does not exist on your system, then you will need to install it. It is out of the scope of this document to specify how this is done for your particular flavor of Linux.
Exit any existing running Allegro CL instances. Installation is most likely to be trouble free if there are no other Allegro CL instances running.
Execute the downloaded installer. This will start the installation program. Each dialog in the installation program has a different purpose (agree to license, choose installation directory, etc). Click Next until you are presented with a Finish button, selecting your preferred options along the way.
A dialog may appear when the installation is finished saying you must restart the machine to complete the installation and asking if you want to do this now. Restarting is not always necessary. Clicking Cancel ends the installation process and does not restart the machine. If restarting is required and you choose to delay it, do not use Allegro CL until you have restarted. We assume in the subsequent steps you have restarted if necessary.
Copy the license file into the Allegro directory and change its name to devel.lic.
See the testing the installation section below.
NOTE: see this note about updating in the presence of OpenSSL 3.3.
(Be sure to see the macOS 14 (and later) permission fix for updating Allegro CL below.)
Allegro CL on macOS is distributed both as a dmg file and as a zip file. This section will focus on the dmg installation, as the zip installation is for advanced users who should know how to use and install it.
Open the dmg file you downloaded. When you do, you will see something like this:
To install, you drag the AllegroCL64 icon to the /Applications folder icon. (The picture shows AllegroCL64 but the actual name may differ depending on what you downloaded). You may be asked to authenticate during the copy to /Applications. The Finder will show a progress bar during the copying process, which should take no more than a few seconds. Once it is done, you can close the Finder window for the dmg and unmount it (eject the icon on your Desktop, etc). You should now see a new application in /Applications for what was just installed. The name will depend on which version you installed, but it will always start with AllegroCL.
Installing the License File on the Mac
NOTE: Express users can ignore this section, as the license file is already included in the installation.
You must let Allegro CL install the license file just after installation by starting Allegro CL without the license and telling it where the license can be found. If you copy the license file into the /Applications/AllegroCL64.app/Contents/Resources/ directory and then try to start Allegro CL, macOS will think the application is damaged and will not start. Once you have run Allegro CL the first time and the license has been installed, you can copy new licenses in (when, for example, you add new features and get one with a later expiration) to replace the existing one. If you delete the license file, starting Allegro CL will again prompt you for its location.
As noted, the license file lives in the Contents/Resources/ subdirectory of the main application directory:
/Applications/AllegroCL64.app/Contents/Resources/devel.licIMPORTANT: if the license file is invalid or becomes corrupted and you try to start the IDE from Finder, then you will briefly see the icon for Allegro CL in the Dock but the IDE will not start properly. (If the license file is simply not there, you will be prompted for its location.) To confirm the reason for the IDE not starting, run it from a Terminal to see the error message (use the correct folder name if it differs from AllegroCL64.app, script is the correct startup script when running in a terminal to start the IDE):
$ /Applications/AllegroCL64.app/Contents/Resources/script
Looking for valid 64-bit Mac OS (Apple Silicon) license file, but found
invalid license file
(/Applications/AllegroCL64SMP.app/Contents/Resources/devel.lic).  Lisp
cannot start up.
$
This means you have a corrupt or improperly installed license file.
See the testing the installation section below.
If you have no interest in using the SSL module in Allegro CL or deploying Common Graphics applications via a web browser, then you may skip this entire section and its subsections. Otherwise, there is very important information in this section, especially for deployment of applications.
Allegro CL uses OpenSSL for the See Secure Socket Layer (SSL) protocol and the :ssl module. It is the basis for HTTPS communication using AllegroServe.
The IDE uses SSL communication but has its own version of the OpenSSL libraries, if none are found via the mechanisms discussed here. This means developers who need a specific version of OpenSSL can configure their environment so the IDE uses it, and users who do not use and install OpenSSL can still use the IDE.
The :ssl module, when loaded, generally finds the newest installed version of OpenSSL libraries and loads them. There are exceptions to this (see below).
If you load foreign libraries which themselves use OpenSSL, either in a development image or in a delivery (application) image, those libraries must be compatible with the version of OpenSSL used by the :ssl module. If they are not, the :ssl module cannot be used.
In general, we support currently supported versions of OpenSSL, which, at the time of the 11.0 release, are 1.0 (Linux only), 1.1, 3.0 and 3.1.
OpenSSL 1.0 is only supported on Linux, even though official support for it has been dropped, because Red Hat themselves are maintaining it for their customers. This means that some Linux versions, CentOS and RHEL variants (e.g. Rocky Linux), will continue to support OpenSSL 1.0 for some time. When native operating system support is dropped on these platforms, we will cease to support it on those platforms.
On Linux and FreeBSD, we strongly recommend that you use the native operating system version of OpenSSL with Allegro CL.
On macOS and Windows, the situation is more complex. See the sections below for each of these platforms for a detailed explanation of how OpenSSL is installed on those platforms.
There are two issues with deployment:
Installation of OpenSSL by users of the application
Unless you include a version of OpenSSL with your application, users will be required to install it before they can use the application.
See the next section for considerations on including it or not, but if you have determined you want to include it, then merely including the specific OpenSSL libraries loaded when (require :ssl) is evaluated in the main application directory is enough.
Security of data touched by the application
Because SSL is used to secure communications, it is imperative that it be secure. OpenSSL, like all software, can have vulnerabilities. It is vital that any vulnerabilities in OpenSSL be patched quickly as soon as they are discovered. There are many organizations looking for vulnerabilities in OpenSSL and updates with security fixes are common.
When you build an application that uses OpenSSL, the product of the application build is a set of files in a directory. By design, OpenSSL libraries are not included in that directory. It is also up to you to inform your customers about the security implications of OpenSSL and keeping it up to date.
What happens when OpenSSL is not found
The startup of a generated application that does not have a compatible OpenSSL installed and available will trigger an error page in the user's default browser. The default version of this error page is not suitable for end users and it should be replaced with one which is.
There are two templates for this error page that can be used to construct an application-specific error page. The files are ssl-not-found.html and ssl-not-found-app.html; both live in the Allegro installation directory. The former is used by the IDE if it does not find OpenSSL when it starts up, and the latter is the default used by CG/JS applications generated with Allegro CL's IDE. The name of the error file in the generated application is ssl-not-found.html. Please read the discussion of adding your own version of ssl-not-found.html to your IDE project.
macOS-specific issues for deployment
On macOS, be aware there are Finder issues for deployment of applications.
Specifying the location of shared libraries on macOS can be tricky. See our discussion of OS-Specific Library Search Path.
Many linux platforms and the Mac include OpenSSL as part of the regular OS installation. On such platforms, no action is typically required to use OpenSSL with Allegro CL. If your platform does not include OpenSSL libraries or if for some reason you want a different version than that supplied by the OS, get further information at openssl.org. See Secure Socket Layer (SSL) in socket.html for further information and instructions on how to ensure Allegro CL can find the OpenSSL libraries when required.
NOTE: see this note about updating in the presence of OpenSSL 3.3.
Long ago Apple made it impossible for developers to use the macOS native SSL libraries. For this reason, you must install another version of OpenSSL. We recommend you use Homebrew or Macports. We prefer Homebrew because it is easier to install and update. Also, Homebrew, unlike MacPorts, does not require root installation. Homebrew merely requires administrator rights for installation.
Before installing either Homebrew or MacPorts
You should install Apple's Command Line Developer Tools, using the following command in a Terminal:
$ xcode-select --installThis process takes a few minutes and installs the Xcode compilers. It makes installing Homebrew or MacPorts packages easier.
Also, updates to Command Line Developer Tools will be handled in the usual way on macOS, to ensure they stay up to date.
Homebrew installation:
Install OpenSSL:
$ brew install opensslNote: from time to time, a new major version of OpenSSL is released. When 3.1.0 came out, it appeared in the updates to Homebrew quickly. New versions of OpenSSL require patches for our :ssl module to properly load them, so you might need to keep installed an older version of OpenSSL. On Homebrew, this is easy. The example below is to illustrate how to use an older version of OpenSSL until Allegro CL supports the newer version.
For example, to install OpenSSL 1.1 and ignore the also installed OpenSSL 3.1:
$ brew install [email protected]Then, to ensure that OpenSSL 1.1 is being used, do this before you execute Allegro CL's IDE:
$ PATH=$(brew --prefix [email protected])/bin:$PATH /Applications/AllegroCL64/Contents/Resources/scriptWe have revealed some information not discussed thus far: the actual program invoked on macOS for the application installed in /Applications/ is called
script.
MacPorts installation:
Install OpenSSL:
# port install opensslFinder issues for application deployment
When starting an application from the Finder, it is important to know that environment variables you set in your BASH or shell initialization files are not known by the Finder. The Finder environment is not the same as the shell/command line environment. For this reason, any setting you may have for DYLD_LIBRARY_PATH to allow Allegro CL to find OpenSSL libraries will not be known by Allegro CL, or your application, when started via the Finder.
For this reason, the Allegro CL IDE is actually a shell script which sets DYLD_LIBRARY_PATH so the :ssl module can be loaded. When you deploy on macOS, you will need to do something similar if you want users to execute your application from the Finder.
Microsoft does not maintain a version of OpenSSL for developers to use. Unfortunately, there is no easily available, free version of OpenSSL for Windows. We do, however, make builds of OpenSSL available for purposes of testing your application. We build from official sources and make no changes to them. WARNING:
DO NOT DEPLOY YOUR APPLICATION WITH THIS VERSION of OpenSSL or use it in situations where security is important. We are not responsible for your application being exploited by security vulnerabilities which exist in this version of OpenSSL. We DO NOT make timely security-related fixes to these OpenSSL binaries and you will put your application and data at risk if you use them in situations where threats are present. If you require secure SSL communication, then you MUST obtain OpenSSL libraries from another source, possibly building them yourself.
To test that Allegro CL can load the :ssl module, start a non-IDE image, either alisp or mlisp, and evaluate the require form below. It is important that you start a non-IDE image, otherwise you will not see any error messages, should the OpenSSL libraries fail to load:
cl-user(1): (require :ssl)
; Fast loading /net/quadra/acl/11.0/bin/linux86/code/ssl.fasl
;   Fast loading /net/quadra/acl/11.0/bin/linux86/code/osi.fasl
;     Fast loading from bundle code/fileutil.fasl.
;     Fast loading from bundle code/acldns.fasl.
;     Fast loading from bundle code/iodefs.fasl.
;       Fast loading from bundle code/iordefs.fasl.
;         Fast loading from bundle code/efmacs.fasl.
;   Foreign loading libcrypto.so.10.
;   Foreign loading libssl.so.10.
;   Foreign loading sys:aclissl.so.
t
cl-user(2):
If in the above, loading the OpenSSL 1.0 libraries failed, then you should try loading the 1.1, 3.0 or 3.1 version, to see if they work:
:reset
;;;; Choose one!
(setq *aclssl-version* '(1 1))
(setq *aclssl-version* '(3 0))
(setq *aclssl-version* '(3 1))
(require :ssl)
If one of the alternate versions works, then you can make the change permanent by creating a file in the Allegro CL installation directory called ACL_OPENSSL_VERSION. Here is a table with all possible values for the file's contents:
| OpenSSL version | *aclssl-version* value |
file contents |
|---|---|---|
| 1.0.x | (1 0) |
10 |
| 1.1.x | (1 1) |
11 |
| 3.0.x | (3 0) |
30 |
| 3.1.x | (3 1) |
31 |
The steps to test that the installation worked are to start an Integrated Development Environment (IDE) image. This tests the installation more thoroughly than starting one of the alisp or mlisp images.
Also, by default, on macOS and Linux the IDE uses your native browser. It is important to test the communication between the browser and Allegro CL on those platforms.
When the IDE starts, you will see a Debug window with a prompt similar to cg-user(1):. You can enter the Lisp expression
(+ 1 2)and press ENTER to see the response, which shoudl be 3. In that case, your IDE is operational.
Test the installation by starting the IDE from the Start menu. You should see an Allegro CL 11.0 item on the All Programs submenu of the Start menu. That item has a submenu, with (among other items) submenus Modern ACL Images and ANSI ACL Images. There are also separate choices for running the IDE either in a web browser or directly on the Windows desktop. Select one of the IDE images, such as
Start > All Programs > Allegro CL 11.0 > Modern Executables > Allegro CL 11.0 (Desktop IDE, Modern)
You should see a splash window and then a window titled Allegro Common Lisp Console. Shortly thereafter, the console window should disappear and the the IDE windows should appear, typically starting with some dialogs which you must resond to or dismiss (dismissing is okay).
You should see something like this after it starts up:
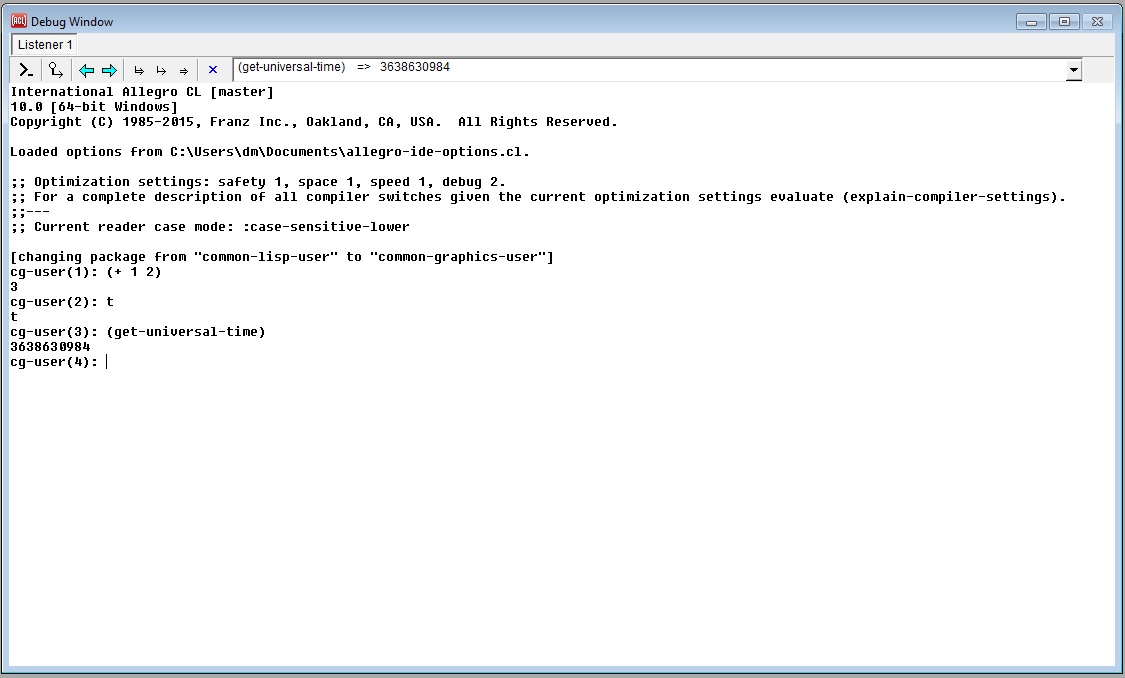
In that example, three forms have been typed to the Debug Window and their responses are shown.
If you see something similar to the above, then you are finished with the installation of Allegro CL.
For macOS, use the Finder to locate the version of Allegro CL you installed in the /Applications/ folder. You can double-click on it to run it and you should see something like this:
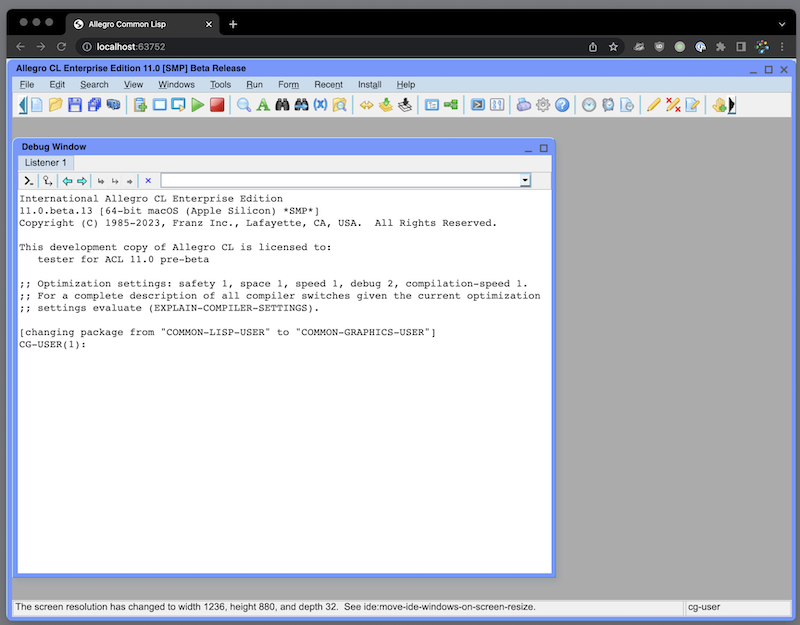
You may now either exit Allegro CL with choosing File | Exit (that is, the Exit choice from the File menu) or you may continue using Allegro CL. If you choose to exit, a dialog will appear asking if you really want to exit.
You may also close the browser tab to kill the running IDE.
Once Allegro CL is installed, test the installation by starting Allegro CL from a shell prompt. Assuming the Allegro directory is /usr/local/acl11.0/, start the IDE with the following command:
$ /usr/local/acl11.0/allegroIt should give you a new tab in your default browser.
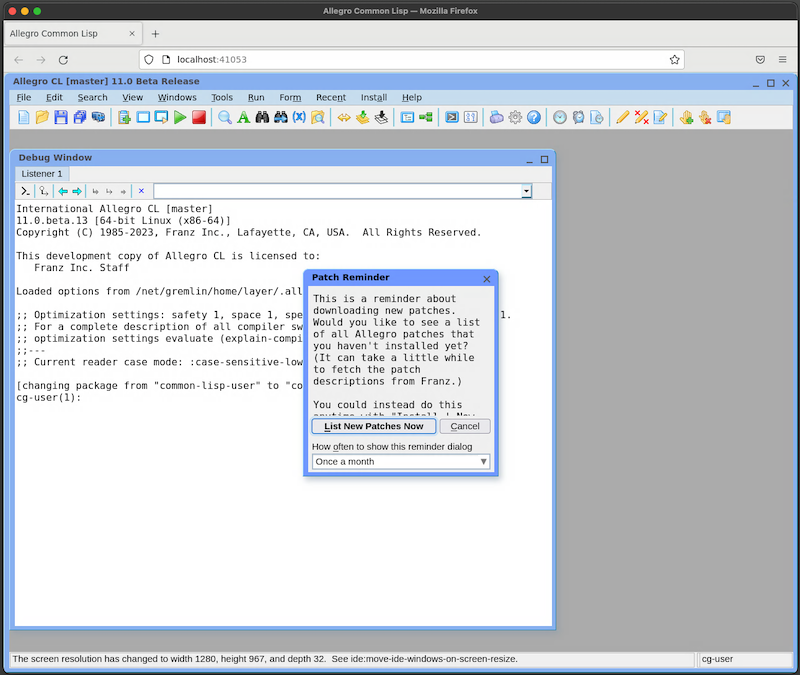
If you do not see the above picture, then there is a problem. There are two things to try:
Allegro CL may have problems starting up when SELinux is enabled.
Security-Enhanced Linux, or SELinux, is a feature that is available on many modern versions of Linux and is enabled by default on some. It affects the way shared libraries are loaded and that can prevent Allegro CL from starting up. To test this as the possible problem, as you started the allegro image above, start mlisp:
$ /usr/local/acl11.0/mlisp
cannot restore segment prot after reloc: Permission denied
The above error or something like segmentation fault is an indication there is a basic problem. Try the SELinux remedy first, then contact support if that fails.
In order to get source code (if your license allows it), you must return the source code license addendum included with the distribution. When that addendum is received, you will be sent a new license which allows installing source code. (Some sources are free to licensed customers and others are provided for an additional charge. If you have questions about getting source code, please contact your Account Manager.)
The sources available are:
Encrypted source files are already supplied with the Allegro CL distribution. Various src*.sh files (on UNIX and macOS) or src*.bat files (on Windows) will, on UNIX, decrypt these files directly into a subdirectory named src/ and, on Windows, generate .zip files for you to unzip. Assuming you have an appropriate updated license, here are the steps for installing the sources:
On Windows, open the Windows Explorer.
On Windows, find the Allegro directory in the explorer (it is typically c:\Program Files\acl11.0\ but you may have chosen a different directory).
On UNIX, cd to the Allegro directory (it is typically /usr/local/acl11.0/ but you may have chosen a different directory) in a shell.
On Windows, double-click on the files srclisp.bat (and also if appropriate srcaodbc.bat, srcmysql.bat, srcoracle.bat, and srcorblink.bat). Note that the CG and IDE sources are unpacked by srclisp.bat.
On UNIX, run ./srclisp.sh (and also, if appropriate ./srcaodbc.sh, ./srcmysql.sh, ./srcoracle.sh, and ./srcorblink.sh).
On UNIX, you are now done. The files decrypt into the src/ subdirectory and are now available. On Windows, you will see a .zip file for each src*.bat file run. Clicking on the file in the Windows explorer will often allow you to extract the contents. Or if you have Cygwin installed, it has an unzip program.
Like all complex programs, Allegro CL should be regularly updated with patches and other updates. Patches are either compiled Lisp files (though the file extension is usually not fasl) or shared library files.
The update program, update.sh on non-Windows platforms, update.exe on Windows, rebuilds Allegro CL images (dxl files). Only dxl default files (such as mlisp.dxl and allegro-ansi.dxl to name two) are rebuilt. The update process does not know how to rebuild dxl files you may have created.
Patches are downloaded by the Lisp function sys:update-allegro, by the Download Patches dialog in the Integrated Development Environment (IDE), and by the update program itself when passed the -u option. (The -u option always downloads all new patches. The other two download options allow choosing which patches to get.) update may have to be run by a user with admin privileges.
So on non-Windows machines:
% ./update.sh -u does everything necessary including rebuilding images (but see below for other arguments to handle proxies if necessary), as does
% ./update.shafter you have called sys:update-allegro and exited lisp or you have downloaded patches using the IDE's Download Patches dialog.
macOS note 1
Both sys:update-allegro, and the Download Patches dialog may trigger a call to update so a separate call is not necessary.
macOS note 2
Starting with version 14 (Sonoma),
update.shmay not have permissions to modify files in the installation directory. This only happens on some installations of Sonoma (and possibly with later versions), but if it does happen you will see this error in one in the .build files after runningupdate.sh:
Operation not permittedIf you see this error, then the fix is to modify your system as follows. In the System Settings dialog, under Privacy & Security and then App Management, turn on access (by moving the slider) for the Terminal entry. This will allow the update process to modify the installation directory. Systems without an entry for Terminal are likely not impacted by this problem.
macOS note 3
To update the original version of Allegro CL 11.0 with the latest OpenSSL 3.3, you will need to do the following, after installing the license file:
$ brew update
$ brew upgrade
$ brew install [email protected]
$ cd /Applications/AllegroCL64.app/Contents/Resources
$ env ACL_OPENSSL_VERSION=30 DYLD_LIBRARY_PATH="$(brew --prefix [email protected])/lib:$DYLD_LIBRARY_PATH" ./mlisp
(require :ssl)
(sys:update-allegro)
If the (require :ssl) fails, then contact us ([email protected]).
Windows note
On Windows, replace
update.shwithupdate.exeor select Start | Allegro CL | update.exe (download new update and rebuild images) (equivalent toupdate.sh -r) or get patches with sys:update-allegro or the download-patches dialog and then Start | Allegro CL | update.exe (rebuild images only) (equivalent toupdate.sh).
All that sounds and is very simple. But update.sh/update.exe in fact has two arguments to deal with proxies (-p and -P) and a bunch more arguments to allow specifying details of the rebuilt images. Here are the proxy arguments:
-p - set the proxy argument to sys:update-allegro; the form of this argument is host:port. This argument may be specified without also specyfing -P.
-P - set the proxy-basic-authorization argument to sys:update-allegro; the form of this argument is username:password.
--skip-ide [update.sh only] causes the updating process to skip rebuilding the allegro images (which are the images with the IDE that start the IDE when started).
The remaining arguments specify details of the images that will be rebuilt. All have the same names as equivalent argument to the build-lisp-image, the function that creates a dxl file from scratch. They arguments are (all are optional):
for update.sh [--newspace size], for update.exe [-n size]
for update.sh [-o size], for update.exe [--oldspace size]
[--lisp-heap-start addr]
[--lisp-heap-size size]
[--aclmalloc-heap-start addr]
[--aclmalloc-heap-size size]
addr (addresses) are positive integers less than 2^62. size arguments must be of of the form
size := number + suffix
number := [0-9]+
suffix := g | m | k
The "g", "m" and "k" in the suffix stand for "gigabytes", "megabytes" and "kilobytes" respectively, so 10000000k, 10000m and 10g all mean 10 gigabytes.
The --newspace, --oldspace, and --*-heap-start arguments use the same format as the --*-heap-size arguments above.
See build-lisp-image for more information on these arguments.
Kinds of patch files
Files with names like p8a002.001. These are called patches and are compiled Lisp files (despite not having the extension fasl) which fixes some specific problem or provides an enhancement or, sometimes, adds a new feature). The names of these files encode information about their applicability and use. Please do not rename them. The extension indicates the patch version. Patches are often replaced (perhaps to provide additional fixes, perhaps to fix an introduced problem). When that happens, a new version (with a different extension) is provided. The patch system ensures you have a consistent set of patches. These patch files go in the update/ directory of the Allegro directory. Note the second character ("8" in the example) identifies the version of Allegro CL and is the value of excl::*cl-patch-version-char*.)
Files with module names and three-digit numeric extensions (top-level.001 or streams.003). These files replace Lisp library files in the code/ subdirectory of the Allegro directory. (Most of these files are originally in the Lisp bundle file and so you may not see the originals of these files.) The system knows to look in the code/ subdirectory before looking in the bundle file. The names of these files must also not be changed.
Miscellaneous other files.
Further important points to note
Many patch files are numbered in the file extensions and also coded by product. They are read in order, higher numbers first. The order in which they are read is very important. Do not change the names or extensions of patch fasl files. A single patch may have various versions. This means the patch has been further updated.
Do not use an patch for one release of Allegro CL with another release. (Patches are placed in a subdirectory of the Allegro directory. Since each new release (typically) has a different Allegro directory, you can have more than one distribution on a single machine, and patches in each one. If you do that, be sure that patches for a particular release are placed only in that release's Allegro directory.)
Note on backups of dxl files**: the first time update.sh/exe* is run, the dxl files are copied to files with orig added -- mlisp.dxl to mlisporig.dxl, e.g. The second time, they are copied with old added -- mlisp.dxl to mlispold.dxl (so mlisporig.dxl is always the actual original mlisp.dxl). Subsequent runs replace the mlispold.dxl so if you want to preserve that, rename it before a subsequent update, to, say *oldn.dxl (for some n -- for example, mlispold.dxl to mlispold1.dxl).
Backing out of patches: you may occasionally discover that an updated image does not work properly. (Perhaps the patch was faulty, or perhaps the fix, whatever it is, interacts incorrectly with your application.) To back out of patches, (1) rename the new dxl files, (2) copy the original dxl files (they will have "old" or "orig" appended to their filenames) to their original names, and (3) move any new fasl files out of the code/ subdirectory. You are now back to where you were before running update.sh or update.exe. Or you can reinstall and just download the patches you want.
Lists of patches can be found on the Franz Inc. web site, at https://franz.com/support/patches/log/.
The report created by dribble-bug lists all patches included in the image. It is very important that this information be included with a bug report.
Whether or not you should get all available patches depends on your current tolerance for instability. Because patches are less well tested than releases, patches may occasionally introduce errors as well as fix problems.
However, even a correct patch may introduce instability: if a patch enables a feature which was previously ignored or signals an error (correctly) where none was previously signaled, your code may fail because the patch uncovered a problem which was previously unnoticed. Suppose, for example, a patch causes certain declarations to be used during compilation (without the patch they are ignored). Such a patch would not fix a bug (since ignoring declarations is permitted) but if your code happened to contain incorrect declarations, then the patch would be destabilizing. (Without the patch, the wrong declarations were ignored and so did not harm. With the patch, they are used.)
The potential impact of a patch is given in the LOG file in the update directory. Here are two entries from the 10.1 patch LOG (the current patch LOG file will be organized similarly):
lisp patch pma049 ...
Date posted:    Thu Jun 8 10:48:16 PDT 2023
Patch names:    update/pma049.001,
code/streamc.001
Description:    Fixes a stream bug where if with-output-to-buffer is given a null optional buffer argument and non-character operations are peformed within in the body then nil is overwritten, which can cause dire consequences.
Impact: recommended

compiler patch pmb007 for intel only
Date posted:    Tue Aug 21 10:41:36 PDT 2018
Patch name: update/pmb007.001
Description:    Enhances the compilation of bitwise and operations to generate more efficient code. All intel-based architectures benefit from this optimization.
Impact: minor
Other info: Recompilation is necessary to see the benefits of this patch.
Notice the Impact line. It provides an assessment of how destabilizing a patch may be. Note that in these cases, one is minor and the other patch is recommended.
If you are in a development cycle, our advice is to get all available patches for a platform (machine type) and Allegro CL version. Patches for associated products should be included as well.
But if you are preparing a delivery, we advise you to be selective, perhaps getting only the patches that deal with problems you report.
The bundle file contains a collection of fasl files associated with Allegro CL modules. When a module is autoloaded or loaded by a call to require, it is typically loaded from the bundle file. (If you see the message "Fast loading from bundle...", the file is being loaded from the bundle file.) The location and name of the bundle file are returned by the function bundle-pathname.
Sometimes module fasl files have to be updated. In that case, a new file is downloaded from the Franz Inc. update repository and is placed in the code/ subdirectory of the Allegro directory. The system always checks the code directory first for a module fasl file before looking in the bundle file. That assures that the latest version of a module fasl file is loaded.
However, it is often useful to update the bundle file to include all the updated module fasl files. In Allegro CL, this update is performed automatically (when update.sh or update.exe is run).
You can create your own bundle file with the bundle program. See The bundle program in Other Programs.
Copyright (c) Franz Inc. Lafayette, CA., USA. All rights reserved.
|
Allegro CL version 11.0 | ||||||||