| Allegro CL version 10.1 Unrevised from 10.0 to 10.1. 10.0 version | ||||||||||
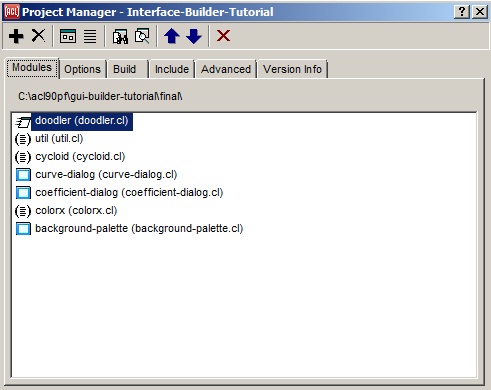
This tab on the Project Manager Dialog lists the modules in the project.
The static-text widget at the top of this tab displays the default directory for the project, which is simply the directory that contains the project's .lpr project definition file. The large list widget just below displays the project's modules in the order in which they are loaded. The pathname shown for each module is relative to the project's default directory. (The module paths are stored that way so that they are still correct if the project directory is moved.)
Each module of a project is of one of several standard module types. The types are:
Each type is represented in the Project Manager by a particular icon --- form modules use a "window" icon, source code modules a "lines inside parentheses" icon, and so on. In addition, the main-form of the project uses a window icon that appears to be moving fast, alluding to the fact that this is the form that is initially "run" by the Run | Run Project command (assuming that the default on-initialization function is used). In the illustration above, doodler, cycloid, coefficient-dialog, and background-palette are all form modules, and doodler is the main form. Util, cycloid, and colorx are source code modules. There are no shared library, sub-project, or distributed-file modules illustrated.
A form module contains a .bil file that is automatically generated to provide the finder-function and maker-function for creating the running window of an interactively designed form window, plus (sometimes) a .bml file to hold pixmap data (only when widgets on the form use any pixmaps), and a .cl file that is set up automatically for you to fill in custom event-handler source code and other code associated with the window. A source code module simply contains a single arbitrary source code file. A sub-project module points to the .lpr project definition file of another project that is always used by this project. A shared library module contains a DLL file (on Windows) into which the project can make foreign-function calls. A distributed file module is an arbitrary file that should be distributed with your application; the File | Build Project Distribution command simply copies this file to the distribution directory along with the runnable files of the project that it creates. A distributed directory module is a directory that will be copied along with its entire contents into the standalone app's distribution directory. An editable file module is a file that is neither compiled and loaded nor distributed, but which may be shown in the editor from this list in the project manager, and searched when the Find In Files dialog searches the current project.
To add a module to the current project, press the Project Manager Dialog's Add File button (identified by a + sign) on the left end of the Project Manager's toolbar. A dialog appears asking which type of module you would like to add.
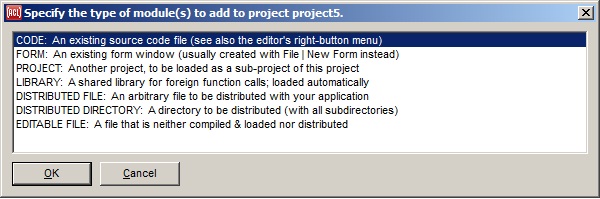
The file selection dialog is then shown, initially displaying only those files whose pathname-types match the requested module type. Specifically, .cl, .lsp, and .lisp files are shown for a source code module, .bil files are shown for a form module, .dll files are shown for a shared library module, .lpr files are shown for a sub-project module, and all files are shown for a distributed file module or editable file module, and directories are shown (in a different dialog) for a distributed directory module. Selecting a file of the appropriate type will add it to the current project and list it in the Project Manager. The next File | Save All that is done will then save the .lpr project definition file to include a reference to the new module.
Note that form modules are typically added by using the File | New Form command and then placing widgets onto the form interactively. But an existing form may still be added with the Add File button, perhaps a form that was removed from the project at an earlier time.
A quick alternative to using the Project Manager's Add button is to right-click an editor buffer pane and select "Add File to Project" from the pop-up menu that appears. If a source code file that you would like to add to the current project is already open in the editor workbook, this is faster than reselecting the file in the file dialog invoked by the Add button.
When a module is selected, clicking on the Remove Selection button (the one displaying a large X) removes the module from the project (if you confirm). The module's file is not deleted from the filesystem.
When a project is opened or loaded in the IDE or run as a standalone application, the modules are loaded in the top-to-bottom order shown in this list, after the project definition .lpr file itself is loaded. If the load order is important, the up and down arrow buttons on the Project Manager's toolbar may be used to shift modules around in the load order. The dialog constrains the order somewhat, however, and a warning dialog will indicate this fact if you try to move a module out of the area of the load order where it is allowed. Specifically, all shared libraries are always loaded first, followed by all sub-projects, followed by all form modules and source code modules combined. Distributed files, distributed directories, and editable files are not loaded at all, but are always listed last nevertheless.
Each item in the list shows the name of the module followed by the pathname of its file in parentheses. (A .cl file is shown for a form module, and implies the associated .bil and .bml files that have the same pathname-name.) If the file is in the same directory as the .lpr project definition file, this path is simply a pathname name and type, and otherwise it is a full (absolute) pathname --- this reflects the way the pathnames are stored internally, and therefore means that the project will still remember where all of its files live if the developer arbitrarily moves the directory containing the project definition file (or moves all of the project's files in that directory as a group) to a new parent directory or filesystem.
The name of each module depends on the module type. For source code modules, shared library modules, and distributed files, the module name is simply the pathname-name of the module's associated file (the source module util is named by its associated file util.cl, for example). For a form module, it is the name of the form window (which may not be the same as the name of the associated file, although in the illustration, all forms have the same names as their associated files). For a sub-project module, it is the name of that project.
If a sub-project module is added to the project, it will initially appear as a single line in the list of modules. Its icon will be a simple dark-blue triangle arrow pointing to the right. Unlike the icons for other types of modules, which are simply visual indicators, you can click on the arrow icon of a sub-project module to reveal all of its modules as an indented sublist. (Alternately, select the item for the module and press the right-arrow key, as usual with an outline widget.) Sub-projects can have their own sub-projects in turn, all of which can be shown in the module list as a tree. A project will remember which subtrees were currently visible when you last saved it, and restore the same visible part of the tree the next time you open the project.
The modules of a sub-project may then be accessed from the Project Manager and edited in the same way as modules of the current project itself. If you modify a sub-project, such as by changing the order of modules within a sub-project, the File | Save All command will know to regenerate the .lpr file of the subproject just as it does for the current project.
If you would like to open a sub-project as the current project, a quick way to do that is to right-click the item for the sub-project and select the Open Selected Project command from the pop-up menu that appears.
It may not be apparent how to rename various modules or to move their files to new locations, and in fact this depends on the type of module. To rename or move a source code module, select the module in the list and press the View Selected Code button to edit the source code file. Then (in the editor) use the File | Save As command to save the file to a different pathname. The Project Manager will automatically update to display the new pathname, and the next File | Save All that is done will save the .lpr project definition file so that it points to the new pathname of that module's file. To rename a form module, double-click the form to display it in the inspector, and then change the "name" property in the inspector. Again, the Project Manager will update to display the new module name, and the next Save All will update everything on disk. As with source code modules, the File | Save As command may be used while a form window is selected to save the form to a new pathname. To move a shared library or distributed-file module (or to rename its file), you need to move the file to a new pathname, then remove it from the project (or vice versa), and then add it back to the project at its new pathname (this technique could actually be used for any module type). To rename a sub-project module, you would need to open that project, change its name, and save it, and then re-open this project.
To change the name of the current project itself, use the Name widget on the Options tab. When the modal dialog that then appears asks whether to also rename the .lpr project definition file to match the new project name, then the .lpr file will be renamed if you answer Yes. (This dialog will not appear for a new project that has never yet been saved.) This is recommended to keep things simple, but is not necessary. The .lpr file could also be renamed in the OS file manager if the project is not open in the IDE at the time, though the Recent menu would then not find the project where it remembered it to be.
To move the entire project to a different directory, either move the directory itself or move all of the project's files that are in the directory to a new parent directory, then re-open the project from its new location.
Right-clicking in the list of modules shows a shortcut menu of commands that are generally the toolbar button commands. This menu also shows the keyboard shortcuts for the commands. Pressing the spacebar will also show this menu. Pressing the Enter key will invoke the Edit Source Code button, while double-clicking a module will invoke the Edit Dialog Form button (or else edit source code for a non-form module).
See the general description of the Project Manager Dialog for more information on the toolbar buttons.
Copyright (c) 1998-2022, Franz Inc. Lafayette, CA., USA. All rights reserved.
This page was not revised from the 10.0 page.
Created 2019.8.20.
| Allegro CL version 10.1 Unrevised from 10.0 to 10.1. 10.0 version | ||||||||||