| Allegro CL version 10.1 Unrevised from 10.0 to 10.1. 10.0 version | ||||||||||
The IDE's Class Interface Editor dialog is used to interactively create a graphical user interface (GUI) for editing the instances of a class. Typically this user interface is for editing information in an AllegroCache database, though it could be used to edit arbitrary class instances.
You can use the Class Interface Editor to edit either an object-editor dialog or a class-grid widget. An
object-editor dialog contains a widget for each slot of interest,
while a class-grid widget contains a grid column for each slot
instead. These interface objects will automatically create and lay
out their widgets or grid columns according high-level parameters that
you specify interactively.
Specifically, the Class Interface Editor lets you specify the value of
the edited-slots property of
an object-editor or class-grid. You could alternately
specify this property programmatically; see the doc page for the
edited-slots property as well
as the document cg-object-editor-and-class-grid.htm.
The Class Interface Editor is normally used on a form window in a
project so that code for recreating the interface objects is saved
with the project. So starting from scratch you would create a new
project with the File | New
Project command. Then you would create
either (1) an object-editor
form or (2) a generic form with a class-grid on it.
To create an object-editor form, use the File | New Form command as usual. The key step is to select object-editor in the Window Class widget of the New Form dialog that appears. You will then be asked to enter the name of a class for the object-editor to edit. You must enter a class name at this time or the new form will not be created. It's OK to type in the name of a class that doesn't exist yet, though, such as a class in a database that you haven't opened yet.
To create a standalone class-grid on a generic form, first use the File | New Form command to create some other type of form, typically a dialog. Then click on the Class Grid button in the Components Toolbar (the button shows a grid with header cells plus a red "C" in the body) and then click on the form window. This will create a sample class-grid for the class test-person. You may want to run the form with its sample property values to see how it works. Once you've done that, you will probably want to inspect the widget and change its value property to nil to remove the sample rows. Then change the edited-class property to be the name of a class to edit, since you are not prompted for that as with an object-editor.
In case you were wondering, a class-grid can also be used on an object-editor, but that's done in a different way that's covered toward the end of this document.
Now that you have an object-editor form or a class-grid on a form, there are three ways to invoke the Class Interface Editor dialog on it:
object-editor only,
select the module for the object-editor form on the Project Manager's
General tab, and then click on the button in the Project Manager's
toolbar whose tooltip is Edit Class Interface. (The two
horizontal green bars on this button represent two single-line text
widgets aligned in a column on an object-editor, if you appreciate
minimalism.)
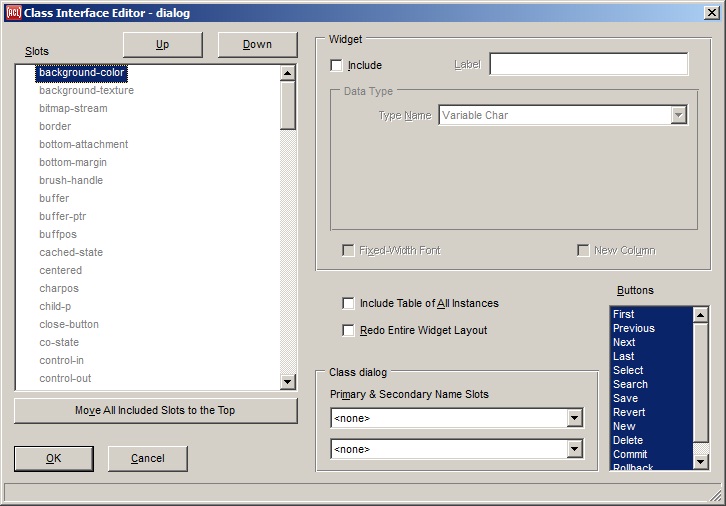
Here is a Class Interface Editor editing the class dialog, just for illustration:
When the Class Interface Editor appears, a list of all of the slots of the edited class will appear in the Slots widget at the left. If this is a new object-editor or class-grid, then all slot names will be grayed out because no slots have been selected yet for inclusion in the user interface.
Click on the name of a slot that you would like to include in the interface, and then click the Include check-box near the top of the Class Interface Editor. This will make the rest of the widgets in the Widget group-box available so that you can specify how that slot should be edited by the end user. The slot name will also turn from gray to black in the list of all slots, though you can't see that while the slot is selected.
You may now specify how this slot will appear in the interface. For example, in the Label widget you could type a string to display beside the widget for the slot on an object-editor, or in a column header for the slot in a class-grid. If you leave the label widget blank, the default label will be the slot name with dashes converted to spaces, and each word capitalized.
The most interesting part of the Class Interface Editor is in the Data Type group-box. Here is where you specify what sort of data is in an edited slot, and therefore what type of widget or grid column should be used for editing the slot. The Type Name widget is where you select the main data type for the slot. When you select a main type, one or more additional widgets may appear just below; these widgets allow you to specify various options for the selected type.
The data type choices are not lisp types, but rather types that pertain to how the value may be edited. There are several different data type choices that are used for lisp strings, for example.
The default type for any slot is Variable Char, which means
that the value may be a string of any length. If you are creating an
object-editor, then a
simple editable-text widget
will be created for editing that slot. If you are creating a class-grid, then an editable-text-column-mixin
grid-column will be created
for the slot.
If you change the type in the Type Name widget to Fixed
Char, then a Max Characters widget will appear. This
widget allows you to specify the maximum number of characters that a
string in this slot can have. An editable-text widget will still be created for
the slot, but it will have a template-string that restricts the user to
entering the specified number of characters.
There are a variety of other choices for the data type. For example,
Boolean will create a check-box, Single Choice a combo-box, Multiple Choice a
multi-item-list (for an
object-editor only), and
Pixmap will create a static-picture (or a pixmap-column-mixin column in a class-grid). These choices are
documented more fully on the doc page for the edited-slots property, but here are notes on how
to specify a couple of the less obvious ones on the Class Interface
Editor:
:key to be displayed
for the slot value :partial, the pixmap named
:key-special to be displayed for the slot value
:full, and the pixmap named
:melvin to be displayed for the slot value "Melvin
Ferd" (the string):
    :partial :key
    :full :key-special
    "Melvin Ferd" :melvin
If the Pixmaps Will Strech check-box is checked then the pixmaps will be stretched larger or smaller as needed to fill the available space in the widget or grid cell, and otherwise they will be drawn at their normal sizes.
The Class Interface Editor will create widgets or grid columns in the order that they appear in the list of all slots (ignoring the slots that are not included). This will be widgets from top to bottom in an object-editor dialog, or grid columns from left to right in a class-grid. You can therefore change the order in the list of slots to control the widget order. The Move All Included Slots to the Top button may by handy to use first in order to group all of the currently-included slots together at the top of the list. You can then move individual slots using the Up and Down buttons, or more quickly by left-clicking and dragging slot names to new positions.
If you are creating an object-editor rather than a class-grid, then there will also be a New
Column check-box. By default, an object-editor will lay out its
widgets in a single vertical column. The exception is that if you
check the New Column check-box for a particular slot, then a
new column of widgets will be started at the widget for that slot.
That can save space vertically.
Pressing the OK button will exit the Class Interface Editor, which will then automatically create or update widgets or grid columns as needed to match your specifications. You can then edit the widgets further using the inspector just as you would widgets on a regular form, and move and resize the widgets or grid-columns with the mouse. You can even add other arbitrary widgets to an object-editor form. The Class Interface Editor doesn't have facilities for specifying properties like a widget's size or font because that would be redundant with the more general tools.
After editing the created widgets of an object-editor directly, you can invoke the Class Interface Editor again at any time. A reinvocation will never resize an existing widget unless you change the data type so that a different type of widget will be substituted. It will not undo general property changes that you have made in the inspector. And by default the only widgets that it will move are any new widgets that it adds for additonal slots that you tell it to include; these new widgets will be arranged below all widgets that existed already (other than the lower row of command buttons, which will still be kept at the bottom). Added widgets will be aligned with each other but not with the pre-existing widgets.
If you check the Redo Entire Widget Layout check-box before exiting the Class Interface Editor, then it will move all widgets (other than any that you created by hand) to align them just as if you had created them all at once. Existing widgets will still not be resized. So if you have begun moving widgets around directly on the object-editor form, then you should not check Redo Entire Widget Layout thereafter, or else it will undo any direct moving of widgets that you have done. On the other hand, if you have not yet moved any widgets directly on the form then you probably DO want to check Redo Entire Widget Layout on each re-invocation of the Class Interface Editor in order to keep all widgets nicely aligned, and in the same order as in the Slots widget. This check-box is never turned on by default to make it less likely that you will accidentally leave it enabled and undo your careful hand-positioning of widgets. This check-box will not appear when editing a class-grid because the grid columns will always be arranged to match the order in the Slots widget.
If you are creating an object-editor rather than a class-grid, then there will be a Buttons
widget in the lower right corner. Here you can select any subset of
several built-in command buttons that let the user do things such as
selecting an instance to display in various ways, or reverting from
the current edits. These buttons call exported functions, so
alternately you could add your own widgets to the object-editor form
later and make them call these same functions. The set of buttons and
the functions they call are documented on the page for the command-buttons property.
These widgets let you specify one or two slots whose values will be used as a "pretty name" for an instance. The pretty name will be displayed in widgets that hold class instances, and in menus for selecting instances. The drop-down lists for these widgets let you select any slot.
These widgets usually edit values for the edited-class of the object-editor or class-grid that you are editing in the Class Interface Editor. An exception is that if a slot uses one of the data types for class instances (see further below), then the Primary and Secondary Name Slots widgets will edit values for that slot's class whenever it is selected in the list of all slots.
For more information see primary-name-slot and secondary-name-slot.
The Fixed-Width Font check-box will be checked by default whenever you select a data type that requires a fixed number of characters. You can override that default by toggling this check-box yourself. A widget will use the current global CG fixed-font when this check-box is checked, or the current proportional-font otherwise. (You could change a widget's font in the inspector as usual after the widget gets automatically created.)
If you are creating an object-editor rather than a class-grid, then there will an Include Table
of All Instances check-box. If you check this widget, then a
special class-grid will be included at the very bottom of the dialog.
This class-grid will have a row for every instance of the edited class
(and so would probably not be very useful if there is a huge number of
instances). The end user can edit instances here as an alternative to
doing so in the main part of the dialog. Selecting an instance in the
grid will display it in the rest of the dialog as well.
If you are creating a class-grid, then there will be a few other
widgets. Three of these are check boxes for whether the grid column
will be resizable, proportional, and/or sortable. A resizable
class-grid column allows
the user to change its width by dragging the right edge of its header
cell. A proportional column will be resized proportionally when the
width of the class-grid
itself changes. And a sortable grid column allows the user to sort
the grid rows by that column's values by clicking the column's header
cell.
One other widget for class-grids that will appear, though only for certain data types, is the Printer widget. Its value should be the name of a function that takes a data value and returns the string to display for it. It defaults to princ-to-string.
In the list of all slots, a persistent slot whose index attribute is
:any will display a yellow key with a single prong,
and an index attribute of :any-unique will display
a green key with two prongs.
The data type choices for slots that hold class instances are of particular interest in the Class Interface Editor. In the Type Name widget, if you select Class Instance, Static Class Instance, or Table of Class Instances, then a Class widget will appear where you can enter the class whose instances the slot holds. Any classes that are defined in the currently open AllegroCache database will be listed in the drop-down list for easy selection; otherwise you can type in the name of the class. You will then be able to add widgets or grid columns that edit slots of these instances indirectly.
For example, if you are creating an object-editor that edits instances
of the patient class, and a patient has a
doctor slot that holds an instance of the
doctor class, then you could select the doctor slot
in the list at the left, set its main data type to Class Instance, and
its Class to doctor. At this time a blue arrow will appear beside the
doctor slot in the list of all slots. Clicking this arrow will reveal
a sublist containing the slots of the doctor class. If you then
specify a widget for the phone-number slot of the doctor class, then
the object-editor for the patient class will include a widget for the
phone number of the doctor of the currently-displayed patient. (If
you don't want the end user to be able to change the doctor's phone
number while editing a patient, then you should probably specify the
Static Text type for that slot.)
If a slot holds a list of instances of some class, and you are
creating an object-editor
rather than a class-grid,
then you can specify the Table of Class Instances type for that slot.
This will create a class-grid on the object-editor, where the grid
will have a row for each instance in the list.
For example, the patient class could have a
prescriptions slot that holds a list of instances of the
prescription class. If you are creating an object-editor for the patient class, then you
could select the prescriptions slot in the list of all slots, then set
its main data type to Table of Class Instances and its Class to
prescription. This will create a class-grid on the object-editor for patient that displays a row
for each prescription of the currently-displayed patient.
This sort of indirection can be carried to any practical number of levels. For example, the prescriptions table could have a column for the medicine of the prescription of the patient and an indirect column for the manufacturer of the medicine of the prescription of the patient. In the Class Interface Editor, a new level of slot names will be made available for selection whenever you specify one of the class instance data types at a preceding level.
When specifying a Table of Class Instances on an object-editor, there is also a list of buttons
that you can select that go along with the grid-widget that gets created. These buttons
will create, delete, add, or remove instances in the list of instances
that the table's slot contains. This allows the end user to edit the
actual list of instances, rather than only to edit each instance
that's in the list already. The Create button allows the user
to create an instance and add it to the list, while the Add
button allows the user to select an existing instance from a menu and
add it to the list. Similarly, the Delete button will remove
an instance from the list and delete the instance, while the
Remove button simply removes the instance from the list without
deleting the instance itself. In the prescriptions table example, the
Create and Delete buttons are more appropriate because a
prescription is unique to a particular patient. If the table held a
list of medicine instances instead, where there is only a single
instance for each medicine product, then the Add and
Remove buttons would be more appropriate.
Copyright (c) 1998-2022, Franz Inc. Lafayette, CA., USA. All rights reserved.
This page was not revised from the 10.0 page.
Created 2019.8.20.
| Allegro CL version 10.1 Unrevised from 10.0 to 10.1. 10.0 version | ||||||||||